Climbing roses are one of the most rewarding plants you can grow — but they need strong, thoughtful support to reach their full potential.
Without the right structure, those long, arching canes can become tangled and unruly, reducing air circulation and ultimately limiting how much they bloom. The good news? You don’t need a big budget or professional help to get it right.
Whether you’re just getting started with rose gardening and companion planting, or you’re looking to upgrade an existing setup, this guide covers 10 easy climbing rose trellis ideas that suit a range of styles, spaces, and budgets. Let’s dig in.
Why Climbing Roses Need the Right Trellis Support
Unlike true vining plants, climbing roses don’t have tendrils or suckers that naturally grip a support. Their long canes grow outward, and it’s up to you to tie and train them along a structure.
That’s why choosing the right trellis isn’t just about looks — it’s about giving your roses the foundation they need to flourish.
Here’s what a good climbing rose trellis does for your garden:
- Improves air circulation — Spreading canes out horizontally along a trellis prevents the dense, overlapping growth that leads to fungal issues like black spot and powdery mildew.
- Maximizes blooms — When canes are trained horizontally, the plant produces more flowering lateral shoots, leading to a heavier, more dramatic display.
- Adds vertical interest — Trellises draw the eye upward, making even a small garden feel larger and more layered.
- Provides privacy and structure — A rose-covered trellis can act as a living screen, softening fences, walls, and bare structures beautifully.
- Keeps your garden tidy — Without support, climbing rose canes can sprawl onto pathways and other plants, making maintenance harder and pruning more hazardous.
If you’re already experimenting with vertical gardening structures, you’ll find the same principles apply here as in our guide on genius squash trellis ideas for the garden — the right support transforms how a plant grows.
Garden Planner
The 24-page planner timed to your county's real frost dates. Planting windows, monthly checklists, and a harvest log you'll fill with pride by August.
Your Free 24-Page Garden Planner
Built for your exact ZIP code — planting dates, harvest log, and a month-by-month plan. 15-second sign-up.
10 Easy Climbing Rose Trellis Ideas for Every Garden Style
Whether you prefer a polished, classic look or something more rustic and handmade, there’s a climbing rose trellis idea here for you. These options range from ready-to-buy structures to simple DIY builds — and most can be set up in a single afternoon.
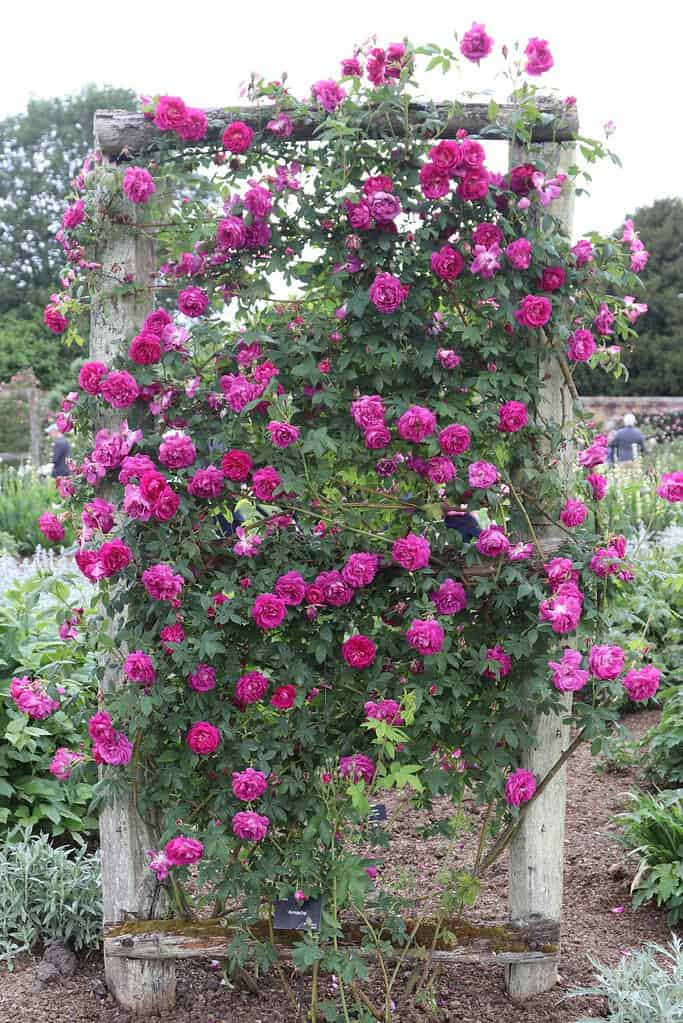
1. Classic Wooden Lattice Trellis
A wooden lattice trellis is one of the most versatile and timeless options for climbing roses.
The crisscross pattern of diagonal or square gaps gives rose canes plenty of anchor points, and the natural texture of wood blends beautifully with any garden style — from formal English rose gardens to relaxed cottage landscapes.
You can mount a lattice panel flat against a fence or wall, or use it as a freestanding divider between sections of your garden. Cedar or redwood are excellent choices as they are naturally rot-resistant and can hold up to years of outdoor exposure without warping or splitting.
- Best for: Cottage gardens, traditional gardens, wall-mounted displays
- Tip: Space the lattice at least 3–4 inches away from a wall to allow air to circulate freely behind the canes.
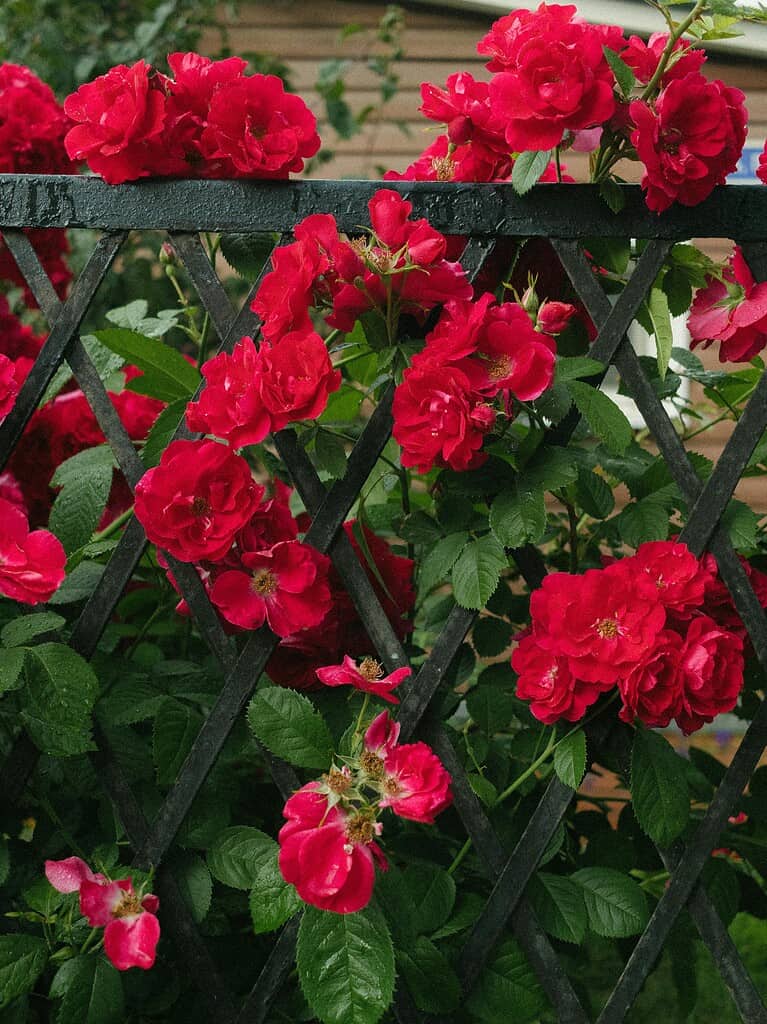
2. Wrought Iron Arch Trellis
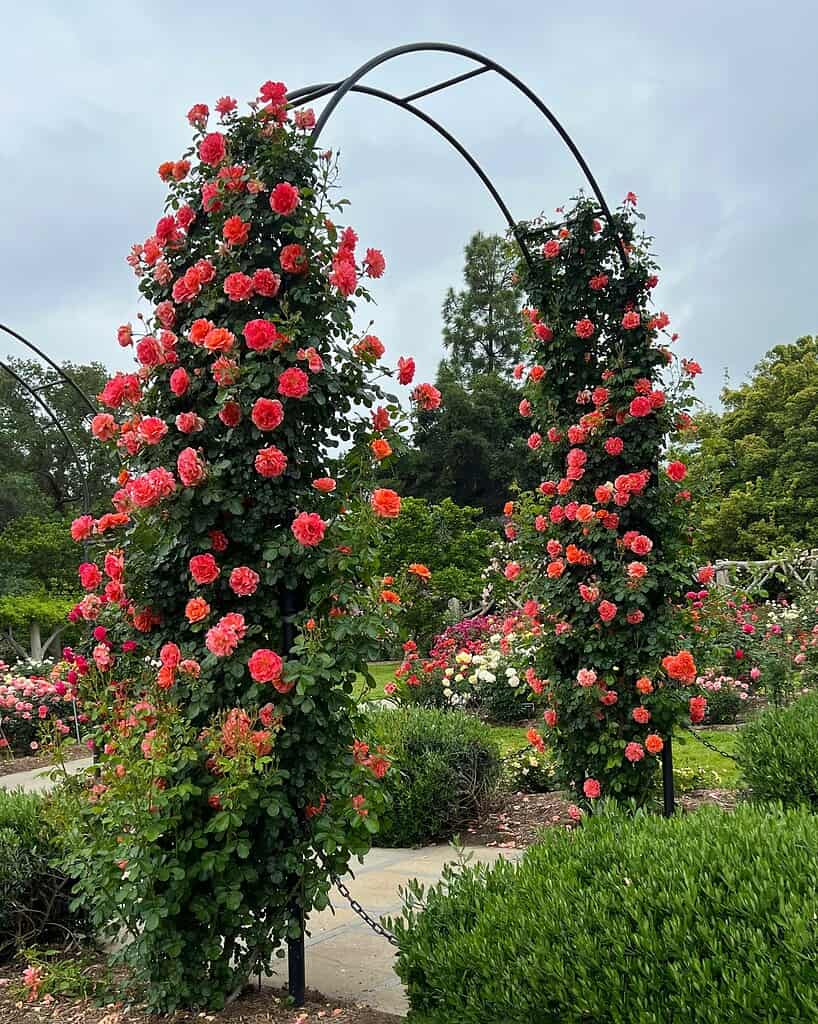
A wrought iron arch is one of the most dramatic and elegant structures you can use with climbing roses. Position one at the entrance to a garden path or at the threshold between two areas of your yard, and train a rose (or even two complementary varieties) to cover it over a season or two.
Wrought iron is incredibly durable and can support even the heaviest-caned roses without bending or sagging. It also looks stunning year-round — even in winter when the roses are dormant, the arch itself becomes a sculptural garden feature.
This idea pairs beautifully with the kind of layered planting style explored in our post on dreamy cottage garden designs for your backyard.
- Best for: Garden entrances, pathways, formal or romantic garden styles
- Tip: Anchor the legs at least 18–24 inches into the ground to keep the arch stable under the weight of a mature rose.
3. Fan-Shaped Trellis
A fan trellis radiates outward from a central base point like — you guessed it — a fan, with individual slats spreading in different directions.
This design is especially effective for training climbing roses against a wall or fence because it naturally encourages canes to spread wide rather than grow straight up in a narrow column.
Fan trellises are widely available in garden centres in both wood and metal, and they’re usually compact enough to fit even small garden walls and courtyard spaces. The angled slats make it easy to tie canes down at different points as they grow.
- Best for: Small gardens, courtyard walls, single rose specimens
- Tip: Tie new canes loosely with soft garden twine — never wire directly against canes, as it can cut into them as they thicken.
4. Pergola-Style Rose Trellis
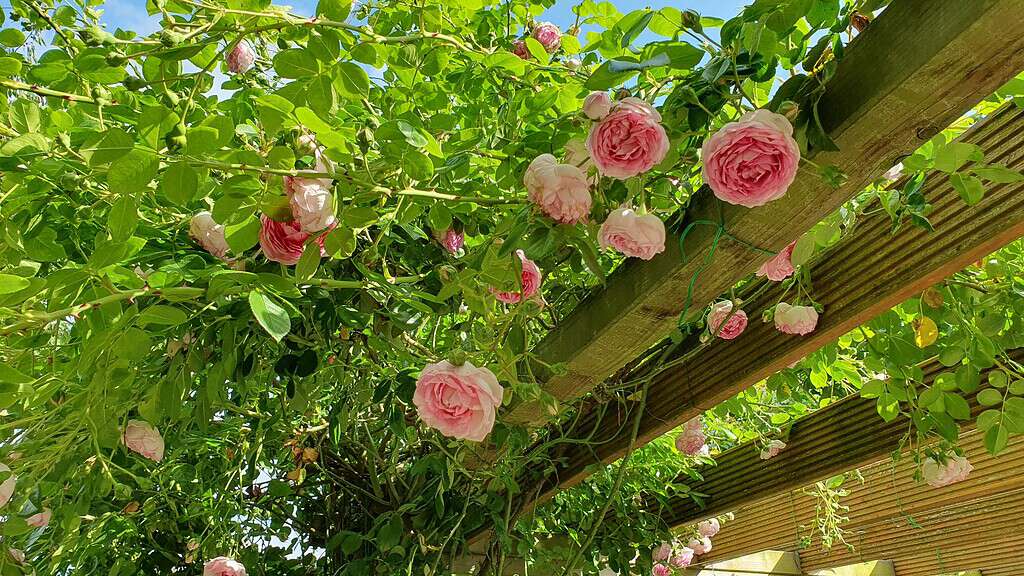
If you want to go bold, a pergola turns your climbing roses into a living overhead canopy.
The open-top, beam-and-post structure creates the perfect framework for roses to grow up the posts and sprawl across the top, creating a fragrant, shaded walk-through experience that feels like something out of a classic English estate garden.
A pergola is a bigger investment in terms of materials and setup, but it becomes the centerpiece of a garden and adds real value to an outdoor space.
Train one rose up each post and let the canes intertwine overhead. Adding complementary plants underneath ties the whole look together — much like the layered approach covered in our guide on backyard garden ideas worth copying this season.
- Best for: Large gardens, outdoor entertaining areas, statement garden features
- Tip: Choose vigorous, large-flowered climbers like ‘New Dawn’ or ‘Westerland’ that will cover a pergola structure with confidence.
5. Bamboo Pole Trellis
Looking for an easy, budget-friendly option? A DIY bamboo trellis built from bamboo poles lashed together with twine is one of the most accessible options out there.
It’s especially useful for gardeners who want a natural, low-impact look that complements organic or kitchen garden aesthetics.
You can build a simple A-frame shape, a tepee, or a flat grid — all using bamboo poles of varying lengths and garden twine. While bamboo isn’t as long-lasting as hardwood or metal, it’s inexpensive enough to replace every few seasons without much financial pain.
- Best for: Budget builds, vegetable garden crossovers, organic garden styles
- Tip: Use thicker bamboo poles (at least 1 inch in diameter) for roses, as thin poles can snap under the weight of mature canes.
6. Wire and Post Trellis
A horizontal wire trellis is one of the most practical and professional-looking options for growing climbing roses along a fence line or garden wall.
Simply drive posts or eye bolts into a wooden fence or masonry surface, and run tensioned galvanized wire between them at intervals of about 12–18 inches.
The result is a clean, almost invisible support system that lets the roses take center stage. This style is a favorite in kitchen gardens and walled gardens where clean lines matter. It also makes annual pruning much easier than a lattice because individual canes are easily accessible for tying or removal.
- Best for: Fence lines, walled gardens, minimalist or modern garden styles
- Tip: Use vine eyes or standoff brackets to keep the wires 3–4 inches away from the wall surface, improving air flow and preventing moisture build-up.
7. Garden Obelisk Trellis
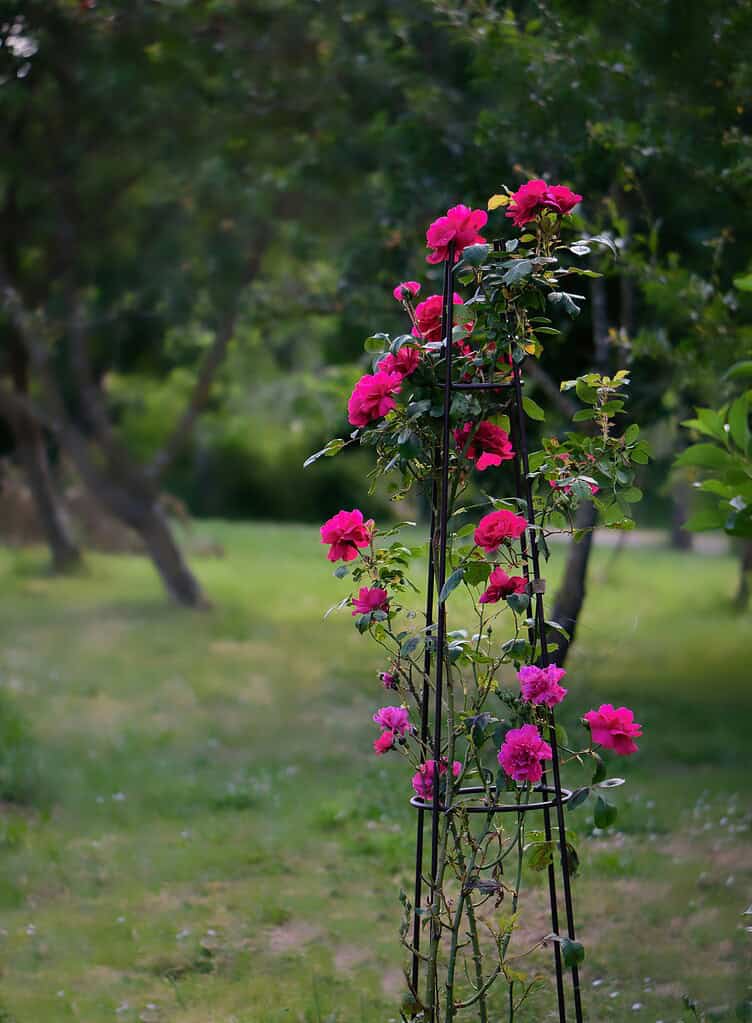
A garden obelisk is a tall, pointed, freestanding structure — usually in metal or wood — that provides a beautiful vertical accent in a border or flower bed.
For climbing roses, an obelisk works best with shorter, more compact climbers or pillar roses that don’t get quite as sprawling as larger climbers.
Obelisks add instant height and structure to flat borders, and a rose-covered obelisk in full bloom is genuinely stunning. They come in a wide range of sizes and styles, from simple painted metal frames to elaborate ornamental ironwork.
You can even build a simple version from timber posts and battens. This type of structural vertical planting fits naturally into the layered garden style discussed in our ultimate summer garden guide for a lush backyard.
- Best for: Mixed borders, formal beds, compact climbers and pillar roses
- Tip: Spiral the rose cane around the obelisk rather than training it straight up — this encourages far more flowers to form along the length of the cane.
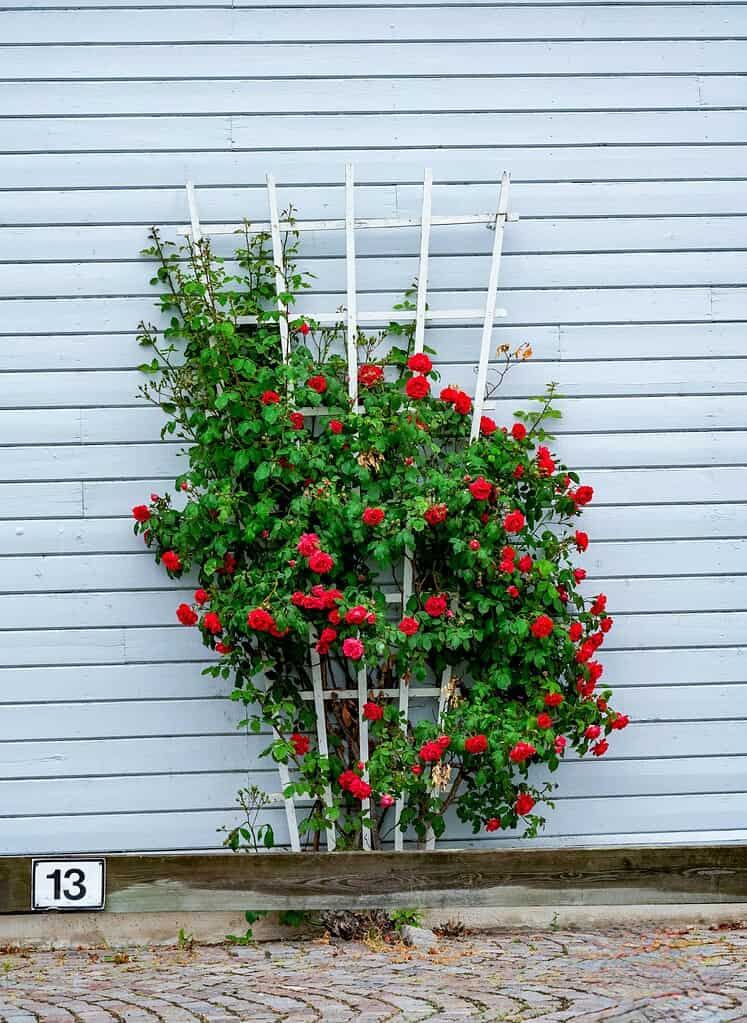
8. Fence-Mounted Trellis Panel

If you already have a garden fence, mounting trellis panels directly onto it is one of the quickest and easiest ways to add climbing rose support.
You can attach lattice or square-grid trellis panels to a timber fence with simple screws and spacer blocks to lift the trellis slightly away from the fence surface.
This approach is particularly smart if your fence is already providing some privacy but needs softening visually.
A climbing rose trained across a fence-mounted trellis creates a lush, living wall effect that dramatically transforms the look of a boundary — turning a plain wooden fence into a stunning garden feature.
For other ways to improve your garden’s privacy and beauty at the same time, take a look at our post on gorgeous privacy shrubs for the backyard.
- Best for: Existing fences, boundary softening, privacy screening
- Tip: Check the condition of your fence before attaching a trellis — a heavy rose in full leaf and bloom adds significant weight, and a rotting fence post may not hold.
9. Repurposed Window Frame Trellis
For a creative, upcycled garden feature with serious charm, an old wooden window frame makes a surprisingly effective trellis for a climbing rose.
The existing glazing bars create a grid of small openings that you can thread rose canes through, and the frame’s classic silhouette adds an artisan, vintage feel to a garden wall or fence.
Source old frames from salvage yards, estate sales, or your own home renovation offcuts. Remove any glass panels first (for obvious reasons), add a coat of exterior paint to protect the wood, and mount the frame flat against a wall. Plant a climbing rose at the base, and within a season or two, the frame will disappear beneath a curtain of leaves and blooms.
- Best for: Cottage gardens, eclectic or vintage garden styles, upcycling enthusiasts
- Tip: Seal the wood well with an exterior primer and paint — raw or poorly sealed wood will degrade quickly in wet weather.
10. A-Frame Trellis
An A-frame trellis is a freestanding structure that leans two panels together at an angle, creating a triangular shape when viewed from the side.
It’s self-supporting, doesn’t require a fence or wall, and can be placed anywhere in the garden — making it incredibly versatile for smaller spaces, rental properties, or gardens in progress.
You can build an A-frame from lumber and wire mesh or buy a pre-made version in metal or timber. Plant a climbing rose at the base of each side, and they’ll gradually meet at the top to form a natural arch.
This can become a living focal point in an open lawn, a garden border, or even a productive cutting garden. The same structural thinking that makes A-frames work so well applies to other vertical garden features — explore more in our round-up of rock garden landscaping ideas that will inspire your whole yard.
- Best for: Open gardens, rental properties, creating instant focal points
- Tip: Drive stakes through the base of each side into the ground for extra stability — A-frames can topple in strong winds if left to stand on their own feet.
How to Choose the Right Trellis for Your Climbing Roses

With so many options available, how do you narrow it down? Here are the key factors to consider before you commit to a style:
Consider the Mature Size of Your Rose
Not all climbing roses are created equal. Some varieties, like ‘New Dawn’ or ‘Kiftsgate’, can grow 20 feet or more and need the substantial support of a pergola, large arch, or fence.
Others, like ‘Dublin Bay’ or ‘Compassion’, are more compact and manageable on an obelisk or fan trellis. Always check the expected height and spread of your rose before purchasing a support.
Match the Trellis Material to Your Climate
Wood is beautiful but requires maintenance — it needs painting, staining, or sealing every few years to prevent rot.
Metal is more durable but can rust if the coating is chipped or if it’s not galvanized or powder-coated. In wet or humid climates, a galvanized steel or aluminum trellis will outlast a wooden one with far less maintenance.
Think About Your Garden’s Aesthetic
A rusted iron arch suits a romantic cottage garden beautifully but would look out of place in a sleek modern yard. Think about the overall style of your outdoor space before choosing a trellis.
If you’re still developing your garden’s personality, browse ideas in our guide to stunning summer flowers for a bloom-filled garden for inspiration on how color, form, and structure work together.
Factor in Accessibility for Pruning
Climbing roses need regular pruning — typically in late winter and again lightly after flowering. Make sure your trellis design allows you to access the canes without too much difficulty.
A flat lattice against a wall is easy to reach; a dense, multi-layered pergola can be more challenging. Plan ahead so your annual pruning doesn’t become a battle.
Miss it by a week and you lose the crop. The free 24-page planner pins down your exact dates — last frost, first frost, and the weekly steps between — so you plant on the days that actually work for your ZIP.
Tips for Training Climbing Roses on a Trellis
Getting your roses onto the trellis is only the beginning. How you train them from season to season will determine how well they bloom and how healthy they stay. Keep these tips in mind:
- Train horizontally wherever possible. Canes trained at an angle or horizontally produce far more lateral shoots — and those shoots are where the flowers come from. Roses growing straight up tend to bloom only at the very top.
- Tie canes loosely. Use soft garden twine, foam-padded wire ties, or purpose-made plant ties. Tight or rigid ties will cut into canes as they expand and can cause lasting damage.
- Fan canes outward from the base. Rather than running all canes in the same direction, spread them out like a fan. This maximizes the coverage of the trellis and produces more evenly distributed flowering.
- Check and retie ties annually. Old ties can become embedded in the bark as canes thicken. Every winter, go through and replace any ties that are too tight or starting to damage the cane.
- Remove dead or diseased canes promptly. Don’t let dead wood linger on the trellis — it becomes a breeding ground for disease. Cut cleanly back to healthy tissue using sharp, sterilized secateurs.
- Feed and mulch generously. Climbing roses are hungry plants. A good slow-release rose fertilizer in spring, followed by a liquid feed high in potassium through the growing season, will support strong cane growth and heavy flowering.
Start Building Your Dream Rose Garden This Season
A climbing rose on a beautiful trellis is one of those garden investments that pays off for decades. You plant it once, guide it through a few seasons, and eventually — almost magically — it becomes a permanent, living feature of your garden that blooms more lavishly each year.
The key is matching the right trellis to the right rose in the right spot. Whether you go for the drama of a wrought iron arch, the practicality of a wire and post system, or the charm of a repurposed window frame, any of the ideas on this list will give your climbing roses the solid foundation they need to grow into something spectacular.
Don’t forget that the plants surrounding your roses matter just as much as the trellis itself.
Thoughtful companion planting can enhance fragrance, deter pests, and extend the season of interest in your garden — something we cover in depth in our guide on what to plant with roses for a lush, cottage garden look.
Which of these climbing rose trellis ideas are you most excited to try? Have you already built or bought a trellis for your roses? Drop a comment below and share what’s working in your garden — we’d love to hear from you!
Best gardening planner I've used in 10 years — and I keep coming back to it every season.
How Hard Is It to Garden in Your County?
Every county has a unique Gardening Difficulty Score based on frost risk, soil quality, drought, altitude, and climate trends. Find yours — plus personalized frost dates, planting calendars, and soil data.
Check Your County's Score →Plan Your Garden With Confidence!

Ever start planting… and then realize halfway through that things feel a little scattered?
A simple plan changes everything.
When you sketch your layout first, you can see what fits, what flows, and what actually makes sense for your space. It saves time, money, and a whole lot of second-guessing later.
Our free Garden Planner helps you map out beds, organize plant spacing, rotate crops, and keep track of seasonal tasks – all in a clean, printable format you can actually use.
Whether you’re designing a low maintenance front yard or planning your full homestead garden, this gives you a clear starting point.
Less chaos. More clarity. A garden that works.
Frequently Asked Questions
How far from a wall should a climbing rose trellis be positioned?
Ideally, your trellis should sit at least 3–4 inches away from the wall surface. This gap is crucial — it allows air to circulate freely around the canes and foliage, which significantly reduces the risk of fungal diseases like black spot and powdery mildew.
Use standoff brackets, vine eyes, or spacer blocks when mounting any trellis against a solid wall or fence to maintain this gap.
How long does it take for a climbing rose to cover a trellis?
Most climbing roses will begin making visible progress across a trellis in their second year, after they’ve had a season to establish a strong root system. By year three or four, a vigorous climber should provide good coverage on a standard-sized arch or lattice.
The old gardening saying holds true here: “First year sleeps, second year creeps, third year leaps.” Patience pays off generously with climbing roses.
Can I grow climbing roses on a metal trellis without the metal heating up and damaging the plant?
In most temperate climates, this isn’t a significant concern — the ambient air temperature rarely stays hot enough long enough for a metal trellis to cause heat damage to rose canes. However, in very hot climates or areas with prolonged intense sun, dark-painted metal trellises can absorb a lot of heat.
In these situations, opt for a lighter-colored powder-coated finish, galvanized steel, or aluminum, which reflects rather than absorbs heat. Also avoid positioning trellises against south-facing masonry walls in hot climates, as the combined radiated heat can stress plants.
Do climbing roses need to be tied to the trellis, or will they grip on their own?
Unlike true climbers such as clematis or ivy, climbing roses have no natural mechanism for gripping a support — no tendrils, no aerial roots, no adhesive pads. Their thorns can hook onto rough surfaces loosely, but this is not reliable support, especially once canes become heavy with leaves and flowers.
You will need to actively tie and train canes to the trellis throughout the growing season, at least until the plant is well established and the older canes have been woven through the structure. Regular tying is simply part of growing climbing roses successfully.
What is the best way to winterize a climbing rose on a trellis?
In mild climates (USDA Zones 6 and above), most climbing roses can be left on their trellis over winter with minimal protection — simply tie any loose canes securely so they don’t whip around in winter winds.
In colder climates (Zones 4–5), you may need to carefully detach the canes from the trellis, bundle them gently together, and lay them on the ground or wrap them in burlap to protect from extreme freeze-thaw cycles. Avoid cutting the canes back too hard in autumn — wait until late winter or early spring to do your main pruning, once the worst of the cold has passed.
Level Up Your Garden
Our most popular gardening guides


