Growing your own potatoes is one of the most satisfying (and surprisingly simple) things you can do in the garden.
There’s something special about harvesting your own potatoes, pulling them from the soil, and knowing you have nurtured them from the ground up.
It may take a little patience (and possibly some dirt under your nails), but the process itself can be quite enjoyable.
There’s some kind of satisfaction in watching your tiny spuds grow into something you can actually eat.
So, if you’re curious about how to grow these tubers in your garden, let’s break it down step by step.
7 Steps on How to Grow Potatoes
I have included a simple but helpful video on how to grow potatoes (with tips) in just a few simple steps. If you want to go further into detail, I suggest you keep reading below.
Step 1: Choose the Right Potato Variety

First, you need to decide which kind of potatoes you want to grow. There are different types, and each one works better for different purposes.
For example, Russet potatoes are good for baking, while Yukon Gold potatoes are great for mashing.
When choosing, it’s also important to consider your climate. Some potatoes grow better in warmer weather, while others thrive in cooler places.
If you’re not sure which one to pick, it’s a good idea to ask at your local garden store or check what others in your area are growing.
The right potato variety can impact how well your plants grow, so it’s worth choosing carefully.
Step 2: Prepare the Planting Area
Potatoes need soil that’s easy for their roots to spread in. That means loose soil that drains well (so it doesn’t get soggy).
If your soil is hard or clay-like, you can mix in some compost or sand to make it easier for the potatoes to grow.
You can find more tips on the Berkeley method of composting for a faster composting process.

How to Compost Using The Berkeley Method (Have Rich Compost Within 18 Days!)
Composting is one of the simplest and most successful ways to create nutrient-rich soil (and plants) for your garden.
But, if you’re like me, you probably forgot to create your compost over the winter/early spring, and who are in a time crunch to prepare it.
And if that’s the case, then the Berkeley Composting Method is what you’d want to use if you need it for your gardens quickly.
Find a sunny spot for your potatoes because they need at least 6 to 8 hours of sunlight a day (so don’t pick a shady area).
If you’re planting in a garden bed, make sure it doesn’t get waterlogged or stay too wet—potatoes don’t like too much water.
Raised garden beds work well too, especially if your soil isn’t great. We also have lots of raised garden bed kits you might want to consider.
To prepare your garden area, simply dig up the soil and break it apart a bit, so it’s loose and ready for planting. The right gardening tools can make this part quicker and easier, especially if you’re working with tough or compacted soil.
Step 3: Prepare and Cut the Seed Potatoes
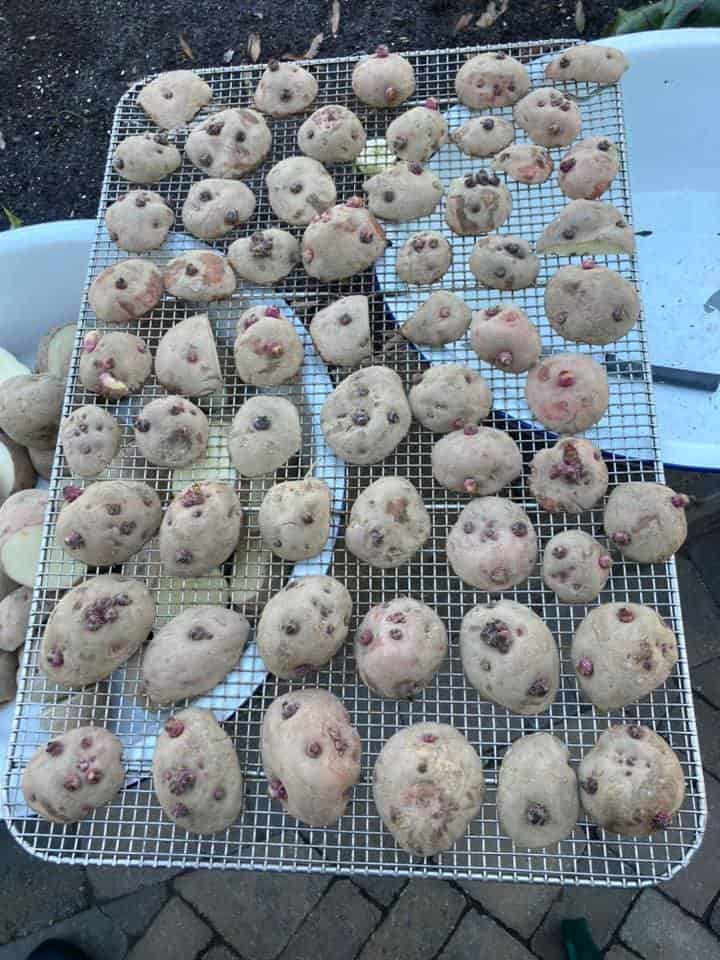
You’ll want to start with “seed potatoes” (which are potatoes specifically used to grow new ones, not actual seeds). Avoid using store-bought potatoes because they might carry diseases or pests.
The same goes for garlic. As I mentioned in our guide on “Can you grow garlic from grocery stores?”, while it’s possible, it’s better to opt for an organic option to avoid the treated chemicals used to prevent sprouting during transportation.

Can You Grow Garlic from Grocery Stores?
Garlic is a very popular ingredient in many dishes and is present in almost every kitchen.
But a common question for many gardeners is, “Can I plant garlic bought from grocery stores?”
In this article, I’ll share some helpful info on whether you can grow grocery store garlic, how to plant it, and which types are best for your garden.
It’s best to buy seed potatoes from a garden store or a local farm near you.
Here’s what you’ll do: cut your seed potatoes into pieces (each about the size of an egg).
Make sure each piece has at least one or two “eyes” (the little spots that sprout).
If the potato is small and has only one eye, you can plant it whole (no need to cut).
Let the pieces sit for a day or two so the cut edges can dry out. This helps prevent rotting when you plant them.
Step 4: Dig Planting Trenches or Holes

Once your potatoes are ready, you’ll need to dig either a trench or individual holes to plant them in. Potatoes need space to grow, so make sure you dig deep enough for them.
If you’re digging a trench, make it about 4 to 6 inches deep and space each trench about a foot apart. If you prefer holes, dig individual holes about 4 inches deep and 12 inches apart.
My tip is to give the potatoes plenty of room to grow and spread, as crowding them together can make it harder for them to thrive.
Step 5: Plant the Seed Potatoes
Alright, now it’s time to get those potatoes in the ground.
Take each seed potato and lay it down with the “eyes” facing up in the trench or hole you’ve prepared. Make sure they’re spaced about 12 inches apart to give them room to stretch their roots.
After that, cover them with soil. You don’t need to pack it down too much—just enough to cover the potatoes with about 4 inches of dirt.
As the plants grow, you’ll keep adding more soil around them. This process is called “hilling” (we’ll talk more about that in the next step).
Step 6: Water After Planting
After planting, give them a good shower of water. Potatoes need enough moisture to grow, but they don’t like sitting in wet soil.
You’ll need to water them regularly, especially during dry periods, but make sure the soil doesn’t stay too soggy.
A good rule of thumb is to water deeply and less often rather than giving them a little water every day. I suggest watering deeply about once a week.
To make watering more consistent and efficient, consider using one of these drip irrigation kits. They deliver water right to the roots and help prevent overwatering.
Step 7: Hill the Soil Around the Plants

This is what I was talking about earlier.
As your potato plants grow, you’ll need to mound soil around them to prevent the potatoes from being exposed to sunlight (because if they are, they can turn green and become bitter).
When your plants are about 6 inches tall, gently push soil up around the base of the plants.
This process is called “hilling.” You’ll want to do this a couple of times during the growing season, each time adding more soil to cover the plants as they grow taller.
Garden Planner
The 22-page planner timed to your county's real frost dates. Planting windows, monthly checklists, and a harvest log you'll fill with pride by August.
Your Free 22-Page Garden Planner
Built for your exact ZIP code — planting dates, harvest log, and a month-by-month plan. 15-second sign-up.
Growing Potatoes in Containers

Not everyone has a garden bed, but that doesn’t mean you can’t grow potatoes.
If you’re tight on space or just prefer the convenience of containers, potatoes can thrive in pots, bags, or even large buckets.
How?
Grab a container
You’ll need a container that’s at least 12-18 inches deep and wide enough for the potatoes to spread out (think big, like a 5-gallon bucket or a large storage tote).
Make sure there are drainage holes in the bottom to prevent the soil from getting soggy. You want your potatoes to be well-drained, not drowning.
Fill with a well-drained and crumbly soil
Once you’ve got your container ready, fill it with some good, loose, well-draining soil. A mix of garden soil and compost works best.
After filling the bottom of the container with about 4-6 inches of soil, it’s time to plant.
Start putting the seed potatoes
Place your seed potatoes on top of the soil, eyes facing up, and cover them with another few inches of soil.
As your potato plants start to grow, keep adding more soil around them, just like you would with traditional hilling in a garden bed.
Place the container in a sunny area
Don’t forget to place those containers to a spot that receives lots of sunlight.
Adding more soil as they grow
As the potatoes grow, you’ll notice the plants getting taller. Keep adding more soil as they grow, covering the stems to encourage even more tubers to form.
When it’s time to harvest, all you have to do is dump the contents of the container onto a tarp or in your yard.
Easy, right? You won’t need to dig up a whole garden bed to harvest them.
So, if you’ve got limited space but still want to try growing your own potatoes, container gardening is the way to go.

Container Gardening for Small Spaces
Container gardening is a great way to grow plants, especially if you’re tight on space or live in an urban area. It’s perfect for small areas like balconies, patios, or even windowsills.
In this article, you’ll learn how container gardening works, why it’s a great option, and some tips to help you get started.
It’s simple, convenient, and you get to enjoy fresh, homegrown potatoes with less effort than you might think.
When Should I Harvest My Potatoes?

It’s time to harvest when the plants start dying back and the leaves turn yellow or brown. This indicates the potatoes are done growing and ready to be harvested.
Before digging them up, wait until the soil is dry—this makes it easier to lift them out.
Be careful not to damage the potatoes while digging. It’s best to use a garden fork or one of these harvesting tools for root vegetables to gently lift the plants from the ground.
Miss it by a week and you lose the crop. The free 22-page planner pins down your exact dates — last frost, first frost, and the weekly steps between — so you plant on the days that actually work for your ZIP.
Free Planting Guides for This Article
Get exact planting dates, frost schedules, and growing tips for your zone:
Cure and Store the Harvest

After harvesting your potatoes, let them sit in a cool, dark place for about two weeks. This process, called “curing,” helps thicken the skin so they last longer in storage.
Once they’re cured, store your potatoes in a cool, dark place—but not in the fridge, as refrigeration can make them taste sweet.

A basement or cool pantry works well. Check on them periodically to ensure none are going bad, as a rotten potato can quickly spread to the others.
How Do I Keep Pests and Diseases Away from My Potato Plants?
Potatoes can attract pests like aphids and beetles, but there are a few things you can do to keep them away.
One method is to spray the plants with a mild soap and water solution. This helps eliminate pests without harming the plants. You can also use natural oils, like neem oil, to repel insects.
For more ideas on safe, chemical-free pest control, check out our favorite natural pest control solutions.
To prevent diseases (such as blight), it’s helpful to rotate where you plant potatoes each year. Avoid planting them in the same spot to prevent diseases from building up in the soil.
Planting herbs like marigolds around your potatoes can also deter pests, as they emit a scent that bugs dislike. For more tips, check out our companion planting guide.
Best gardening planner I've used in 10 years — and I keep coming back to it every season.
How Hard Is It to Garden in Your County?
Every county has a unique Gardening Difficulty Score based on frost risk, soil quality, drought, altitude, and climate trends. Find yours — plus personalized frost dates, planting calendars, and soil data.
Check Your County's Score →Common Mistakes to Avoid in Growing Potatoes
Sometimes, even seasoned gardeners can make mistakes. So, here I cover things you should avoid to ensure you grow healthy potatoes in the long run:
Using Store-Bought Potatoes
I’ve mentioned this already, and I’m going to repeat it: store-bought potatoes might have chemicals or diseases that can harm your plants. It’s best to use seed potatoes from a garden store for healthy growth.
Crowding Plants Together
Potatoes need space to grow. If you plant them too close together, they may struggle to grow properly. Be sure to space them about 12 inches apart.
Not Hilling Properly
Hilling helps keep your potatoes from being exposed to the sun, which can cause them to turn green and bitter. Always pile up soil around the plants as they grow.
Planting Potatoes Without Eyes
The eyes are where your potatoes will sprout. Make sure each piece of seed potato has at least one eye to grow new plants.
Planting Too Early
Potatoes prefer warm soil. If you plant them too early when the soil is still cold, they may rot or grow slowly. Wait until the soil reaches about 40°F (4°C) before planting.
Avoid these mistakes, and you’ll have a better chance of growing healthy, delicious potatoes.
Happy growing!
Do you have any tips or personal experiences with growing potatoes? We’d love to hear from you!
Share your thoughts, questions, or suggestions in the comments below and let’s keep the conversation growing. 🌱
Ready To Transform Your Garden?

Are you looking for the best way to layout your garden beds? Maybe you’re feeling a bit stuck on how to make the most of your space?
We’ve got you covered! Check out our 101+ Garden Bed Layout Ideas for your next raised bed project. This guide is filled with creative and practical ideas that can help you design a garden that fits your style, whether you’re just starting out or have been gardening for years.
Get your copy today and get inspired to bring your gardening dreams to life.
Level Up Your Garden
Our most popular gardening guides


