Canning potatoes at home is a good way to make sure you’ve always got something ready to eat on the shelf. Whether you grow your own or buy in bulk, it saves time and cuts down on waste.
But when it comes to canning potatoes, safety isn’t optional – it’s essential.
Potatoes are low-acid, which means they can’t be canned in a water bath like pickles or jams. You’ll need a pressure canner, and there are a few non-negotiable steps you’ve got to follow to do it right.
(If you’re brand new to canning, you might want to start with this canning for beginners guide first.)
This article breaks it all down in simple terms. From choosing the right potatoes and prepping your jars to processing times and what to watch for after the jars cool, everything is here.
Why Potatoes Must Be Pressure Canned

You can’t safely can potatoes using a water bath canner. It just doesn’t get hot enough to kill off the kinds of bacteria that can grow in low-acid foods like potatoes.
One of the biggest concerns is botulism, which can be deadly – and it’s the kind of bacteria you can’t see, smell, or taste.
Potatoes grow underground, so they’re more likely to carry spores from the soil, which is why proper canning matters.
A pressure canner reaches the high temperatures needed to make sure those bacteria are taken care of. That’s why pressure canning is the only tested and approved method for potatoes.
(If you’re curious about when water bath canning is safe, I put together a simple water bath canning for beginners guide that explains what you can use it for.)
Need more info on home canning?
I’ve put together a whole series of step-by-step guides to help you fill your shelves:
When Should You Plant in Your Area?
Enter your ZIP code for personalized frost dates, planting schedules, and growing tips.
Ingredients
- Fresh potatoes (firm, free from green spots, sprouting, or bruises)
- Use waxy types (reds, yellows) for best texture.
- Whole potatoes must be 2 inches or smaller in diameter.
- Larger potatoes should be peeled and cut into ½-inch cubes.
- Boiling water (enough to cover potatoes in jars)
- Canning salt (optional)
- ½ teaspoon per pint jar
- 1 teaspoon per quart jar
Tools & Equipment
- Pressure canner (required for safety – not an Instant Pot)
- Canning jars (pints or quarts, designed for home canning)
- New canning lids and clean rings
- Canning rack (to keep jars off the bottom of the canner)
- Canning funnel (for tidy filling)
- Jar lifter (canning tongs) (to handle hot jars safely)
- Plastic utensil or chopstick (for removing air bubbles)
- Clean towel (to set jars on after processing)
- White vinegar (optional) – 1/3 cup in canner water helps prevent cloudy deposits on jars
Once you’ve got these on hand, you’ll be ready to move on to prepping your potatoes.
Choosing and Preparing Potatoes

Quality & size: Select small to medium, mature potatoes in good condition. If packing whole, choose potatoes 1–2 inches in diameter; larger potatoes should be peeled and cut.
Note: potatoes stored below 45°F may discolor when canned.
Peel: Wash and peel all potatoes (skins are not used in the tested method).
Cut options (tested):
- Whole: only if ≤2 inches in diameter.
- Cubed: ½-inch cubes.
(These are the shapes in the tested directions.)
Prevent darkening: After peeling/cutting, place potatoes in an ascorbic acid solution to help maintain color, then drain before precooking.
Texture tip (optional, not required): Waxy/boiling types (e.g., many red or yellow varieties) tend to hold their shape better than high-starch baking types; choose based on the texture you prefer. (This is a quality suggestion; NCHFP does not mandate varieties.
Plan your batch: As a guide, ~20 lb potatoes per canner load of 7 quarts; ~13 lb for 9 pints. A 50-lb bag yields about 18–22 quarts.
Free Planting Guides for This Article
Get exact planting dates, frost schedules, and growing tips for your zone:
Blanching the Potatoes

Hot-pack is required for potatoes.
- Drain peeled/cut potatoes (after any color-prevention soak).
- Bring clean water to a rolling boil.
- Parboil:
- Cubes (½-inch): 2 minutes
- Whole potatoes ≤2 inches: 10 minutes
- Drain well. Keep potatoes hot for packing.
4 Steps to Pressure Can Potatoes
With your potatoes already prepped and blanched, it’s time to move on to the canning process. Follow each step carefully to ensure safe, shelf-stable results.
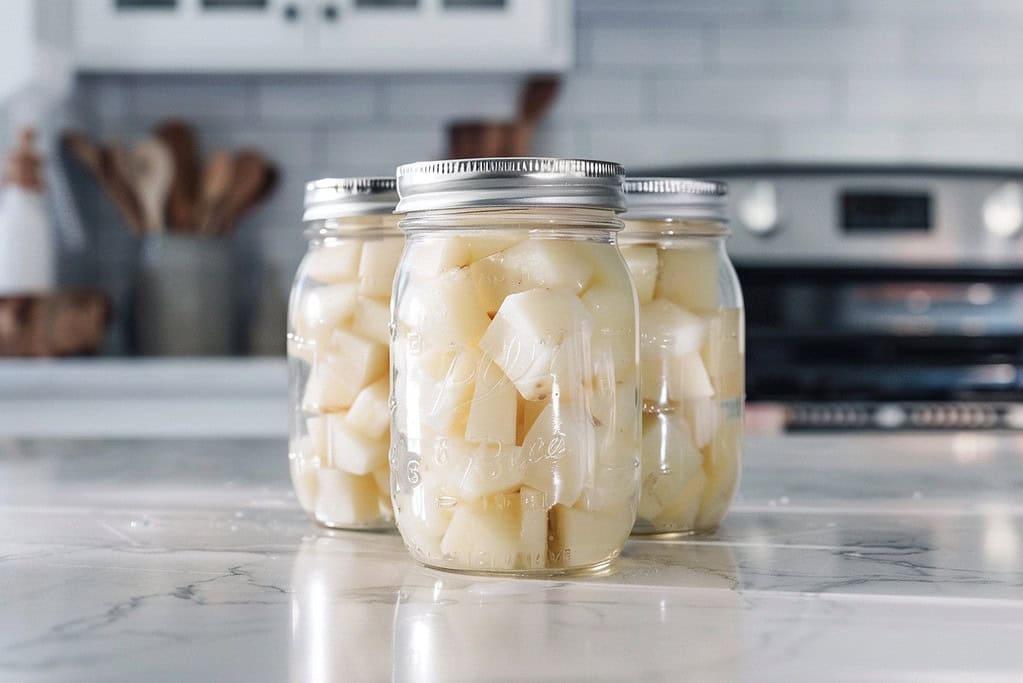
Step 1: Fill the Jars
Start by placing your blanched potatoes into hot jars, allowing for up to one inch of headspace. If desired, add a measured amount of canning salt – one teaspoon per quart jar.
Next, cover the potatoes with fresh boiling water, making sure the water completely covers the potatoes and leaving one inch of headspace.
Do not use the water in which the potatoes were boiled – it's too starchy and can affect quality.
Remove air bubbles, recheck the headspace, wipe the jar rims clean, and place lids on with rings tightened fingertip-tight.
Step 2: Process in the Pressure Canner
Place the filled jars onto the rack inside the pressure canner. Add two to three inches of hot water, or follow your canner’s specific instructions.
Lock the lid in place and heat the canner until you see a steady stream of steam escaping through the vent; vent the steam for ten full minutes.
After venting, apply the pressure regulator or weight and begin building pressure.
Maintain the correct pressure and processing times:
- Pints: 35 minutes
- Quarts: 40 minutes
Pressure depends on altitude and canner type:
Dial-gauge canner:
- 0–2,000 ft elevation: 11 psi
- 2,001–4,000 ft: 12 psi
- 4,001–6,000 ft: 13 psi
- 6,001–8,000 ft: 14 psi
- 8,001–10,000 ft: 15 psi
Weighted-gauge canner:
- 0–1,000 ft elevation: 10 psi
- Above 1,000 ft: 15 psi
If the pressure drops at any point, bring it back up and restart the timing – do not include the time before the pressure drop.
Step 3: Cool and Remove the Jars
When the processing time is done, turn off the heat and allow the canner to depressurize naturally. Do not force it by opening or cooling.
Once the pressure gauge reads zero, remove the weight or regulator and carefully lift the lid away from you to avoid the steam.
Allow the jars to rest undisturbed inside the canner for five minutes before removing them.
Use a jar lifter to place the jars on a clean towel, spaced a few inches apart, and let them cool fully for 12 to 24 hours without disturbance.
Step 4: Check Seals and Store
After the jars have cooled, check each lid for a proper seal – it should be concave and not flex when pressed. Any unsealed jars must be refrigerated and used promptly.
Remove the rings from sealed jars, clean off any residue, label them with the date, and store in a cool, dark place. Properly canned potatoes will remain good for 12 to 18 months.
How to Store Your Canned Potatoes

After jars have cooled and seals are confirmed, remove the screw bands, wash the jars to remove any residue, and store them in a cool, dark, dry place between 50°F and 70°F.
Avoid sunlight, furnaces, or damp areas that can corrode lids. Label each jar with the canning date and rotate your stock so the oldest is used first.
For best quality, enjoy your canned potatoes within 12 months, though they remain safe beyond that as long as the seals hold.
Always check for spoilage before opening – signs like bulging lids, leaks, spurting liquid, unusual odor, or discoloration mean the food is unsafe and should be discarded without tasting.
How Hard Is It to Garden in Your County?
Every county has a unique Gardening Difficulty Score based on frost risk, soil quality, drought, altitude, and climate trends. Find yours — plus personalized frost dates, planting calendars, and soil data.
Check Your County's Score →Common Problems (and How to Handle Them)
Even when you do everything right, a few things can still happen during or after canning. Here’s what to look out for and what you can do about it.
Siphoning (Liquid Loss)
Liquid loss can happen if the canner is force-cooled, if pressure fluctuates during processing, if air bubbles aren’t removed, if jars are packed too tightly, or if headspace is off.
Let the canner depressurize naturally, then remove the weight and wait 10 minutes before opening.
If jars lost liquid but sealed, do not open them to replace liquid; liquid loss alone is not spoilage (quality may be affected).
Cloudy Liquid
Cloudiness may indicate spoilage, but with potatoes it’s often starch. The tested method specifically says to cover potatoes with fresh boiling water, not the cooking water.
If there are spoilage signs (off-odors, bubbling, leaking, lid issues), discard safely; otherwise, a mild starchy haze is a quality issue.
Unsealed Jars
If a jar doesn’t seal, it isn’t shelf-stable. You may reprocess within 24 hours: inspect the rim for nicks, replace with a new properly prepared lid, and reprocess using the same time.
Or refrigerate and use within a few days/one week, or freeze (leave adequate headspace).
Mushy or Soft Potatoes
Soft texture usually results from overcooking during the parboil or overprocessing.
Stick to the tested parboil times (2 minutes for ½-inch cubes; 10 minutes for ≤2″ whole potatoes) and the exact pressure/time tables; begin with good-quality, mature potatoes for best texture.
Lower Than Expected Yield
This is normal – potatoes shrink with precooking and processing. As planning numbers, expect ~20 lb per 7-quart canner load, ~13 lb per 9 pints, and ~50 lb to yield 18–22 quarts.
(Optional) Dark Top/Sediment/Floating
Darkening at the top can come from oxidation or not enough liquid covering the food; sediment and cloudiness can be from starch or minerals/salt additives; fruit/veg pieces can sometimes float due to trapped air.
Use hot pack, remove bubbles, use pure canning salt, and follow headspace directions to minimize these issues.
Stick to the Tested Method and You’ll Have Potatoes Ready Anytime
Canning potatoes isn’t complicated, but it does require sticking to a few non-negotiable steps.
Using a pressure canner, peeling your potatoes, and following proper prep and timing are what make the difference between food that’s safe to store and food that isn’t.
If you follow the process laid out here, you’ll end up with jars of ready-to-eat potatoes that’ll keep well for months.
They’re handy for soups, stews, or quick meals when you don’t have time to peel and cook from scratch. Do it right the first time, and you won’t have to worry about safety or waste later on.
FAQs
1. Can I use a water bath canner for potatoes?
No. Potatoes are low-acid and must be pressure canned to safely kill bacteria like botulism. A water bath canner doesn’t get hot enough.
2. Do I need to peel potatoes before canning?
Yes, always. The skins can carry bacteria from the soil, and peeling them is a safety requirement – not just a preference.
3. What kind of potatoes are best for canning?
Waxy potatoes, like red or yellow varieties, hold their shape better during processing. Avoid starchy types like russets – they break down too easily.
4. Why is my canned potato liquid cloudy?
That’s just starch from the potatoes. It looks a little messy but isn’t harmful. Rinsing potatoes well and using fresh boiling water helps reduce it.
5. What if a jar didn’t seal?
Put it in the fridge and use it within a few days. Don’t store it on the shelf, and don’t try to reseal unless you’re willing to reprocess it right away using a full canning cycle.
Level Up Your Garden
Our most popular gardening guides


