Landscaping around trees can transform bare, patchy ground into a beautiful focal point in your yard.
Often, grass struggles to grow under a tree’s shady canopy and extensive roots, leaving an eyesore of dirt or weeds. Luckily, there are effortless, low-maintenance ways to spruce up this space without harming your trees.
In this article, we’ll explore 11 easy landscaping ideas that are beginner-friendly, budget-conscious, and will make the area around your trees look naturally stunning.
Whether you’re a new homeowner or a seasoned DIY homesteader, these ideas will help you create an attractive, low-upkeep landscape under any tree.
Let’s dig in (figuratively, of course)!
11 Effortless Landscaping Ideas Around Trees
Below are 11 effortless landscaping ideas around trees that add structure and visual interest without requiring a lot of upkeep.
1. Create a Mulch Ring with Edging
One of the simplest and most effective landscaping ideas is to form a neat mulch ring around the base of your tree.
Spread a layer of organic mulch (like wood chips or bark) about 2–4 inches thick in a circle around the tree, extending out to the drip line (the canopy’s edge).
Keep the mulch a few inches away from the trunk – avoid piling it against the bark to prevent rot (the dreaded “mulch volcano”).
You can add a border of bricks, stones, or pavers to define the circle and keep the mulch contained. This not only looks tidy but also helps retain soil moisture and suppress weeds, all while protecting the roots.
If you want more inspiration, see our practical garden mulch ideas that work beautifully around trees and garden beds.
A wide mulch ring also spares you from mowing or weed-whacking right up to the trunk, making lawn maintenance easier.
Tip: Choose mulch in a natural color (brown, black) for a polished, professional look that boosts curb appeal.
2. Plant a Shade-Loving Flower Bed
If you crave a pop of color around your tree, consider planting a flower bed with shade-tolerant plants. Many perennials and annuals thrive in the dappled light under trees.
For example, hostas and ferns are classic choices that provide lush foliage and come back every year. You could also add shade-loving flowers like impatiens, begonias, or astilbes for splashes of color.
If you need inspiration, browsing stunning flower bed ideas can help you visualize layouts that work beautifully in shaded areas.
Before planting, enrich the soil with a bit of compost to help new plants establish (just be gentle around tree roots).
Arrange the plants in a circle or semi-circle around the trunk, keeping them a comfortable distance away from the tree’s base so as not to crowd the roots.
Edge the bed with rocks or a short fence to define the area and prevent grass from encroaching.
A ring of blooming flowers or vibrant foliage under a tree instantly softens the landscape and makes your yard feel like a cozy woodland garden.
Choose mostly perennials (which return each year) for the most effortless, low-maintenance flower bed.
3. Cover the Ground with Hardy Groundcovers
For an ultra-low-maintenance solution, plant groundcover plants under your tree. Groundcovers are creeping or low-growing plants that spread to form a lush carpet, eliminating bare soil and weeds.
They’re perfect for areas where grass won’t grow. For shady spots, try varieties like vinca minor (periwinkle), pachysandra, or English ivy, which will thrive under tree canopies.
In sunnier conditions (for example, beneath a high-limbed or small ornamental tree), you might use creeping thyme or creeping phlox for a flowering carpet.
Once established, groundcovers require minimal care – they come back every year and crowd out most weeds on their own. They also help protect the tree’s roots by keeping the soil cool and moist.
Plant them in well-draining soil and water regularly at first. Soon you’ll have a soft, green blanket extending from your tree trunk.
Bonus: many groundcovers are evergreen, so you’ll have year-round coverage and color around your tree.
4. Design a Natural Rock Garden
For a more rustic or drought-tolerant approach, create a rock garden around the tree. This idea works especially well if you have a tree in a sunnier spot or live in a dry climate.
Start by arranging a variety of rocks, stones, and pebbles in an attractive layout at the tree’s base. You can mix large boulders with medium river rocks and gravel to add texture and visual interest.
Between the rocks, plant hardy succulents or alpine plants that don’t mind a bit of shade – think sedum, hens-and-chicks (Sempervivum), or even a few golden creeping junipers.
These plants have shallow roots and can thrive in the rocky, well-drained environment. A rock garden not only looks naturally beautiful but is also extremely low-maintenance – rocks never need watering!
Just be sure to leave some gaps for water and air to reach the tree roots below. In a real-life example, designers in Southern California surrounded a mature tree with low-maintenance succulents, rocks, and gravel, creating a colorful yet effortless landscape that enhanced the curb appeal.
You can do the same on a smaller scale: after placing your rocks and drought-tolerant plants, add a layer of pea gravel or decomposed granite to fill in the spaces.
This gives a finished look and helps suppress weeds. The result is a Zen-like, natural scene around your tree that practically takes care of itself.
5. Use Decorative Gravel or Stones
If you prefer an even easier non-plant option, consider covering the ground under the tree with decorative gravel or small stones.
Washed pea gravel, river pebbles, or crushed granite can create a clean, modern look around the trunk. Simply remove any grass or weeds, lay down landscape fabric (optional, for extra weed control), and pour a few inches of gravel in a wide ring around the tree.
You can include a stone or metal edging to keep the gravel contained. The gravel acts much like mulch – it protects the soil, prevents erosion, and suppresses weeds – but it doesn’t need to be replenished as often.
Lighter-colored stones can brighten up a shady area, while dark or multicolored pebbles give a rich, landscaped appearance. This approach is budget-friendly and very low-maintenance over time.
Just remember to occasionally rake or hose off the stones to keep them looking fresh (fallen leaves can be picked out or allowed to decompose).
And like with mulch, keep the gravel a little bit away from the tree’s trunk to allow the tree to “breathe.” Decorative stones are an easy way to get a polished look with virtually no ongoing work.
6. Add a Circular Tree Bench or Seating
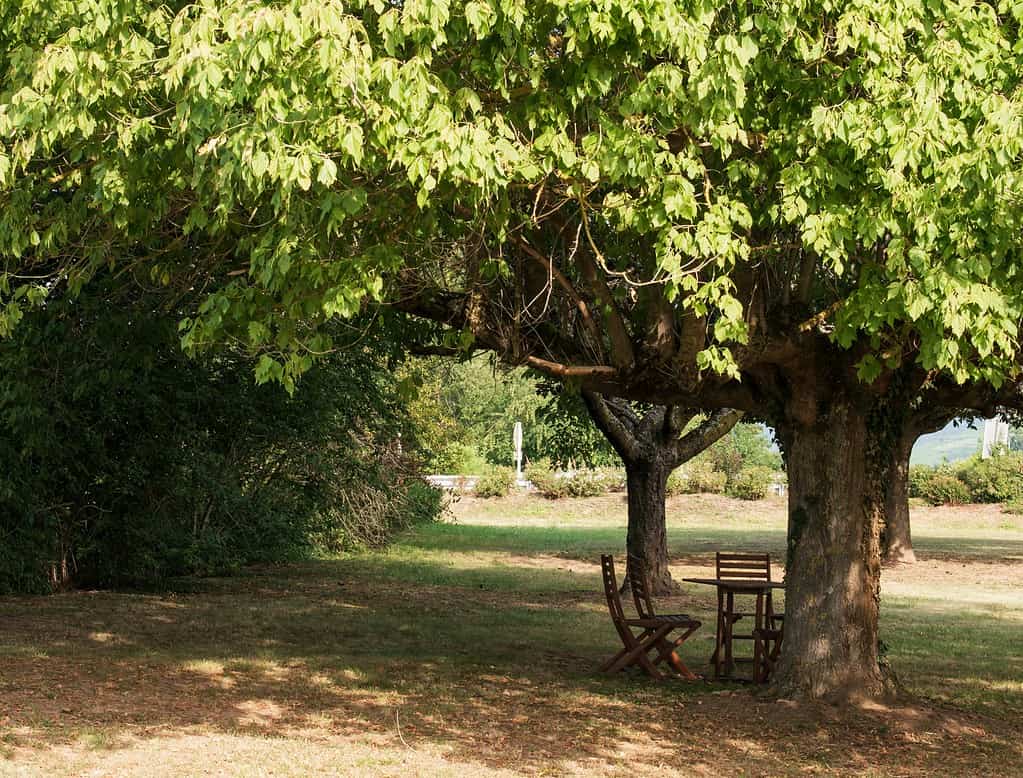
Why not turn your tree into a natural gathering spot? Installing a circular bench around the tree creates a charming seating area and a focal point in your yard.
You can purchase or build a bench that encircles the trunk, providing 360° of seating shaded by the tree’s canopy.
This idea is perfect for large trees in a backyard or homestead setting – it invites you and your guests to sit and enjoy the cool shade on a summer day.
Make sure to choose a bench designed for outdoor use (wood or weather-resistant material) and install it far enough out to accommodate the tree’s trunk and allow room for growth.
A general guideline is to leave a few inches gap between the trunk and the bench. Besides being a cozy retreat, a tree bench also serves a practical purpose: it discourages foot traffic over the tree’s root zone (protecting those roots from compaction).
If a full circle bench is too much, even a small curved bench or a pair of chairs beneath the tree can create a mini outdoor lounge. Place a little side table or some pillows to make it extra inviting.
This effortless addition doesn’t require any plant care, and it transforms your tree area into a functional space for relaxation or socializing.
7. Add Whimsical Decor or a Fairy Garden
Give your tree base a touch of magic by creating a fairy garden or adding whimsical decor. The base of a tree is a perfect spot for a miniature garden scene or a few well-placed garden ornaments.
To make a fairy garden, use a section of the mulched area around the trunk to arrange tiny houses, fairy figurines, little mushrooms, and other miniature accessories among some low plants or moss.
Kids (and kids at heart) will love the enchanting vibe it brings. You can also incorporate small shade-tolerant plants like creeping thyme, baby tears, or mini ferns to serve as “fairy forest” greenery.
If you enjoy playful outdoor details, many of the same ideas found in creative mailbox landscaping ideas translate beautifully to tree bases as well.
Another whimsical idea is to place a gnome, a gazing ball, or a decorative statue at the tree’s base as a fun accent. Even a simple birdbath can be a wonderful addition – it provides a quaint visual element and helps attract birds to your yard.
This creative approach keeps things low-maintenance – you’re mostly arranging objects – and can be done on a small budget using DIY crafts or thrifted garden art.
For inspiration: Some homeowners design entire fairy gardens under trees, complete with tiny paths and houses, to create an eye-catching conversation piece in their yard.
8. Arrange a Container Garden Under the Tree
If digging into the tree’s root-filled soil seems daunting, try using container plants to landscape around the tree.
Simply arrange a group of potted plants around the tree’s base to add greenery and color without disturbing the roots at all.
Vary the pot heights and sizes for visual interest – for example, place a couple of large pots with shrubs or tall ornamental grasses at the back (farthest from your view), and smaller pots with flowers or trailing plants toward the front.
You can include hanging baskets on lower tree branches or hook planters if the tree is sturdy and it suits the look.
This method is incredibly flexible: you can move containers around until you find the perfect layout, and you can swap out plants seasonally or as your tastes change.
Choose shade-loving potted plants if your tree casts heavy shade (like coleus, begonias, fuchsias, or hostas in pots). If the area gets some sun, potted roses, lavender, or daylilies could work nicely.
If you need inspiration, exploring the best flowers for container gardening can help you choose varieties that thrive in pots.
To tie the look together, consider placing the pots on a layer of mulch or gravel spread around the tree. This hides any patchy ground and visually unifies the container arrangement.
A container garden around a tree is not only effortless to set up, but also easy to maintain; just water and feed the plants as needed, and there’s no weeding of the ground required!
9. Install Landscape Lighting for Nighttime Charm
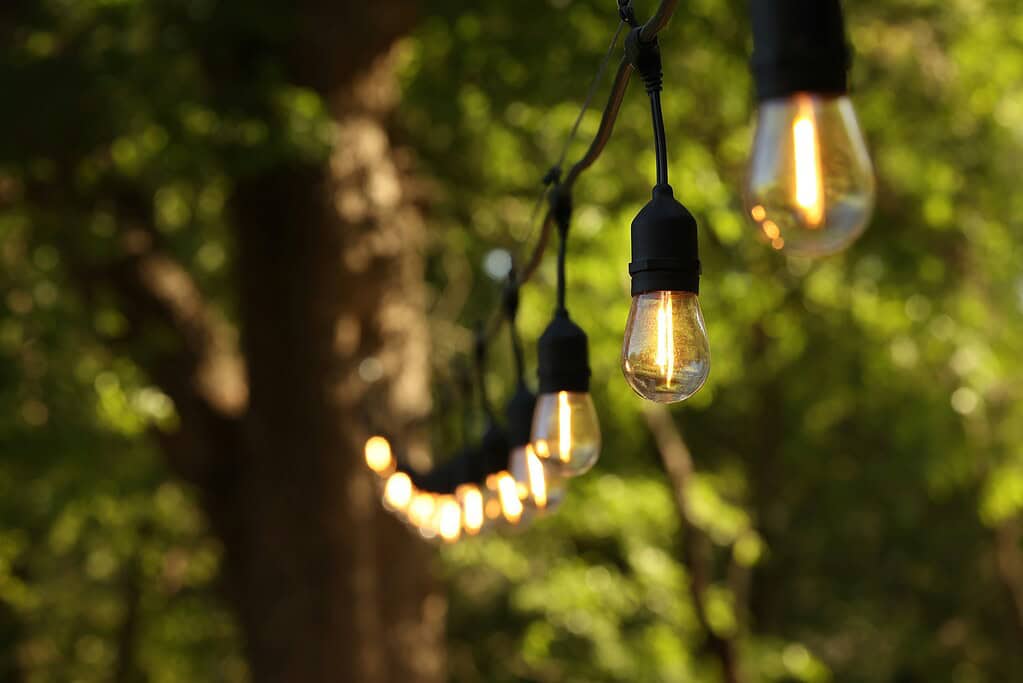
Don’t let your beautiful tree landscaping disappear after dark. Adding a bit of outdoor lighting around the tree can create a magical evening scene with minimal effort.
The easiest option is to use a few solar-powered landscape lights: stick them into the ground around the tree’s perimeter or along a path leading to the tree.
They will automatically glow at night, highlighting the tree trunk and any plants or features around it.
For a dramatic effect, you could install a low-voltage spotlight aimed up into the tree’s branches – uplighting a tree from below creates a stunning silhouette and really showcases the texture of the bark and canopy.
Another idea is to wrap a string of outdoor fairy lights loosely around the trunk or lower limbs, giving the area a cozy, inviting glow (this works great for special occasions or just to enjoy summer nights outside).
Best of all, modern LED and solar lights are set-and-forget – little to no maintenance is needed aside from maybe cleaning the solar panel occasionally.
10. Build a Low Tree Border or Retaining Wall
For a more structured look, you can build a low border or retaining wall around the tree’s planting area. This can be done with natural stone, bricks, or interlocking block pavers to form a circle or hexagon around the tree.
Aim for the wall to be maybe 6–12 inches high (just a few layers of stone) to create a raised bed effect – this helps keep mulch and soil in place and gives a tidy, raised-edge appearance.
Be cautious with this idea: you don’t want to bury the tree’s trunk or major roots. One safe method is to construct the border a few feet away from the trunk (at or beyond the tree’s drip line) so that you’re encircling the outer root area.
Then fill the inside of the ring with mulch or a light layer of soil. This creates something called a “tree well,” which protects exposed roots and can even help if your yard is sloped.
Keep the depth of added soil minimal over the root zone, or stick to mulch or gravel inside the wall, to avoid suffocating the roots.
You can plant shallow-rooted, shade-loving plants in the raised bed portion, or simply leave it mulched for a clean look. The raised border doubles as a visual frame for the tree and prevents lawn creep.
It also serves a practical purpose: a short wall can deter vehicles or lawn mowers from getting too close to the tree.
Building a border is a bit more effort upfront, but once it’s in place, maintenance is a breeze – just top up the mulch occasionally and enjoy the well-defined, landscaped look around your tree.
11. Embrace a Natural Woodland Look
If a manicured garden isn’t your style, you can opt for a natural, woodland approach to landscaping under your tree. This means working with nature to create a low-maintenance, organic look.
Start by allowing a layer of leaf litter or wood chips to cover the ground under the tree – in a woodland, fallen leaves naturally mulch the soil and nourish the tree.
You can replicate this by simply not raking all the leaves in fall (or by spreading a thin layer of chopped leaves or pine needles as mulch).
Next, introduce a few native shade plants that thrive in your region. For instance, native ferns, wild ginger, trilliums, or woodland wildflowers can establish around the tree and largely take care of themselves once settled.
Plant them in groupings that mimic how they’d grow in nature – irregular clusters rather than formal rows. Add a log or two (from a fallen branch or cut tree) as a rustic accent and to encourage beneficial fungi/insects.
The goal is a self-sustaining mini ecosystem under your tree: the plants return every year, the leaves recycle into nutrients, and it all looks like a peaceful forest floor.
This approach has the advantage of being very forgiving – no need for perfect edging or heavy watering. It also benefits the tree by keeping its root area undisturbed and enriched.
Over time, your tree’s undergrowth might even attract pleasant wildlife like butterflies, toads, or birds hunting for bugs in the leaves.
Expert Tips for Low-Maintenance Landscaping Around Trees

Even with these easy ideas, a few general tips will ensure your tree landscaping stays healthy and beautiful with minimal work:
- Protect the Roots: Whenever planting or landscaping under a tree, be gentle around the roots. Avoid deep digging or cutting large roots. If you encounter big roots near the surface, plant around them or choose very shallow-rooted plants. It is possible to landscape around exposed roots by using mulch or groundcover instead of heavy soil. Never nail or attach anything directly to the tree trunk that could harm it.
- Give the Tree Room: Ensure any edging, retaining walls, or built features are placed far enough from the trunk. Leave a gap (at least 6–12 inches or more) between the tree’s bark and any materials or thick mulch. This prevents moisture buildup against the trunk and gives the tree room to grow. Similarly, space new plants a bit away from the trunk so they’re not crowding it.
- Choose the Right Plants: If you’re adding plants, pick varieties suited to the light and soil conditions under your tree. For shady areas, go with proven shade-tolerant plants (hostas, ferns, astilbe, impatiens, etc.). For part-sun spots, maybe hardy perennials or shrubs like daylilies or azaleas. Using native plants adapted to your region’s conditions can reduce maintenance since they’ll thrive naturally. Group plants with similar water needs to make care easier.
- Mind the Water: Big trees can drink a lot of water, so new plantings underneath may need extra watering at first. Use a soaker hose or drip irrigation to deeply water the area occasionally, which helps both the tree and the underplants. Once established, many shade plants actually require less watering, as the tree moderates the soil moisture. Also, remember to water the tree during extended dry spells, since a landscaped area might not get as much rain penetration (soaker hoses ensure water reaches the roots under mulch or gravel).
- Use Quality Mulch (and Replenish it): Mulch is your best friend for low-maintenance tree areas. Organic mulches (wood chips, bark, shredded leaves) gradually break down and improve soil health. Top up the mulch annually or as needed to maintain that 2–4 inch layer. This will continuously suppress weeds and reduce the need for frequent watering by keeping the soil moist. Just don’t let the mulch pile up against the tree trunk (no mulch volcanos!).
- Prevent Weed Problems: To save yourself from future weeding chores, lay down weed barrier fabric under gravel or mulch in areas where you aren’t planting other things. This porous landscape fabric can block weeds while still allowing water and air to reach roots. Just be sure to cut a wide hole around the tree’s base so the fabric isn’t choking the trunk. Alternatively, a thick layer of mulch alone (renewed regularly) often does the trick.
By following these tips, you’ll ensure that your landscaping not only looks great but also stays low-maintenance and tree-friendly.
A little planning goes a long way to create a tree surround that practically takes care of itself!
Transform Your Tree’s Landscape with Ease
Ready to give that lonely tree a makeover? With these effortless landscaping ideas, even the busiest homeowner or novice gardener can achieve a beautiful yard feature around their trees.
So go ahead – pick an idea and bring your tree’s surroundings to life. Transform that under-tree area into something special, and then sit back (perhaps on your new tree bench!) and admire the view.
You’ll not only gain a prettier yard, but your tree will thank you for the improved care and attention. Happy landscaping, and enjoy your homestead haven!
We’d love to hear about your own tree landscaping projects or any creative ideas you have. Which idea are you excited to try around your trees?
Drop a comment below and let us know how you plan to enhance your yard – or share any questions you have about the process.
Happy gardening!
FAQs
Will landscaping around a tree damage the roots?
Landscaping around a tree is safe if done gently. Avoid deep digging or cutting roots. Stick to shallow-rooted plants, thin layers of soil or mulch, and work around visible roots instead of removing them. Never pile mulch or soil against the trunk. Done correctly, options like mulch rings or groundcovers can actually protect roots and help retain moisture.
What plants grow well under trees?
Shade-tolerant plants work best. Perennials like hostas, ferns, astilbe, and coral bells do well in low light. Groundcovers such as periwinkle, pachysandra, and sweet woodruff are also great choices. For seasonal color, try impatiens, begonias, or coleus. Native woodland plants are especially reliable since they are adapted to growing under tree canopies.
Should I understand mulch or rocks around my tree?
Both options work, but mulch is generally better for tree health. Organic mulch improves soil, holds moisture, and keeps weeds down, though it needs occasional replenishing. Rocks and gravel are very low maintenance and decorative but do not enrich the soil and can heat up in summer. Choose mulch for a natural, tree-friendly approach or rocks for a long-term, decorative look.
Can I build a raised bed or retaining wall around a tree?
Yes, but it must be done carefully. Avoid piling soil directly against the trunk. If using a retaining wall, place it farther out toward the drip line and keep it low. Fill the area with mulch or well-draining soil, and always leave the trunk exposed. This approach protects roots while improving the look of the area.
How can I prevent weeds from growing under my tree?
Covering the ground is the key. Apply a 2–4 inch layer of mulch to block sunlight and suppress weeds. Landscape fabric or cardboard under mulch or gravel adds extra protection. Groundcovers help crowd out weeds over time, and edging the area keeps grass from creeping in. With good coverage and light upkeep, weeds should stay minimal.