Pickled cauliflower is a colorful, crunchy way to brighten your meals. With its tangy, zesty flavor, it’s perfect alongside a sandwich, added to a snack tray, or eaten straight from the jar.
This recipe is a tested canning method, which means you can safely preserve jars of pickled cauliflower to enjoy all year long.
If you're new to preserving food, check out our canning for beginners guide to learn the basics of canning and how to safely store your pickled cauliflower for long-term use.
The process is simple: blanch the florets, simmer a spiced vinegar brine, pack everything into jars, and process them in a boiling-water canner. Once sealed, the jars are shelf-stable for up to 12 months.
By following the steps below, you’ll have a pantry stocked with tangy cauliflower pickles that are as safe as they are delicious.
Why Make Pickled Cauliflower?
Cauliflower on its own is mild, but once it’s pickled it takes on a bright, zesty flavor that perks up just about any meal.
Plus, the process is flexible: you can enjoy it as-is, or add in spices like garlic or dill to match your taste.
Another bonus: it’s a smart way to use up extra cauliflower before it goes soft in the crisper. Properly canned, jars will keep for up to a year – so you can stock the pantry with ready-to-go flavor.
Love Pickling? This is part of my How to Pickle Everything series! Check out more recipes:
- Quick Pickled Radishes Recipe
- Easy Pickled Beets Recipe
- Homemade Pickled Okra Recipe
- How to Make Pickled Cabbage (Only 20 Minutes!)
- How to Make Pickled Jalapeños at Home
- How to Make Pickled Cucumbers at Home
- Pickled Garlic Recipe
- Easy Pickled Banana Peppers Recipe
- Quick Pickled Carrots Recipe
- How to Make Pickled Asparagus at Home
- How to Make Pickled Ginger (Gari) at Home
- Crisp Pickled Green Beans Recipe
- Homemade Pickled Eggs with Beets
- Easy Pickled Cherry Tomatoes (No Canning Needed)
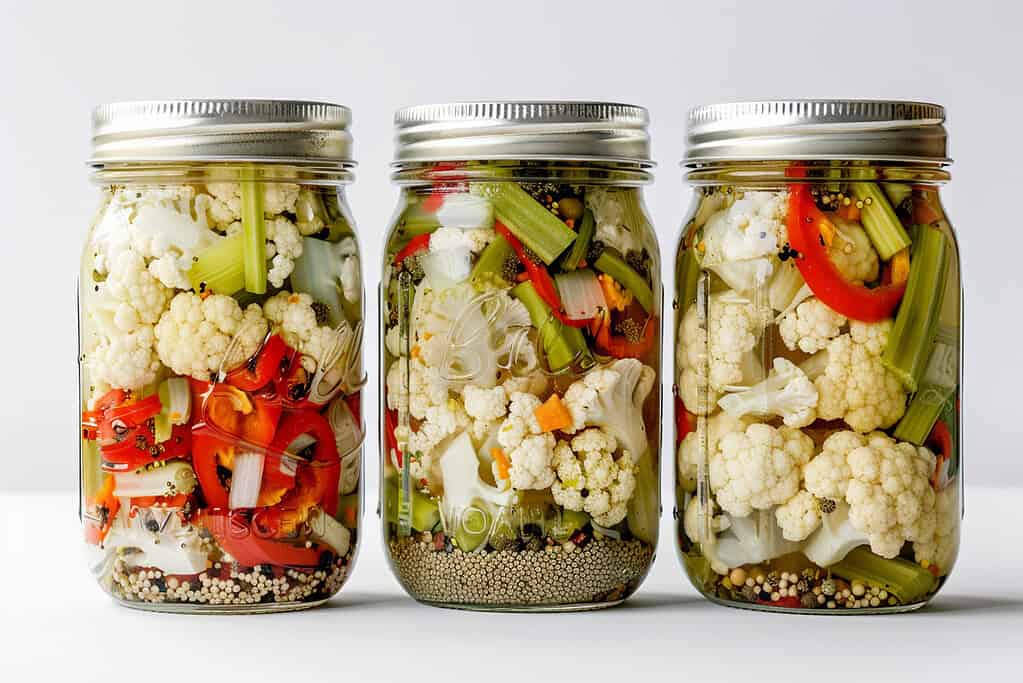
Ingredients You'll Need (Yield: about 9 half-pints)

- 12 cups cauliflower florets (1–2 inch pieces)
- 4 cups white vinegar (5% acidity)
- 2 cups sugar
- 2 cups thinly sliced onions
- 1 cup diced sweet red peppers
- 2 tablespoons mustard seed
- 1 tablespoon celery seed
- 1 teaspoon turmeric
- 1 teaspoon hot red pepper flakes
Essential Equipment
Before you get started, make sure you’ve got everything on hand. You don’t need anything fancy—just a few basics from the kitchen.
- 9 half-pint Mason jars (clean, hot)
- Large saucepan (for brine)
- Slotted spoon (for blanching)
- Water bath canner
- Jar lifter, funnel, headspace tool, chopstick/dowel (for air bubbles)
- Lids and bands
Step-by-Step Instructions for Pickling Cauliflower at Home

Making your own pickled cauliflower may seem intimidating, but it’s really just a matter of following a few simple steps in the right order.
The process is straightforward, and once you’ve done it once, you’ll see how easy it is to turn fresh cauliflower into jars of tangy, crunchy pickles.
The key is to keep the proper proportions of vinegar, sugar, and spices, and to blanch the florets before canning. This ensures both safety and great texture. Here’s exactly how to do it.
1. Prep the Cauliflower

Start by washing your cauliflower thoroughly under cool running water. Cut the head into 1–2 inch florets, discarding leaves and any tough stem pieces.
Bring a large pot of salted water (4 teaspoons canning salt per gallon) to a rolling boil. Add the cauliflower florets and blanch them for 3 minutes.
This brief cooking step helps kill bacteria, keeps the texture crisp-tender, and prepares the vegetable for pickling. Once blanched, drain the cauliflower and allow it to cool while you prepare the brine.
2. Make the Pickling Solution
In a large, heavy saucepan, combine the white vinegar, sugar, sliced onions, diced sweet red peppers, mustard seed, celery seed, turmeric, and red pepper flakes.
Bring the mixture to a boil, stirring occasionally to dissolve the sugar. Once boiling, reduce the heat and let it simmer for 5 minutes.
This step allows the spices, onions, and peppers to release their flavors into the brine, creating a rich base that will infuse the cauliflower.
3. Pack the Jars
Using hot, clean half-pint jars, divide the cooked onion and pepper pieces evenly among them.
Pack in the cauliflower florets, arranging them so they fit snugly but without crushing.
The tighter the pack, the less the vegetables will float once the brine is added.
4. Add the Brine
Carefully ladle the hot pickling solution into the jars over the cauliflower, leaving ½ inch of headspace at the top.
This small space is necessary to allow for proper sealing during canning. Slide a chopstick or non-metallic utensil around the inside edge of each jar to release trapped air bubbles.
Top off with additional brine if needed, keeping that ½-inch headspace. Wipe the jar rims clean with a damp towel, then place the lids and bands on until fingertip tight.
5. Process in a Boiling Water Bath
Place the filled jars into a prepared boiling water bath canner, making sure the water covers the jars by at least one inch.
Bring the water back to a full boil, then start your timing:
| Style of Pack | Jar Size | 0 – 1,000 ft | 1,001 – 6,000 ft | Above 6,000 ft |
|---|---|---|---|---|
| Hot | Half-pints, Pints | 10 min | 15 min | 20 min |
This heat processing step is essential – it ensures a safe seal and preserves the cauliflower for long-term pantry storage.
If you’re new to canning, you can learn more about water bath canning and how to master this technique for safe preservation.
6. Cool and Store
When processing is complete, carefully lift the jars out of the canner using a jar lifter. Place them on a towel-lined counter, leaving space between jars, and let them cool undisturbed for 12–24 hours.
As they cool, you should hear the satisfying “ping” of the lids sealing. After a full day, check each lid: if the center is flat and doesn’t flex, the jar is sealed.
Label, date, and store your jars in a cool, dark pantry for up to 12 months. Any unsealed jars should be refrigerated and eaten within 2 months.
Best Storage Practices

Once your jars have cooled and sealed, they are ready for storage. Properly processed jars of pickled cauliflower are shelf-stable and can be kept in a cool, dark place such as a pantry or cupboard.
For best canned food storage, avoid storing them in direct sunlight or near heat sources, as this can shorten their shelf life.
For the best flavor and texture, use your canned pickled cauliflower within 12 months. The jars may remain safe beyond this if the seals hold, but quality begins to decline after a year.
Always inspect a jar before opening:
- Check that the lid is still firmly sealed (the center should be concave and not flex when pressed).
- Look for signs of spoilage such as a broken seal, cloudy brine, mold, or an off odor.
If you notice any of these, discard the contents without tasting. When handled and stored correctly, your jars of pickled cauliflower will be a safe, flavorful pantry staple to enjoy throughout the year.
How to Solve Common Pickled Cauliflower Problems

Even when you follow the recipe carefully, you may encounter small issues during or after canning. Most of these are easy to understand and address. Here are the most common things to watch for:
1. Jars Didn’t Seal
Sometimes a jar won’t seal after processing. This can happen if the jar rim wasn’t wiped clean, if there was too much headspace, or if the lid was faulty.
- Fix: Refrigerate any unsealed jars immediately and use within a few weeks. Do not attempt to reprocess jars that failed to seal.
2. Cloudy Brine
A little sediment from spices is normal, but cloudy brine can be a warning sign. Cloudiness may result from using table salt (which contains additives), but it can also indicate spoilage.
- Fix: If you used pickling salt and the brine is still cloudy, discard the jar. Never taste food from a jar that looks spoiled.
3. Floating Cauliflower
It’s common for cauliflower florets to float a little after processing, especially if they weren’t packed tightly.
- Fix: Not a safety issue. Over time, the pieces often settle. For best results, pack jars snugly without crushing the florets.
4. Cauliflower Turns Pink or Discolors
Color changes can sometimes occur due to reactions between the vinegar, spices, and natural pigments in the cauliflower.
- Fix: As long as the seal is intact, the brine is clear, and the smell is normal, the cauliflower is safe to eat. If you see mold, off odors, or cloudiness, discard the jar.
5. Not Enough Brine to Cover the Vegetables
If the cauliflower isn’t completely covered, it may spoil.
- Fix: Always prepare the full amount of brine and pack jars tightly to avoid air pockets. Make extra brine if needed, keeping the proportions the same.
Start Small, Pickle a Jar, and See What You Like
I hope this guide gives you the confidence to try canning your own pickled cauliflower at home.
It’s such a simple way to capture fresh flavor and have something tangy and crunchy waiting on your pantry shelf.
By following the steps carefully, you’ll end up with jars that are safe, delicious, and ready to enjoy all year long.
Have you tried making pickled cauliflower before? Or do you have a favorite spice combination you like to add?
I’d love to hear your tips and experiences – so be sure to leave a comment down below and share your canning story!
FAQs
1. Do I really need to blanch the cauliflower first?
Yes. Blanching the florets in boiling salted water for 3 minutes is an important step. It helps preserve texture, removes surface bacteria, and prepares the cauliflower for safe pickling and canning.
2. What type of vinegar should I use?
Always use vinegar labeled 5% acidity. White vinegar gives a classic flavor and keeps the brine clear, while apple cider vinegar adds a slightly sweeter, richer taste. Do not use vinegar with lower acidity (like some rice or wine vinegars) unless the label clearly states 5%.
3. How long will sealed jars last?
When processed and sealed properly, jars of pickled cauliflower will keep their best quality for up to 12 months in a cool, dark pantry. After that, they may still be safe if sealed, but flavor and texture decline.
4. How can I tell if a jar has spoiled?
Before opening, check that the lid is concave and does not flex when pressed. Once opened, discard immediately if the brine is cloudy, moldy, foamy, or has an off smell. When in doubt, throw it out.
5. Can I adjust the sugar or vinegar amounts in the brine?
No. For safety, the vinegar-to-water ratio and sugar content must stay the same as written in the recipe. You can adjust spices like mustard seed, celery seed, garlic, or red pepper flakes to suit your taste, but never change the acid or sugar levels.