Growing your own peas can be incredibly rewarding – and it doesn’t have to be hard. In fact, with the right approach you can grow more peas with less work.
This guide will show beginner and busy gardeners how to cultivate snap peas (and other pea types) easily, even in small spaces like raised beds or containers.
We’ll focus on sugar snap peas for their ease and high yield, while also touching on snow peas and garden peas for variety.
You’ll learn the best low-maintenance methods (including raised beds, container gardening, and even a bit about no-dig techniques) to get a bountiful pea harvest with minimal effort.
Why Grow Peas? Benefits of Snap Peas for Busy Gardeners

Peas are one of the most beginner-friendly vegetables you can grow. Both bush and pole varieties of snap peas are easy to grow – great for beginning gardeners.
Snap peas in particular offer multiple advantages for busy or first-time gardeners:
- High Yield, Low Effort: Snap pea plants tend to produce an abundance of pods over the season, especially if you keep picking them. Many snap pea varieties are known for their excellent flavor and high yield. With continuous harvesting, the plants will keep flowering and producing new peas, giving you more produce for little work.
- Edible Pods (No Shelling!): Unlike regular garden peas, snap peas and snow peas have tender, edible pods. This means no tedious shelling is required – you simply eat the whole pod, which is perfect for busy gardeners who want to skip extra steps. Snap peas are sweet and crunchy, great for snacking right off the vine.
- Beginner Friendly: Pea plants are quite forgiving. They need less fertilizer than many other crops and can even help enrich your soil by fixing nitrogen as they grow (peas are legumes that partner with soil bacteria to convert atmospheric nitrogen into natural fertilizer in the soil). This natural fertilizing ability means you don’t need to fuss with heavy feeding schedules.
- Small Space & Vertical Gardening: If you’re short on space or time, peas are ideal. Snap peas can be grown in compact areas and will climb vertically if given support. A pot on a balcony or a small raised bed can yield plenty of peas by growing upward using a trellis or stakes. Vertical growth not only saves space but also makes harvesting easier.
- Cool-Season Champion: For busy homeowners, peas fit into the cooler parts of the year when the garden might be less demanding. They thrive in spring and fall, allowing you to get a crop in the shoulder seasons. This is perfect for temperate climates where summers get busy or too hot for some veggies.
Overall, snap peas hit the sweet spot for ease and productivity. They’re a low-maintenance crop with big returns, aligning perfectly with the “grow more with less work” philosophy.
Best Pea Varieties for Effortless Gardening
When it comes to growing peas effortlessly, variety matters. Here’s a quick rundown of pea types and which to choose:
Sugar Snap Peas

The star of this guide, snap peas are a sweet pea with crisp, edible pods. You eat them whole, pod and all. Snap peas are the best all-around choice for beginners – they are productive, tasty, and easy.
For example, the variety ‘Sugar Ann’ is a popular bush snap pea that is compact, high-yielding, and easy to grow, perfect for containers or small beds.
Pole varieties like the classic ‘Sugar Snap’ or ‘Super Sugar Snap’ can climb 6+ feet and produce over a longer period.
Giving them proper support helps keep plants healthy and productive, and using one of the best trellises for sweet peas can improve airflow, reduce disease, and make harvesting far easier.
Snow Peas

These also have edible pods but are flat in shape. Snow peas are harvested when the peas inside are still small (the pods will be almost flat).
They are similarly easy to grow and require no shelling. Snow peas tend to have shorter vines (though some climb) and are great for stir-fries and salads.
They offer variety in your garden with minimal extra effort.
Garden Peas (Shelling Peas/English Peas)
These are the traditional peas that you shell to eat the round peas inside. Garden peas can be very sweet and flavorful, but they do require the extra work of shelling pods.
For an effortless garden, you can grow shelling peas if you enjoy them, but remember you’ll need to remove the peas from pods at harvest.
Shelling pea plants (English peas) come in bush or climbing varieties too, just like snap peas.
Bush vs. Pole Varieties
Bush types of peas grow about 2–3 feet high and often produce their crop all at once over a short period.
They can often stand without much support (though some short stakes can help) and are excellent for containers and small spaces.
Pole types (vining peas) grow tall (6–8 feet for pole snap peas) and produce pods continuously over a longer season, but they need a trellis or support to climb.
For effortless gardening, bush peas (like ‘Sugar Ann’ or ‘Cascadia’) are convenient because they don’t require elaborate supports, whereas pole peas (like ‘Super Sugar Snap’) give larger harvests over time if you’re willing to set up a trellis.
Disease-Resistant Varieties
If you want truly low-maintenance peas, look for varieties described as disease-resistant in seed catalogs.
For instance, ‘Cascadia’ snap pea is noted to resist common pea diseases, meaning less chance of issues like powdery mildew slowing you down.
Tip: When buying pea seeds, you might encounter some that are sold pre-treated with inoculant or fungicide (to improve germination in cold soil).
If you prefer organic gardening, you can buy untreated seeds and optionally dust them with a legume inoculant (rhizobia bacteria) yourself.
Inoculant isn’t required, but adding rhizobia can help peas thrive if they’ve never been grown in that soil before – it’s an easy step that can boost your plants naturally.
When and Where to Plant Peas
Peas are a cool-season crop, which means they grow best in the cooler parts of the year.
Whether you’re in a temperate region or a warmer climate, timing is key for an effortless pea-growing experience:
Plant in Early Spring or Late Summer
In most areas, the easiest time to grow peas is in early spring, as soon as the ground is thawed and workable.
Don’t wait for hot weather – peas need about 60 days to mature and will stop producing once temperatures regularly exceed ~85°F.
Getting them in the ground early ensures they mature while it’s still cool.
In temperate climates (USDA zones 3–8), sow peas in late winter to early spring (often 4-6 weeks before your last frost date).
For a fall crop, you can plant again in late summer (e.g. mid to late August) so peas grow as the weather cools in fall.
USDA Zones 3–10
Peas can be grown in a wide range of zones; it’s all about catching the cool seasons.
In colder zones (3-5), spring comes late but you have mild summers – plant as early as you can in spring and you might also do a midsummer planting for fall. In mid zones (6-7), spring and fall are both great pea seasons.
In warmer zones (8-10), you’ll likely grow peas as a late winter or very early spring crop, and again in fall/winter.
For example, in parts of Oregon’s Willamette Valley (zone 8), peas are planted February–April for a spring harvest, and again in August for a fall harvest.
In hot summer areas like the U.S. South (zone 9/10), aim to have peas mature by late spring, or plant in fall so they grow through winter.
Cool Soil and Frost
Pea seeds germinate in cool soil (ideal soil temps are around 45–65°F).
You can sow them as soon as soil can be worked in spring – peas actually prefer cool soil and even tolerate light frosts on young plants.
Don’t be alarmed if there’s an odd late frost; small pea plants usually survive a light frost with minimal issues.
(If a hard freeze is forecast when your peas are flowering, throw a row cover or sheet over them for the night.)
Sunlight Needs
Full sun is ideal for highest yields, but peas are somewhat shade-tolerant.
In fact, in very warm climates, planting peas where they get a bit of afternoon shade can help extend their season by keeping them cool.
Aim for at least 6 hours of sun; in hot regions, 6 hours of morning/midday sun and then afternoon shade can prevent heat stress.
Temperature and Moisture
Peas love mild weather. They flourish with daytime temperatures between roughly 55°F and 75°F. Once steady heat arrives (80s and above), pea plants often start to dry up or stop flowering.
That’s why timing is vital. Make use of spring rains – peas often won’t need much extra watering in a cool, wet spring.
Conversely, in a dry spring, you’ll need to ensure they get moisture (more on watering later, but peas typically need about an inch of water per week if nature doesn’t provide it).
By aligning your planting time with the natural cool seasons and providing the right sun exposure, you set yourself up for a thriving pea crop with minimal intervention.
Remember: plant early, harvest before high heat, and consider a second planting for fall if your climate allows. This way, you make the most of peas’ preferred weather windows.
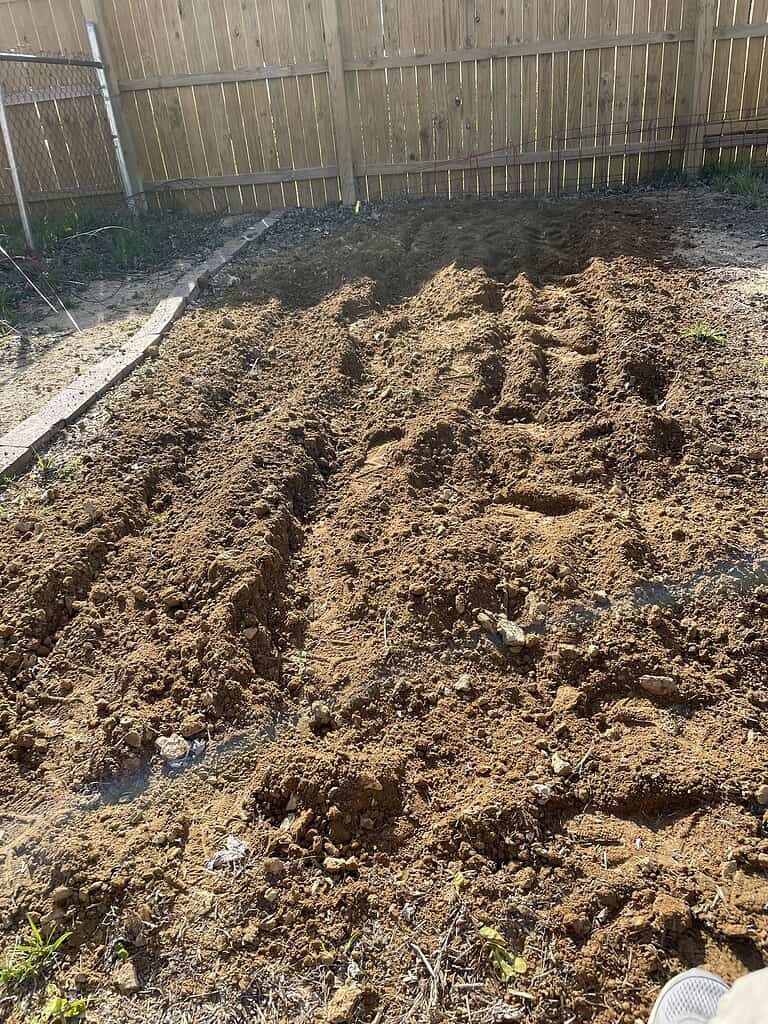
Preparing the Soil and Garden Bed
One key to effortless gardening is setting up a great environment for your peas from the start.
Proper soil preparation and choosing the right growing spot (raised bed, container, etc.) will minimize problems later on:
Raised Beds
If you have the option, use a raised garden bed for growing peas. Peas tend to grow best in raised beds because the soil drains well and warms up faster in spring.
Good drainage is important because peas won’t thrive in soggy, waterlogged soil.
Raised beds also make for easier maintenance – less bending for you, and fewer weeds (especially if you start with weed-free soil mix).
Container Gardening
No garden bed? No problem. Peas do very well in containers, which is great for small-space gardeners on patios or balconies.
Use a large pot (at least 5 gallons or about 12 inches deep and wide) so the soil doesn’t heat up too quickly and has room to stay moist. Ensure the container has drainage holes.
You can plant several pea seeds in a roomy pot – for example, in a 12-inch wide pot you might plant 6-8 peas evenly spaced.
Tip: Light-colored containers stay cooler in sun than dark ones. And remember, container peas will need a small trellis or support (we’ll cover trellising soon).
Soil Composition
Peas aren’t very fussy about soil type as long as it’s well-draining. They can grow in sandy soil or clay soil that’s been amended – but they perform best in rich, loamy soil with lots of organic matter.
Before planting, mix in some organic compost or well-rotted manure into your soil or container mix. This improves fertility and drainage.
Aim for a soil pH around neutral (6.0 to 7.5 is fine), though peas tolerate slightly acidic soil too.
Fertilizer (Keep It Light and Organic)
Avoid heavy synthetic fertilizers for peas. Do not use high-nitrogen fertilizers, as too much nitrogen will result in lush green foliage but poor flowering and pod production.
Because peas can make some of their own nitrogen, they usually only need a gentle feeding.
An initial dose of organic fertilizer (like an all-purpose garden-tone or fish emulsion) at planting time is plenty, or just rely on the compost you added.
Over-fertilizing peas is truly unnecessary and even counterproductive. This is good news for the lazy gardener – less fertilizing work to do!
No-Dig Approach (Optional)
If you’re embracing a low-work gardening style, you might try no-dig gardening for your pea bed.
This method means you don’t till or turn over the soil at all. Instead, you simply spread a layer of rich compost (and other organic material) on top of your bed.
Using compost made with the Berkeley method, which is a fast, hot composting technique, ensures your compost is nutrient-rich, weed-free, and ready to feed your peas efficiently.
This creates a nutrient-rich top layer to plant in, and it smothers weeds – all without back-breaking labor.
The no-dig method has been shown to maximize output while minimizing labor, aligning perfectly with the idea of effortless gardening.
Simply rake the compost smooth and plant your pea seeds directly into it. The underlying soil stays undisturbed, which keeps soil life happy and reduces weeds and maintenance.
…
By preparing a raised bed or container with good soil and compost, you’re setting the stage so that your peas practically grow themselves.
A little prep now means less work later: you won’t need to constantly feed or fuss over the plants. They’ll have everything they need from day one.
Planting Peas: Step-by-Step Guide
Once your site and soil are ready, planting peas is quick and simple. Here’s a step-by-step to get your peas in the ground (or container) with minimal effort:
1. Soak Seeds (Optional)
The night before planting, soak your pea seeds in water for 8-12 hours. This can speed up germination by softening the seed coat.
While this step isn’t strictly necessary, many gardeners find it helps peas sprout a bit faster. If you’re short on time, you can skip soaking and sow dry seeds – they’ll germinate, just a few days later.
2. Plant at the Right Time
As discussed, aim for early spring as soon as soil is workable, or late summer for a fall crop. There’s no need to start peas indoors; they do best when direct-sown where they will grow.
3. Sow Seeds at Proper Depth and Spacing
Plant pea seeds about 1 inch deep in the soil. A simple way is to poke holes or a trench about an inch deep with your finger or a stick.
Drop in the seeds. Spacing: If planting in rows, place seeds roughly 2 to 4 inches apart in the row.
If you have multiple rows, keep about 18 inches between rows of tall peas (so you have room to walk or put a trellis) or around 8-12 inches between rows of bush peas.
You can also plant peas in a wide block or cluster rather than single file – in a container, for example, you might plant them in a circle near the pot edges (each seed ~2-3 inches from the next).
Don’t stress too much about perfect spacing; peas are fairly forgiving. You can always thin later if they’re too crowded.
4. Provide Support While Planting

If you’re growing pole (vining) peas, it’s best to put your supports or trellis in place at planting time. That way you won’t disturb the roots later.
For a row in a garden bed, push in some bamboo stakes or wood stakes at each end of the row and attach garden twine or netting between them for a simple trellis.
Or use a premade pea netting supported by poles. In a container, you can insert a small trellis or even an upside-down tomato cage right after planting.
Bush pea varieties may only need a short support or none at all, but a couple of twiggy branches stuck in the ground can help even bush peas stay upright (and it takes only a minute to do).
5. Cover and Water
Push the soil back over the seeds to fill in the planting holes/trench about an inch. Pat the soil gently to ensure good contact with the seeds. Then water the area thoroughly.
A nice deep watering will settle the soil around the seeds and kickstart germination.
Moving forward, keep the soil evenly moist during the germination period (peas typically sprout in ~1–2 weeks, faster in warm soil, slower in very cold soil).
6. Label and Wait
Mark your pea planting with a label or stake (to remember the variety or just so you know where you planted).
Now, simply wait for the little sprouts to appear! Peas often germinate reliably; you should see sturdy little green shoots within 7-14 days, weather depending.
That’s it. Planting peas is truly straightforward. By following these steps, you’ve set up your pea crop with minimal fuss. The seeds will do the rest of the work underground until they pop up.
While you wait, you can prepare your trellis (if you haven’t already) or get other garden tasks done. Peas practically plant themselves once you’ve sown the seeds!
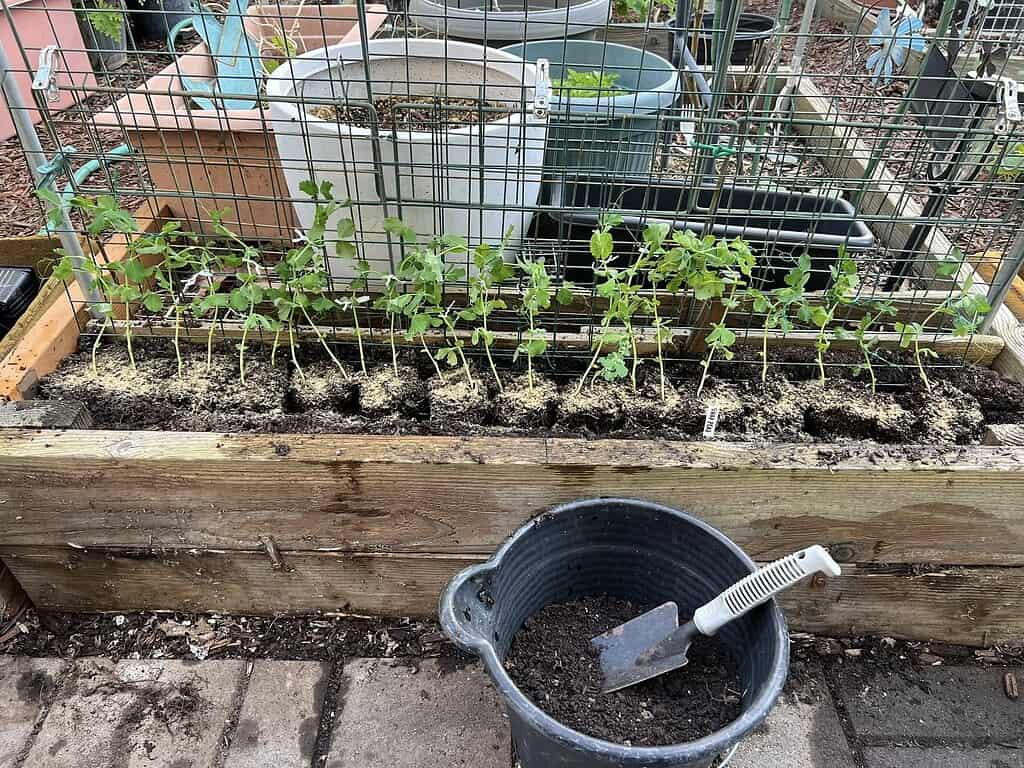
Supporting Pea Plants with Trellises Made Easy
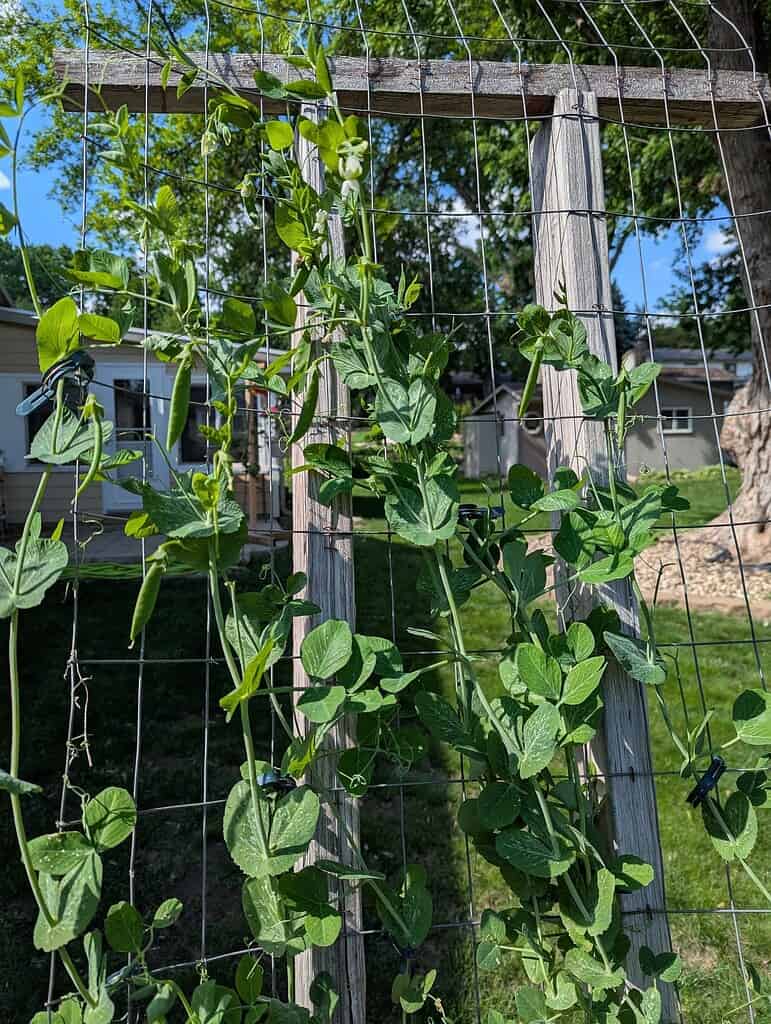
As your pea seedlings grow, the taller varieties will soon start looking for something to climb.
Providing a trellis or support is important for pole snap peas and many snow peas, and even bush peas will appreciate a little boost.
But don’t worry – supporting peas can be very simple and low-cost:
Peas can even be grown in a container using a simple makeshift trellis (in this case, an upside-down tomato cage) for the vines to climb.
Why Trellis?
Climbing peas naturally want to latch onto something with their tendrils.
Giving them a trellis keeps the vines off the ground, which prevents rot and pests on the pods, and makes harvesting much easier (no bending to the ground to find peas).
Trellised peas also get better airflow, reducing disease risk.
Simple Trellis Ideas
You don’t need an expensive setup. Peas are lightweight vines, so the support doesn’t have to be super heavy-duty.
Some easy trellis options include:
- Twine or Netting: Drive a 6-8 foot stake into the ground at each end of your pea row and tie garden twine between them every few inches up, creating a ladder of string for peas to climb. Or, staple some plastic or nylon garden netting to wooden stakes. The peas will grab onto the string or netting with ease.
- Bamboo or Branches: Push a bunch of bamboo canes or bushy branches (like trimmed tree branches) into the soil among the pea plants. This creates a thicket of supports. Pea tendrils will wrap around the thin twigs as they grow. This method is sometimes called a pea brush or pea stakes – it’s traditional and requires zero tying. Just stick sticks in the ground!
- Fence or Mesh Panel: If you have an existing fence, plant peas along it and they’ll climb up. Or use a section of wire mesh or a premade folding pea trellis from the garden center – these can simply be placed in the row.
- Container Supports: For peas in pots, an upside-down tomato cage can be a perfect instant trellis. Place the wide ring of the tomato cage at the top (so it acts like a teepee) and poke the narrow end into the pot – the pea vines will climb the cage. A tripod of three bamboo sticks tied at the top can also form a mini teepee trellis in a container.
Trellis Height
How tall should it be? For pole peas that can reach 6-8 feet, provide as much height as you can – a 6-foot trellis is good, and the vines may flop over the top a bit after reaching the top.
For bush peas (~3 feet tall), a 3-4 foot support is plenty; often just some twiggy sticks will do. If using netting or string, you can stop at 3 feet high for bush types.
Training the Vines
Pea tendrils usually find the support on their own and start climbing.
But if you notice long stems flopping, you can gently lift them and tuck them into the trellis or loosely tie a soft garden tie to guide them.
This little nudge early on is often all that’s needed. After that, the peas will happily climb upward, which means they’re using vertical space efficiently and not sprawling all over your garden.
Providing supports for peas might be the most “work” you do for this crop, but it pays off with cleaner, more productive plants.
And as you can see, it doesn’t have to be complicated – even a few sticks or strings can serve as a handy trellis.
Once the trellis is up, your peas will take care of the climbing, and you can sit back and watch them reach for the sky.
Low-Maintenance Care: Watering, Weeding, and Mulching Tips
One of the joys of growing peas is that, compared to fussier vegetables, they don’t demand much upkeep. That said, a bit of smart care will ensure you truly get more peas with less work:
Watering
Peas prefer consistent moisture, especially during flowering and pod formation. In many regions, peas grow during the rainy part of the year (spring), so you may not need to water them very often.
Check the soil moisture: it should stay damp but not waterlogged. Aim to provide about 1 inch of water per week (including rainfall).
If you have an unusually dry spring or you’re growing in containers, monitor closely – container peas might need watering a few times a week since pots can dry out faster.
Pro tip: Water at the base of the plants (soil level) rather than spraying the foliage. Keeping leaves dry helps prevent diseases like mildew. Early morning watering is best so any splashes dry quickly.
Mulching
To cut down on watering and weeding, apply a layer of organic mulch around your pea plants once they’re a few inches tall.
Use things like straw, grass clippings, shredded leaves, or compost. A 3–4 inch layer of mulch helps retain soil moisture and suppress weeds – meaning less work for you in both watering and weeding.
Mulch also keeps the soil cool as temperatures rise toward summer, which peas appreciate.
Weeding
Peas don’t like competition from weeds (especially when young). Before planting, it’s good to remove any big weeds in the bed.
After planting, if you mulched, you’ve already prevented most weeds.
Any that do pop through should be shallowly removed by hand or with a hoe – remember, pea roots are near the surface, so avoid deep hoeing that could disturb them.
The good news is peas grown closely can form a leafy canopy that shades out many weeds on their own. So a well-planted patch of peas kind of takes care of itself after the initial weed removal.
Fertilizing
As mentioned, peas don’t require much feeding. If you prepared your soil with compost, you likely won’t need to add fertilizer during the season.
Over-fertilizing (especially with nitrogen) can harm your yield. If your plants look a bit pale or stunted (which is rare), you could side-dress with a balanced organic fertilizer or a dose of fish emulsion.
But in most cases, no extra fertilization is needed for peas – they are efficient growers. In fact, at season’s end, the pea roots will have added natural nitrogen to your soil for the next crop!
Pest and Disease Management
Peas are relatively trouble-free in the cooler weather. Still, keep an eye out for a few potential issues:
Slugs/Snails
These critters love tender pea seedlings. If slugs are common in your area, consider using iron phosphate slug bait or laying out grapefruit rinds or beer traps to catch them. Mulch like straw can sometimes give slugs hiding spots, so be vigilant if it’s wet.
Birds
Birds sometimes pluck at young pea shoots. If you notice this, you can cover the seedlings with lightweight bird netting until they get a bit bigger (birds usually lose interest once plants are sturdier).
Aphids
Occasionally aphids might cluster on pea shoots. A quick spray with the hose can knock them off, or you can squish them by hand. Ladybugs, if present, will also feast on them.
For more tips, check out effective ways to get rid of aphids naturally to protect your peas without chemicals.
Powdery Mildew
In late spring, as weather warms, peas can get a white powdery fungus on leaves. This is common as the plants are nearing their end.
To minimize it, ensure good airflow (trellising helps) and avoid overhead watering. If it appears, don’t worry – just harvest what you can. You can also look for mildew-resistant pea varieties next time.
…
In general, peas won’t occupy a lot of your time with care tasks.
By watering deeply but infrequently, mulching to maintain moisture, and doing minimal weeding, you’ll find that your pea patch largely takes care of itself.
This makes peas an ideal crop for busy homeowners or anyone looking for a low-maintenance garden. A little attention here and there will reward you with lots of crunchy peas in return.
Harvesting Peas and Maximizing Your Yield

Harvest time is the payoff for your minimal efforts – and peas make it easy.
Here’s how to harvest and even extend your bounty:
When to Harvest
Snap peas are ready to pick when the pods are plump and about as thick as your finger, but not yet bulging with oversized peas.
You want the peas inside to have filled out the pod nicely, but if you wait until the peas bulge out too much, the pod can get tough and starchy.
A good rule: if the pod snaps cleanly when bent, it’s at a perfect stage (hence the name “snap” pea).
Snow peas should be harvested before the peas inside start to swell – they’ll be flat, tender, and crisp.
Garden (shelling) peas are picked when the pods are well-filled and the peas are round and nearly touching inside, but while the pod is still green (if it starts to yellow, you’re late).
How to Harvest

It’s best to use two hands when picking peas so you don’t yank the vine. Hold the vine with one hand and use the other to pull the pod off, or pinch it off at the stem.
Pea vines can be a bit delicate, so gentle handling keeps the plant intact to produce more. You can also use scissors or garden snips to cut pods off. Harvest in the morning for crispest pods, if possible.
Harvest Often
To maximize yield, keep picking pods every day or two during peak production. The more you pick, the more the plant will try to produce new flowers and pods.
If pods are left to mature fully on the plant, the plant gets a signal to slow down (it thinks it’s done its job of making seeds).
So, regular harvesting = more peas over a longer period. This is one of the easiest “tricks” to get more from your peas with almost no extra work – just keep enjoying them!
Storing the Harvest
Peas are best eaten fresh, when they’re sweetest. However, if you have a big haul, refrigerate peas soon after picking.
For snap peas, put them in a container or plastic bag with some ventilation, and they’ll keep about 5–7 days in the fridge.
You can also blanch and freeze peas (snap or shelling) if you want to store them longer. But with how tasty they are, they might not last that long!
Succession Planting
If you have long cool seasons, you can plant a second batch of peas a couple weeks after the first to extend your harvest window.
In a small garden, another strategy is to plant a fall crop.
For instance, if your spring peas finish by early summer, consider planting more seeds in late summer for a fall harvest once cooler weather returns.
This way you get two rounds of peas in one year – a great yield booster for minimal extra effort. Check out our succession planting chart to plan your plantings perfectly.
After the Harvest – What’s Next
Once your peas have finished producing (you’ll know because the vines start to turn yellow or brown as the heat of summer hits), your work is still minimal.
Don’t rip the plants out by the roots. Instead, cut the vines at soil level and remove the tops (add them to your compost pile).
The roots of pea plants actually add beneficial nitrogen to the soil as they break down. By leaving the roots in place to decompose, you enrich the soil for the next crop without lifting a finger.
You can then plant a new crop in that spot (something that enjoys nitrogen, like leafy greens or brassicas, is a good choice to follow peas).
Enjoy Pea Shoots (Bonus)
If you want to get even more out of your plants, you can pinch off a few tender pea shoots (the top 2–4 inches of the vine) during the growing season.
These pea shoots are edible and delicious in salads or stir-fries.
Snipping a few shoots can also encourage bushier growth. Just don’t overdo it or you’ll reduce your pea yield – take a few from various plants, not all from one.
With these practices, you’ll find that you’ve squeezed the maximum reward from your pea crop with very little exertion.
From the first crunchy pod you eat straight off the vine to the last harvest of the season, growing peas can be a delightfully easy and productive experience.
Ready to Grow More Peas with Less Work?
Growing peas effortlessly is absolutely achievable for anyone – whether you have a sprawling backyard or a small balcony.
By choosing the right pea variety (snap peas for the win!), planting in a raised bed or container with rich organic soil, and giving your plants a simple trellis and some basic care, you’ll be rewarded with a delicious harvest for very little effort.
Peas truly embody the idea of “grow more with less work,” especially when you follow the tips in this guide to leverage nature (cool seasons, nitrogen-fixing, mulching, etc.) to your advantage.
Have you grown peas before, or are you trying it for the first time? Do you have any questions or additional tips on growing peas with ease?
Let us know in the comments below! We’d love to hear about your experiences and any creative “lazy gardening” tricks you’ve discovered. Happy gardening and happy harvesting!
FAQs
Can I grow peas in the summer or hot climates?
Peas don’t tolerate heat well and usually stop producing once temperatures reach the 80s °F.
In warm or tropical climates, it’s best to grow peas during cooler months, such as late fall through winter or very early spring.
Summer growing is possible only in mild areas, with afternoon shade and consistently moist soil, but yields and pod quality may be lower. For easiest success, stick to spring or fall planting.
Do peas need full sun, or will they grow in shade?
Peas grow best in full sun (at least 6 hours daily), which gives the highest yields.
However, they can tolerate partial shade, especially in hotter regions where afternoon shade helps keep plants cool. Avoid deep shade, as it will significantly reduce production.
Should I soak pea seeds before planting?
Soaking pea seeds for 8–12 hours can speed up germination, especially in cool soil, but it’s not required.
Unsoaked seeds will still sprout, just a bit more slowly. If you soak them, don’t exceed 24 hours, and plant immediately afterward.
How tall should my pea trellis be?
Trellis height depends on the pea type. Climbing (pole) peas do best with a 6–7 foot trellis, while bush peas grow only 2–3 feet tall and may not need support at all.
A short trellis or light support can help keep bush peas tidy when loaded with pods.
Do I need to fertilize peas or use an inoculant?
Peas usually don’t need fertilizer if the soil has compost or organic matter. Too much nitrogen can reduce pod production.
Inoculant is optional and mainly helpful in soil where peas or beans haven’t been grown before. Most gardeners get great results by keeping care simple and organic.