Homemade pickled eggs are one of those old-fashioned treats that feel both nostalgic and practical.
They’re simple to prepare, look beautiful on the table, and make for a tangy, protein-packed snack that keeps well in the fridge.
This version uses beets to give the eggs a gorgeous pink hue and a touch of earthy sweetness, making them especially festive in spring or around Easter.
With just a handful of pantry ingredients, you can transform plain hard-boiled eggs into something colorful, flavorful, and ready whenever you want a quick bite.
Why Beet-Pickled Eggs Are Worth Making

Beet-pickled eggs aren’t just pretty to look at – they’re also a smart way to use up extra eggs and beets when both are plentiful.
The beet brine naturally tints the eggs a rosy pink, so you don’t need any artificial dyes.
The flavor only improves with time: tangy from the vinegar, lightly sweet from the beets and sugar, and savory from the salt.
They make a striking addition to a holiday spread, but they’re just as handy to keep in the fridge for quick snacks, salads, or simple lunches.
Love Pickling? This is part of my How to Pickle Everything series! Check out more recipes:
- Quick Pickled Radishes Recipe
- Easy Pickled Beets Recipe
- Homemade Pickled Okra Recipe
- How to Make Pickled Cabbage (Only 20 Minutes!)
- How to Make Pickled Jalapeños at Home
- How to Make Pickled Cucumbers at Home
- Pickled Garlic Recipe
- Easy Pickled Banana Peppers Recipe
- Quick Pickled Carrots Recipe
- How to Make Pickled Asparagus at Home
- How to Make Pickled Ginger (Gari) at Home
- How to Make Pickled Cauliflower
- Crisp Pickled Green Beans Recipe
- Easy Pickled Cherry Tomatoes (No Canning Needed)
Gather Your Ingredients
Here’s everything you’ll need to make a safe, colorful, and wonderfully flavorful batch of beet-pickled eggs – and why each ingredient plays a crucial role:
- 1 teaspoon brown sugar: Brown sugar softens the sharp edge of the vinegar, creating a more balanced, slightly sweet profile that complements the beets.
- 6–12 hard-cooked eggs, peeled: Make sure the shells are clean and intact. Medium-sized eggs work well because their size helps the brine seep in evenly. Fresh eggs are ideal for quality, though slightly older ones peel more cleanly.
- 1 cup canned red beet juice (plus a few small beets or slices, optional): The beet juice is what gives the eggs that beautiful pink hue and adds a hint of earthy sweetness. Using juice from the can ensures a consistent acid level in the brine.
- 1½ cups cider vinegar: This is your acid component – critical not just for taste, but for safety. It helps preserve the eggs and keep harmful bacteria at bay.
Must-Have Equipment for Pickled Eggs with Beets
Making beet-pickled eggs doesn’t require fancy equipment. A few everyday kitchen tools are all you’ll need:
- Medium saucepan – For heating the beet juice, vinegar, sugar, and any spices to make the brine.
- Measuring cups and spoons – Accuracy matters when you’re working with vinegar for pickling, so be sure to measure carefully.
- Mixing spoon – To stir the brine as it heats and dissolves the sugar.
- Clean glass jar with a tight-fitting lid – A quart-size jar works well for 6–12 eggs. Glass is best since vinegar can react with some plastics.
- Slotted spoon or tongs – Helpful for lowering eggs into the jar and removing them later without cracking.
- Bowl of ice water – To cool the hard-cooked eggs quickly, which makes peeling easier.
That’s it – simple tools you likely already have on hand. Once everything’s laid out, the process comes together quickly.
Step-by-Step Process on How to Make Pickled Eggs

Making pickled eggs at home is simpler than you might think. It comes down to boiling the eggs, cooking up a quick beet brine, and letting everything chill together in the fridge.
Here’s exactly how to do it, one step at a time:
Step 1: Hard-Cook and Peel the Eggs
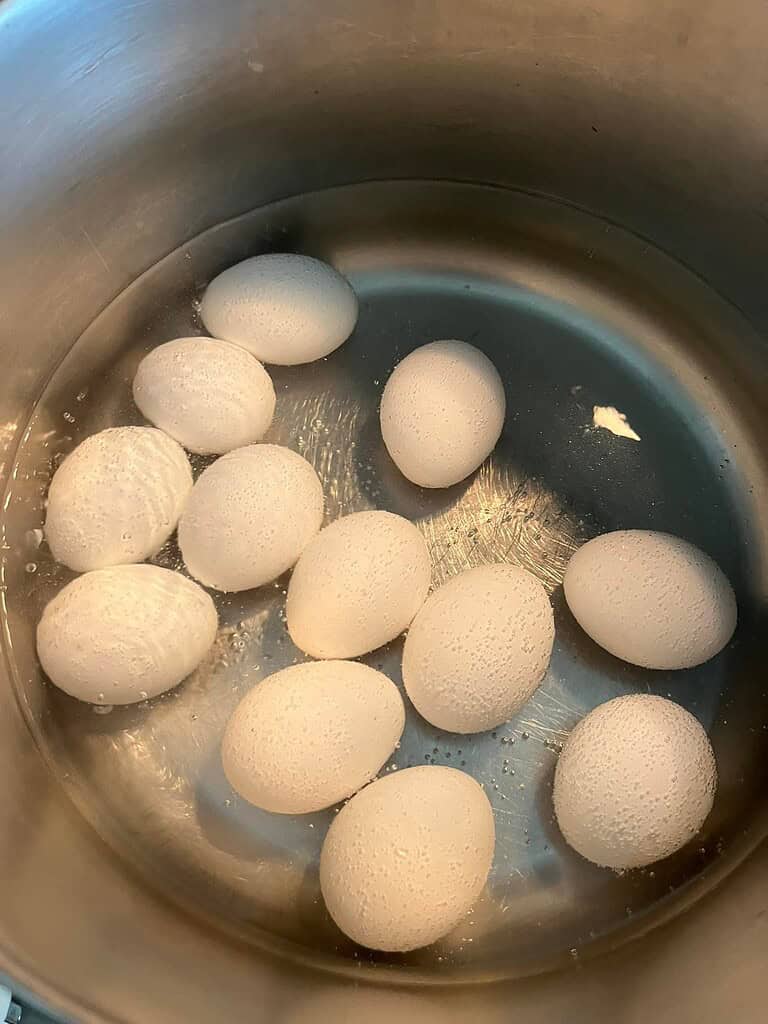
Begin by choosing small to medium eggs with clean, sound shells, since they pickle more evenly and allow the seasoning to penetrate.
Place the eggs in a single layer in a saucepan, cover with cold water, and bring them to a gentle boil. Lower the heat and let them simmer for about 15 minutes.
When they’re done, transfer the eggs immediately to a bowl of ice water to cool quickly. Once cooled, crack the shells all over and peel them carefully under cold running water.
For this recipe, plan on using about a dozen peeled, hard-cooked eggs, which will fit nicely into a quart-size jar.
Step 2: Prepare the Brine
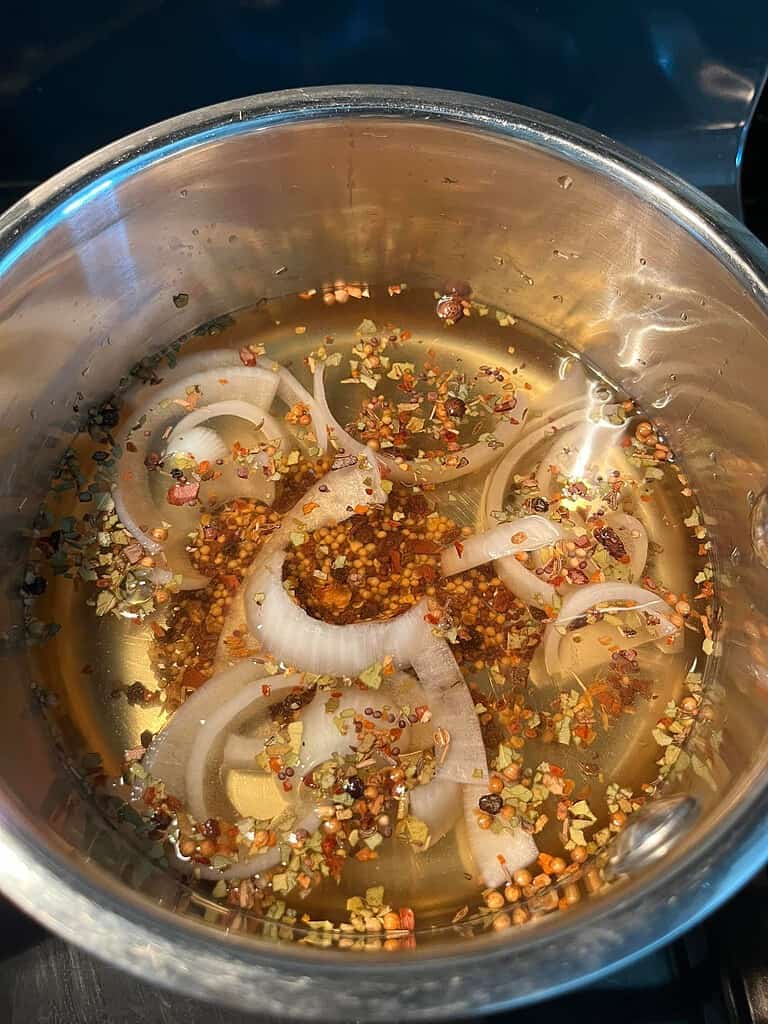
In a medium saucepan, combine one cup of red beet juice from canned beets, one and a half cups of cider vinegar, and a teaspoon of brown sugar.
For added color and flavor, you can include a few whole canned beets or several slices. Bring this mixture to a boil, then reduce the heat and allow it to simmer gently for five minutes.
If you’d like to add spices such as peppercorns, mustard seed, or a bay leaf, stir them in as the brine heats so their flavors have time to infuse.
Step 3: Sterilize the Jar
While the brine simmers, prepare a clean quart-size glass canning jar with a tight-fitting lid. For safety, sterilize the jar and lid by boiling them in water before filling.
This step helps prevent contamination and keeps the pickled eggs safe during storage.
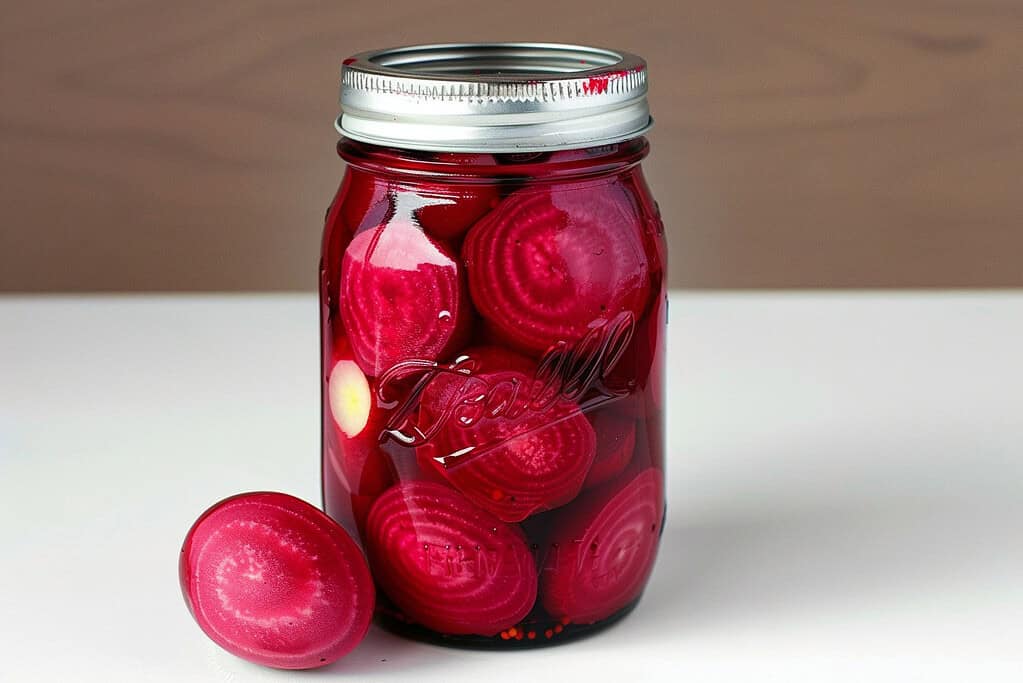
Step 4: Pack the Eggs and Pour the Brine
Place the peeled eggs into the warm, sterilized jar, slipping in a few beet slices if you want a deeper pink hue.
Carefully pour the hot beet-vinegar brine over the eggs, making sure they are completely submerged. Seal the jar tightly with its lid.
Step 5: Refrigerate and Allow to Season
The eggs must be refrigerated immediately – never stored at room temperature.
As they chill, the color and flavor will develop gradually. Smaller eggs typically take one to two weeks to season fully, while medium and larger eggs may need two to four weeks.
For the best quality, plan to use your beet-pickled eggs within three to four months, always keeping them cold in the refrigerator.
How to Store Pickled Eggs Safely (and Keep Them Fresh Longer)
Once your beet-pickled eggs are packed in their brine, the most important step is proper storage. These eggs are not shelf-stable and must be kept in the refrigerator at all times.
Leaving them out at room temperature is unsafe and can lead to serious foodborne illness.
To keep them fresh, make sure the eggs remain fully submerged in the brine inside a clean, tightly sealed glass jar.
Refrigerate the jar immediately after preparing it, and only remove eggs with clean utensils so you don’t introduce bacteria.
Pickled eggs need time to season before they’re at their best. Smaller eggs usually take one to two weeks for the flavor to fully develop, while medium and large eggs may require two to four weeks.
Once seasoned, the eggs will keep their quality for up to three to four months in the refrigerator.
If you notice a cloudy brine, an off smell, or any changes in the eggs’ texture, it’s best to discard the batch and start fresh.
And whenever you serve them, remember to limit their time out of the refrigerator to no more than two hours.
And if you’re also storing other homemade or preserved goods, you might find these canned food storage tips helpful too.
Delicious Ways to Serve Beet-Pickled Eggs
Once your eggs have seasoned in the brine, they’re ready to enjoy. Here are some tasty ideas for serving them:
- Simple snack: Slice in half, sprinkle with salt and freshly ground black pepper, and enjoy straight from the fridge.
- Colorful egg salad: Chop into pieces and mix with mayo, mustard, and fresh herbs for a vibrant twist on the classic.
- Deviled eggs: Use the pickled whites as a striking base for your favorite deviled egg filling—they look especially festive on holiday tables.
- Brunch upgrade: Layer slices on avocado toast and finish with herbs, seeds, or seasoning blends for extra flair.
- Snack board favorite: Pair with cheese, cured meats, olives, and fresh veggies to add tang and color to charcuterie-style platters.
- Salad topper: Slice onto leafy greens or grain bowls to boost both protein and presentation.
Always keep pickled eggs chilled until serving, and return any leftovers to the refrigerator within two hours.
Common Issues (and Helpful Tips) for Pickled Eggs

Even though pickled eggs are simple to prepare, a few small details can make a big difference. Here are some common issues and how to prevent them:
- Eggs that don’t peel cleanly: Very fresh eggs can be tricky to peel. Letting eggs sit for a few days before boiling helps, as does plunging them into ice water after cooking.
- Uneven coloring: Make sure the eggs are fully submerged in the brine. Adding a few extra beet slices can help deepen the color.
- Flavor too strong or too mild: If the vinegar flavor feels sharp, give the eggs more time to mellow in the fridge. If it seems too mild, allow the eggs to season for the full two to four weeks.
- Rubbery texture: Leaving eggs in the brine beyond four months can make the whites too firm. For best quality, enjoy them within that timeframe.
- Cloudy brine or off-odors: Discard the batch immediately if you notice cloudy liquid, unpleasant smells, or changes in texture—these are signs of spoilage. Always use clean utensils when removing eggs from the jar.
Paying attention to these small details ensures you’ll have a safe, flavorful batch every time.
Make a Batch and Keep Them in the Fridge
Pickled eggs are an easy way to add something a little different to your meals without much effort.
With just a few basic ingredients and a little fridge time, you end up with eggs that are full of flavor and color.
Whether you're making them for a quick snack, to liven up a salad, or for a weekend brunch, they’re worth keeping around.
Once you’ve made a batch, you’ll know exactly how you like them – how long to pickle for the color you want, and what (if any) spices to throw in. They’re flexible, simple, and hard to mess up.
Frequently Asked Questions (FAQs)
Can I can pickled eggs for long-term storage?
No. Pickled eggs should never be canned at home. They must be stored in the refrigerator at all times for safety.
How long do pickled eggs last in the fridge?
When kept fully submerged in brine and refrigerated at 40°F or below, pickled eggs stay safe and good quality for up to three to four months.
Do I need to use canned beets, or can I use fresh ones?
For reliable color and consistent acidity, it’s best to use canned beets and their juice. Fresh beets don’t provide the same tested balance of vinegar and acid.
Can I use a different type of vinegar?
Cider vinegar is traditional and provides a mellow flavor, but white vinegar can also be used if you prefer a sharper taste. Do not dilute the vinegar beyond what the recipe calls for—its acidity is what keeps the eggs safe.
Why do the eggs need time before eating?
Pickled eggs need at least one to two weeks (for small eggs) or two to four weeks (for medium or large eggs) in the refrigerator for the flavor and color to fully develop.