There’s something oddly satisfying about watching a squash vine climb – curling up a panel, wrapping around a pole like it knows exactly where it’s going.
And maybe it does. Grown vertically, squash takes up less space, catches more sun, and looks great winding up a trellis.
But it’s not as simple as sticking it in the ground and letting it climb. You’ll need the right setup, the right squash variety, and a little training (for the vines, not you – though maybe both).
Done right, you can harvest up to 40 pounds of winter squash from a 4×4 bed. No kidding.
This article covers it all – from cattle panel arches to trellis-friendly squash varieties, watering tips, and more. Whether you’ve got a big garden or a small balcony, you can grow squash vertically.
Why Grow Squash Vertically?

There are gardeners who swear by it. And there are others who gave it a shot and ended up with a tangled mess of vines, mildew, and regret. So, why trellis your squash at all?
Because when it works, it really works.
Save Space in Small Gardens
Growing squash vertically can save an enormous amount of space, especially if you're working with raised beds, small yards, or balcony setups.
Get Big Yields from Small Spaces
One large trellised plant can yield 20–40 pounds of squash in as little as 16 square feet. That’s no exaggeration – people are doing it.
Improve Airflow and Reduce Disease
It also helps with ventilation. Vines off the ground get better airflow, which (usually) means fewer fungal diseases and less mess to dig through.
Make Pest Control Easier
Pests are easier to spot too – no more flipping leaves like you're playing detective just to find one squash bug.
Harvest Without the Hassle
And harvesting? Much easier. No crawling around on your hands and knees in a jungle of leaves.
It’s not magic. But it is one of the smartest ways to grow heavy, space-hogging plants when horizontal space just isn’t on the table.
Squash Varieties for Trellising

Some squash plants climb like champs. Others… not so much. Choosing the right type makes a big difference especially when you’re counting on vertical growth.
Top Picks for Trellises
- Butternut squash – Reliable, productive, and tough against pests.
- Delicata – Slender, flavorful, and easy to train.
- Tromboncino Rampicante – Great for summer squash fans, and it climbs without complaint.
- Acorn and Spaghetti squash – Manageable size and weight for most trellises.
- Musquee de Provence – Can grow over 20 pounds, but has been trellised successfully without support.
- Chayote, Sweet Dumpling, Pattypan, Cha Cha Kabocha – All solid options if you want to mix things up.
Some squash, like Festival Winter or other semi-bush types, might even climb without being asked. They're not true climbers, but if you give them a structure, they often take the hint.
What to Avoid
Large varieties like Hubbard squash or giant pumpkins are generally too heavy for vertical growing – at least without serious engineering.
If you're dreaming of trellised pumpkins, stick to smaller pie-sized types, or be prepared to get creative with support.
And if you’re working with containers, pick varieties bred for pots. These have compact root systems and are much easier to manage in smaller spaces.
Designing and Selecting a Trellis
This is where things get interesting. Because there’s no one “right” trellis. There are just setups that match your space, your goals, and your level of DIY enthusiasm.
Here are some solid options:
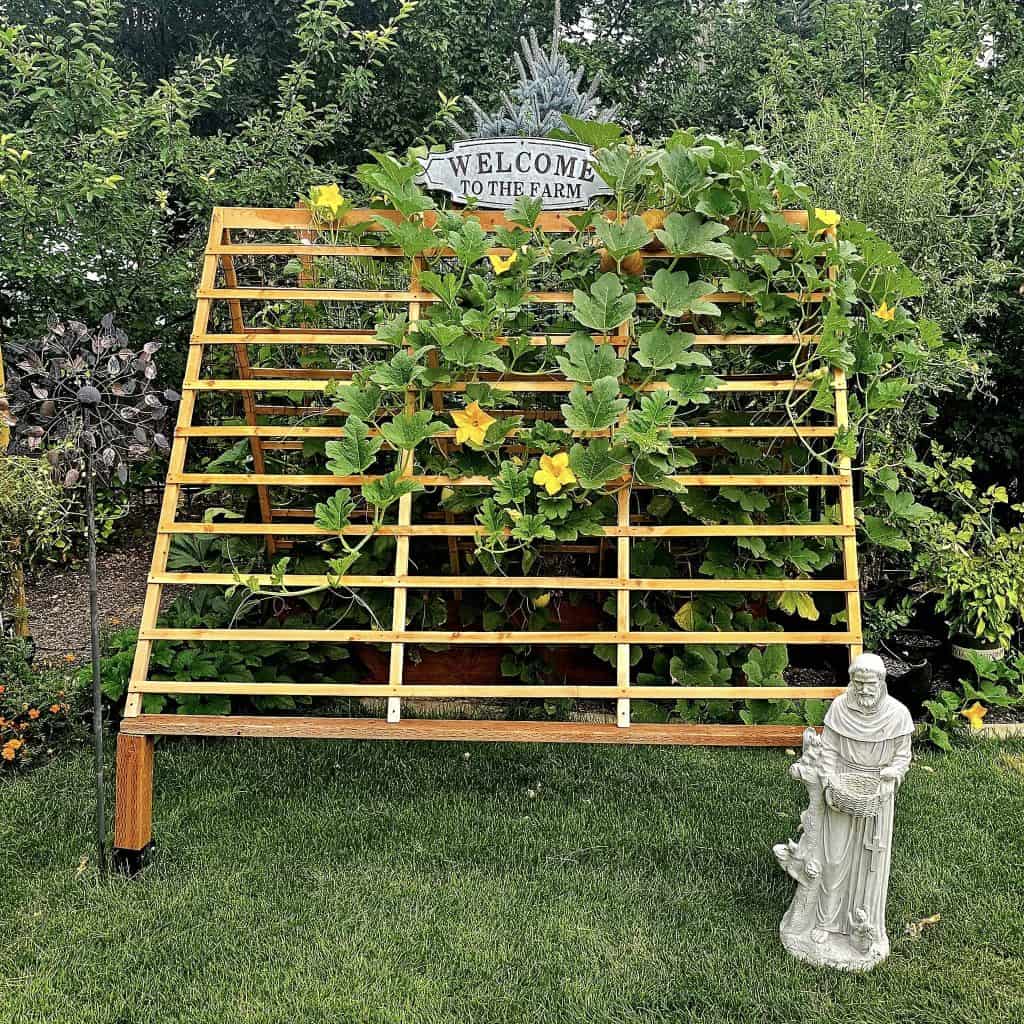
- Cattle panels bent into arches – Surprisingly elegant. Sturdy. Can double as a garden walkway.
- Flat wooden or metal trellises – Simple. Can be leaned against walls or fences.
- Tower or obelisk styles – Best for tight spaces or patios. Bamboo works great here.
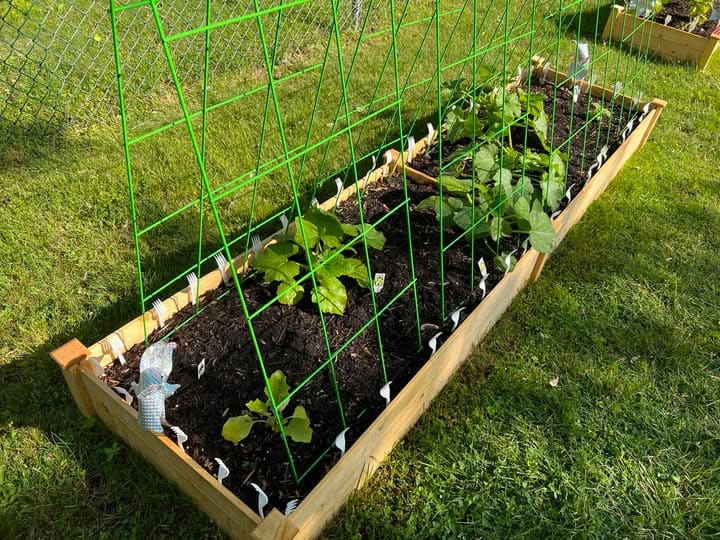
- Trellis netting – Cheap, flexible, surprisingly effective on balconies.
- Rope systems strung between poles – A movable, modular approach if you rotate crops.
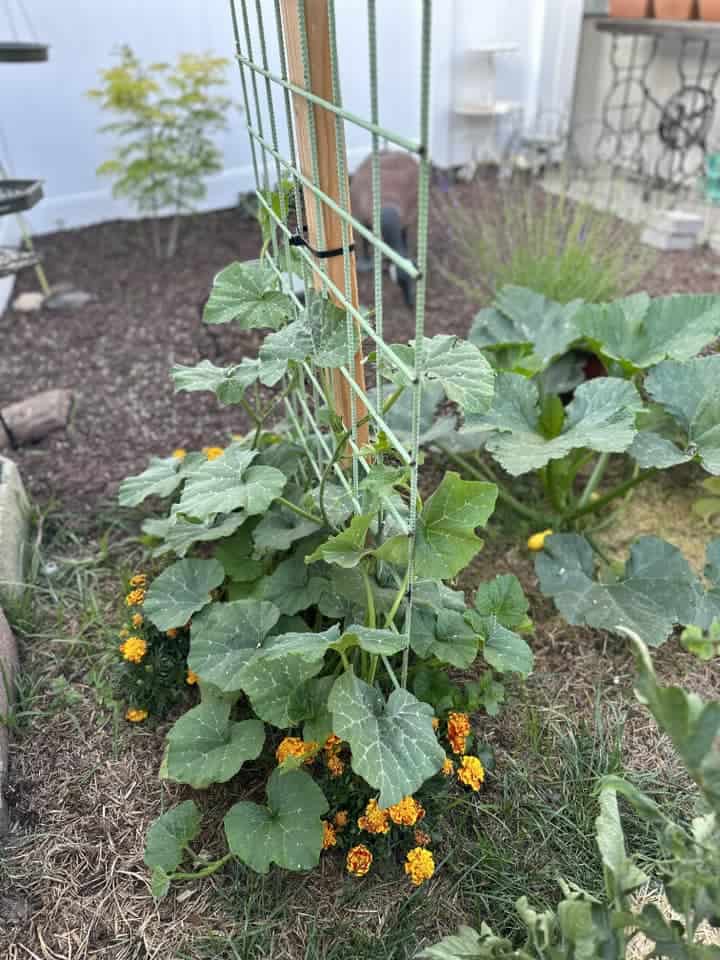
- Welded wire fencing – Durable, but the small holes (2″x4″) can be annoying to thread vines through.
- Chicken wire lean-tos – Good for a 5-foot wall of support in a small patch.
- Even old chain link fences and dollar store trellises tied to wood posts can work if you're creative.
One note: don't wait to install your trellis. Set it up before you plant anything. Trying to wedge poles into a garden bed full of baby squash roots? It’s asking for trouble.
Trellis Setup and Placement
Now that you’ve picked your trellis, where – and how – should you set it up?
First rule: do it early. As in before seeds go in the ground. Trying to pound a t-post next to a growing squash vine is like threading a needle next to a toddler holding scissors. Not worth the stress.
Here's the lowdown on setup:
- If you’re using something like livestock panels cut in half, you’ll want t-posts that are about 6 feet tall. A good chunk of that (around 1 foot) needs to go underground, flange and all.
- Secure the panel about 12 inches off the ground with zip ties or wire. That little gap gives you room for airflow and room to check the base for bugs or borers later on.
- For slanted trellises made with chicken wire, plant along the long edge of your garden space – maybe 3 feet wide – and anchor stakes firmly at that edge.
And don’t forget orientation.
You’ll get the best sun exposure (and airflow) by placing trellises east to west, with the wide face pointed north and south. It’s one of those little details that helps your vines grow straighter, stronger, and less moldy.
Also: if you’re planning to rotate crops next season, choose a setup that’s easy to move or repurpose. You’ll thank yourself later.
Soil Preparation and Fertility
Squash don’t ask for much – except, you know, massive amounts of nutrients, deep soil, and perfect drainage.
They’re heavy feeders with root systems that like to go deep. So if you’re working with raised beds, make sure the soil underneath isn’t compacted. A 6-inch bed sitting on deadpan clay? Not gonna cut it. Loosen and enrich that lower soil too.
What works:
- A thick layer of compost across the whole bed. Every time.
- Organic amendments like feather meal, hen manure, bone meal, kelp, and sulfate of potash. Go ahead and mix it in like you’re making lasagna.
- If you’re in a dry, salty climate – yep, that’s a thing – deep soak the soil (at least 18 inches down) before planting to push salts below root level.
Container growing? Use a high-quality potting mix and liquid fertilizer every two weeks. Organic fish emulsions work, but look for something higher in phosphorus (like 3-4-1) if you want better fruit production.
And if your soil has low CEC (can't hold nutrients well), expect to re-fertilize mid-season, especially if your leaves start to yellow out early.
Planting Squash at the Base of a Trellis
This part is surprisingly easy to mess up.
Spacing is everything. Overcrowd your trellis, and you’ll end up with a jungle of leaves, no airflow, and tiny fruit that never quite ripens.
Here's what to do:
- Plant 3 seeds at the base of each trellis section and thin down to one strong plant.
- For larger trellises (like a 6–7 foot tall cattle panel), one plant per panel is perfect.
- If you're working with an arched trellis (say 8 feet tall by 9 feet wide), you might be able to squeeze in three plants, max.
- Aim for at least 25 square feet per plant for large varieties like butternut.
Vine Training and Pruning Techniques
Vertical squash might sound low-maintenance, but in reality, it’s kind of like managing an overenthusiastic puppy. It needs direction.
Otherwise, it sprawls, tangles, and ends up hogging space you never intended to give it.
Guiding the Vines
Squash vines aren’t natural climbers like pole beans. Their tendrils can latch on, but they won’t hold heavy fruit or keep the plant where you want it. So, early on, you’ll need to step in.
Start by selecting six to eight strong vines from each plant. These will be your main climbers.
As they grow, help them weave through the trellis or secure them loosely with something soft like flagging tape. Wire or rough ties? Avoid them – they’ll cut into the stems.
Keeping Growth in Check
As the plant grows, prune off all the other vines at the base. Anything sprouting at leaf joints – the side-shoots – should go too. Letting them run wild will only crowd the trellis and reduce airflow.
Each main vine can be allowed to grow about six to eight feet. Past that, it’s just weight and chaos. You’ll still get a solid harvest even with the pruning – in fact, you'll probably get better-sized fruit and fewer disease problems.
Vines that reach the top of the trellis tend to keep growing. That’s fine. Let them dangle. They’ll keep producing without overloading the structure.
Watering Needs for Trellised Squash

Here’s a fact that catches a lot of people off guard: squash vines grown vertically need more water than those left to sprawl on the ground. The setup changes everything.
Why Vertical Vines Need More Water
When you lift the vines off the soil, you're removing their chance to root along the way – which is something they naturally do when left on the ground. That single point of contact at the base? It's doing all the heavy lifting.
Then there's the issue of exposure. Vines on a trellis are more exposed to wind and sun, which means leaves dry out faster. And dry leaves = stressed plants.
How to Water (Without Overdoing It)
The goal is deep, infrequent watering. You want moisture to soak at least six inches into the soil. Depending on your weather, watering once or twice a week might be plenty.
If temps start climbing over 90°F regularly, plan on increasing that to two or three times a week.
In drier urban areas, some gardeners use inverted glass bottles – gallon jars filled and buried mouth-down near the base of the plant. One per squash hill. Refill weekly. It sounds like a Pinterest hack, but it actually works.
And don’t forget mulch. It holds in moisture, blocks weeds, and keeps fruit clean. Use straw, old hay, whatever you have – just don’t add it until seedlings have fully emerged if you're direct sowing.
Pest and Disease Management
One of the biggest perks of growing squash on a trellis is better pest control — not because bugs vanish, but because now you can actually find them.
What Trellising Helps With
Lifting the vines off the ground gives better airflow. Less humidity around the base of the plant means fewer chances for fungal diseases to take hold.
It also makes it easier to spot early signs of infestation – no more crouching down and flipping leaves to inspect the undersides.
You’ll also have fewer squash bugs hiding out under tangled leaves, especially if you’ve pruned well and removed ground-level growth.
What Trellising Doesn’t Solve
Powdery mildew still shows up, especially as the season winds down. It’s practically inevitable. Trellising might delay it a little, but not by much.
The best you can do is grow fast, strong plants that produce well before mildew becomes a problem.
Squash vine borers? Still a thing. If you’re growing non-Moschata varieties, check the base of your plants often. Look for small holes with what looks like sawdust. That’s the borer at work.
Some gardeners inject BT (Bacillus thuringiensis) into the stem as a preventive. Others wrap the lower stem in foil. And for those dealing with squirrels or chipmunks nibbling young fruit, bagging them in bits of window screen can be surprisingly effective.
Just one last note – if your vines get infected, don’t toss them into your compost. Most backyard piles don’t get hot enough to kill the pathogens. Best to bag them and dispose of them properly.
Supporting the Fruit

One of the first questions people ask about vertical squash is whether the fruit needs extra support. The answer? Sometimes yes, sometimes no.
When Support Isn’t Needed
Many small to medium-sized squash varieties – especially butternut and other Moschata types – have thick, sturdy stems that can support fruit without help.
Even larger squashes, in the 10–15 pound range, have been grown successfully on trellises with no slings. It really depends on the variety and how healthy the plant is.
When to Use Slings (and What to Use)
If you’re growing a squash that’s on the heavier side – pushing toward 20 pounds or more – or you see the stem starting to strain, it’s time to give that fruit some backup.
A tried-and-true method? Pantyhose. Cut off a leg, slip the squash in like a little hammock, and tie it to the trellis.
It stretches as the squash grows and cradles the weight without cutting into the stem. Other makeshift options include mesh bags, old t-shirts, or even repurposed netting.
Some people like to use slings for peace of mind, even on smaller squash. It’s not always necessary, but it doesn’t hurt either.
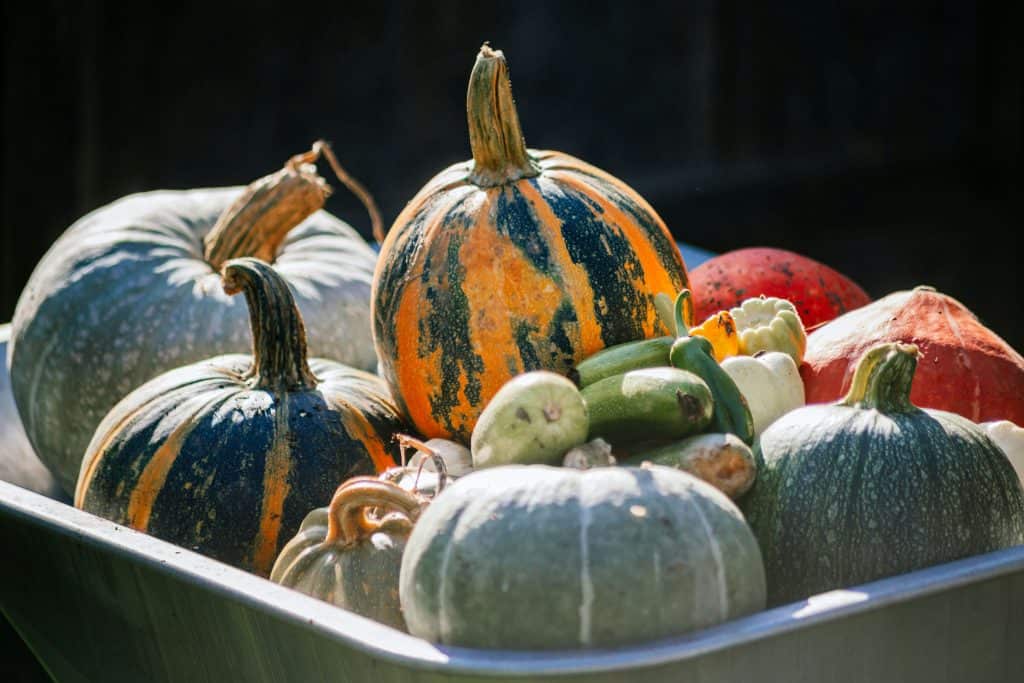
Harvesting and Curing Trellised Squash

When it comes time to harvest, your squash will usually tell you. The vines start to fade. Leaves yellow and die back. And the fruit takes on that deep, rich color you’ve been waiting for.
Knowing When It’s Ready
For winter squash like butternut, mature fruit turns a solid tan color. The skin hardens so hard, you shouldn’t be able to puncture it with your fingernail.
That’s the classic test, though plenty of gardeners skip it and just trust the vine’s cues.
Avoid harvesting early unless you absolutely have to. Immature squash won’t store well and tends to be bland. If a frost is coming and the fruit isn’t quite ready, you can still pick it – just use those ones first or toss them in a stir fry.
How to Harvest Properly
Use sharp pruners or garden shears. Cut cleanly, leaving about two inches of stem on each fruit. That stem is the squash’s built-in seal. If it breaks off or tears, the fruit is more likely to rot early.
Handle squash gently. Don’t drop or toss them into baskets – bruising affects how long they’ll store.
Curing and Storage
After harvest, let squash cure in a warm, dry room for a couple of weeks. This toughens up the skin and sweetens the flavor.
Once cured, move them to a cooler space, ideally around 55–60°F. A garage shelf, basement rack, or closet in an unheated room all work. Stored right, cured squash can last until May or even later.
So grab a trellis, pick your squash, and start growing up – your garden (and your harvest) will thank you!
Growing squash on a trellis might look like a neat garden trick but it’s actually a smart, space-saving method that works in everything from backyard beds to balcony pots.
It does take some planning: the right variety, the right support system, and a bit of pruning and guidance along the way.
But once it’s set up? You’ll wonder why you ever let those vines sprawl all over the ground in the first place.
You can get big harvests from small spaces. Keep pests where you can see them. And make your garden look, well, a little more put together.
Whether you’re training Delicata across a cattle panel arch or growing butternut up a DIY rope trellis in a raised bed, this method’s got real potential.
It’s practical. It’s productive.
Frequently Asked Questions (FAQs)
1. Can I grow squash vertically in containers?
Yes, absolutely – just choose varieties bred for containers. Use large pots (at least 20 gallons), give them a sturdy trellis, and feed them regularly with liquid fertilizer.
2. Do I need to use slings to support the fruit?
For most squash under 10 pounds, slings aren’t necessary especially with strong vines like butternut. But if you're growing heavier varieties, a sling (like pantyhose or mesh) is a good idea for extra support.
3. Why aren’t my squash vines climbing the trellis?
They might need a little help. Squash vines aren’t natural climbers, so start by weaving them through or gently tying them. Also, make sure the trellis is close enough for the vines to reach.
4. How do I prevent squash vine borers in trellised plants?
Grow resistant varieties like Moschata types. For others, check for holes near the base of the stem. Some gardeners inject BT or wrap the lower stem in foil to deter borers.
5. How much squash can I harvest from a single trellised plant?
With good soil, sunlight, and care, you can harvest 20–40 pounds from a single plant growing on a large trellis. It’s one of the most productive uses of a small garden space.
Ready To Transform Your Garden?

Are you looking for the best way to layout your garden beds? Maybe you're feeling a bit stuck on how to make the most of your space?
We’ve got you covered! Check out our 101+ Garden Bed Layout Ideas for your next raised bed project. This guide is filled with creative and practical ideas that can help you design a garden that fits your style, whether you’re just starting out or have been gardening for years.
Get your copy today and get inspired to bring your gardening dreams to life.