Watering your garden every day is honestly exhausting. Especially in summer. That’s where a wicking garden bed changes everything.
It’s a raised bed with a hidden reservoir underneath. You fill it once, and the water slowly wicks up to the roots. Less evaporation, less effort, more consistent moisture.
The best part is you can build one yourself with basic materials – think pond liner, scoria, and a PVC pipe. No fancy tools. No weird gadgets.
In this article, I'll walk you through the whole process – every step, every material, every little trick you really need to know (and a few you don’t, but I’ll tell you anyway).
So whether you’re a first-time builder or just tweaking your setup, this is the how-to article that actually gets you growing.
What Is a Wicking Garden Bed and Why Use One?
A wicking garden bed is like a self-watering raised bed with a secret reservoir under the soil.
That hidden water layer slowly moves upward into the soil above through a process called capillary action – which, by the way, is just a fancy term for how water creeps upward through soil particles like a sponge.
Instead of watering from the top and hoping it soaks in evenly, you fill the reservoir through a pipe. The plants take what they need, when they need it. No more soggy roots one day, bone-dry the next.
So why use one? For starters, it saves a ton of water. Because you're not losing moisture to surface evaporation, you’ll refill the reservoir way less often than you'd need to top-water a regular bed.
It’s also a great way to keep soil consistently moist which plants absolutely love. Especially veggies. Especially in hot weather.
Wicking beds shine in dry climates, places with watering restrictions, or anywhere life gets too busy to stand around with a hose every other day. And once you get the hang of it, they’re weirdly satisfying to build.
Choosing the Right Container for Your Wicking Bed

You’ve got options – lots of them. You can build a wicking bed inside a stock tank, a bathtub, a corrugated steel bed, an old IBC tote sliced in half, or even a sturdy wooden box. The real requirement? It has to hold water. Completely.
If you're building with wood, you’ll need to line it. Otherwise, the water will seep out and rot the wood.
Not great. Galvanized steel beds and heavy-duty plastic containers tend to be watertight on their own – but double-check for drain holes or weak seams if you're repurposing something.
Size-wise, the bed should be big enough to grow what you want, but not so massive that it’s hard to manage. Keep in mind: once you fill it with scoria, soil, and water, you’re not moving it. So plan ahead.
Just remember – strength matters. Your container needs to handle the weight of wet soil sitting on top of rocks and water. Weak plastic bends. Flimsy wood bows. If it looks questionable, it probably is.
Site Preparation and Bed Placement

Pick your spot wisely – because once this bed is filled, it’s not going anywhere. And I mean not. We’re talking hundreds of pounds of gravel, soil, and water. You’ll need to choose your location before you even start building.
Sunlight matters. Most vegetables need full sun (around 6–8 hours a day), so aim for a bright, open area. Avoid spots that stay soggy after rain or pool with water — your wicking bed needs to sit on solid, well-drained ground.
And here's a critical (and often skipped) detail: the bed must be perfectly level. Not kinda level. Dead level. If it’s tilted, water will collect unevenly in the reservoir – meaning one side stays soaked while the other stays dry. That wrecks the whole wicking process.
Use a spirit level. Check it front to back, side to side, even diagonally. If the ground’s uneven, you can either dig out the high spots or build up the low ones with compacted soil, gravel, or sand.
Yes, it’s tedious. Yes, it’s worth it. Uneven beds are one of the top reasons wicking systems fail — and once you’ve filled everything up, there’s no do-over without a shovel and some strong language.
Steps on How to Build the Wicking Garden Bed

Here’s a clear, simple guide to building your own wicking garden bed. Just follow these steps, and you’ll have a water-saving system that’s easy to maintain and built to last.
Step 1: Drill the Overflow Hole
This is what prevents your bed from flooding. You’ll need to drill a hole on the side of your container, about 20cm (8 inches) up from the bottom.
That’s the top limit of your water reservoir – anything above that drains out, so your plants don’t drown.
Use a spade bit or hole saw that matches the size of your bulkhead fitting (usually 20mm or 3/4 inch).
If you’re using a plastic or metal container, drill slowly to avoid cracking or tearing the material. If you’re using wood, make sure the liner will cover the hole from the inside later.
Don’t worry about it being perfectly pretty. Function matters more than cosmetics here.
Step 2: Line the Bed with Pond Liner
This step turns your raised bed into a watertight container. Without the liner, all that carefully stored water will just soak into the ground.
Use a pond liner (PVC or butyl rubber work well), or a heavy-duty plastic sheet like damp course membrane.
The liner should cover the entire bottom and all four sides, reaching well above where the scoria layer will end – ideally up to the top of the bed.
Unfold the liner, place it into the bed, and gently press it into the corners. If it creases a bit, that’s fine. Just avoid sharp folds or stretched spots.
Clamp the liner loosely at the top edges using spring clamps so it doesn’t slide down while you work.
Step 3: Install the Overflow Fitting
Time to seal your overflow hole. This step makes sure that any excess water safely exits the bed, instead of leaking around the liner or soaking your yard.
Take your bulkhead fitting or threaded tank inlet and insert it through the hole you drilled. First, cut a small “X” in the liner right where the hole is – just big enough for the fitting to pass through. Don't overdo it.
Now push the fitting through the liner and the hole in the bed wall. Place the rubber washer on the inside, pressing it against the liner to create a tight seal.
Then thread the nut on from the outside and hand-tighten it firmly. If water can sneak past this fitting, you’ll have leaks so make sure it’s snug, but not overtightened.
Step 4: Prepare the Water Inlet Pipe
This is how you'll fill your reservoir so make sure it’s easy to reach and well-designed.
Option 1: L-Shaped Inlet Pipe
Cut two lengths of 50mm (2-inch) PVC pipe – one vertical (tall enough to stick out above your soil line) and one horizontal (about half to three-quarters the length of your bed). Connect them with a 90-degree elbow joint.
Now drill holes (10–12mm wide) all over the horizontal piece – top, bottom, sides. This is how water escapes into the reservoir when you pour it in from above. You don’t need glue; a snug push-fit is fine.
Option 2: Straight Inlet Pipe
Use a single piece of 50mm pipe. Drill holes around the bottom 30cm (12 inches) of the pipe. Same hole size – 10–12mm.
Either design works. Just make sure the top of the pipe sticks up above your future soil level. Pop a PVC cap or a small upside-down plant pot on top when you’re done to keep bugs and debris out.
Step 5: Lay a Thin Scoria Layer (if using straight pipe)
If you went with the straight pipe, this layer protects the pond liner from getting punctured.
Place about 5cm (2 inches) of coarse scoria (volcanic rock) at the bottom of the bed, directly under the pipe. Gently press it down to create a level, cushion-like surface.
This keeps the pipe’s cut edge from rubbing or digging into the liner once water and weight are added.
If you're using the L-shaped pipe, you can skip this step – the horizontal pipe will sit right on top of the full scoria layer next.
Step 6: Clamp the Liner to Bed Edges
Before things get heavy, you want that liner to stay where it is.
Use spring clamps, bulldog clips, or screw clamps to temporarily secure the liner around the top edges of the bed. Space them every 30–40cm or so. T
his stops the liner from slipping or shifting when you start pouring in rocks and soil.
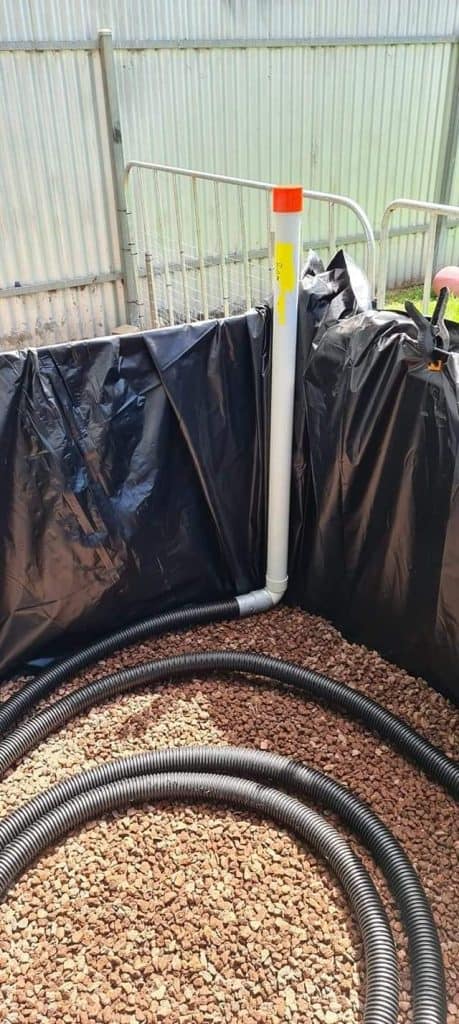
Step 7: Place the Inlet Pipe in Position
Now set the assembled inlet pipe into the bed. If you're using the L-shaped version, the horizontal piece should sit flat on the bottom, near one edge, with the vertical part standing up tall in a corner for easy access.
If you’re using the straight version, just stand it upright on the thin scoria layer you added earlier.
Double-check: the pipe needs to be high enough that it sticks out after the soil is added — otherwise, it becomes a pain to find and fill later.
Step 8: Fill the Reservoir Layer with Coarse Scoria
Now fill the bottom of the bed with coarse scoria – chunks about 20mm or bigger.
Pour it around the inlet pipe and up to the height of your overflow fitting. This is your reservoir. The scoria holds the water and supports the soil above.
Level it with your hands or a board so it’s even all the way across. Uneven scoria means uneven water distribution later.
Don’t crush or compact it. Just make sure it’s settled and spread evenly.
Step 9: Lay Geotextile Fabric or Shade Cloth
This layer stops soil from falling into the scoria and clogging up your water storage.
Roll out a piece of geotextile fabric or 90% shade cloth and lay it right over the scoria. If it’s thin, use two layers.
Cut a slit or small opening where the inlet pipe comes through so it can sit snugly. The rest of the fabric should lie flat, edge to edge.
Step 10: Tuck Fabric Around Pipe and Down Sides
This part is key – don’t skip it.
Wrap the fabric securely around the pipe so no soil can sneak into the scoria through that hole. Then tuck the fabric down between the liner and the scoria layer, at least 15cm (6 inches) deep, all the way around.
Why? Because this little bit of soil that eventually settles along the sides becomes your soil wick. And it’s the soil – not the rocks – that does the actual wicking.
Step 11: Fill the Bed with High-Quality Soil Mix
This is where the magic happens. Good soil = healthy plants = happy gardener.
Use a mix of 50% premium topsoil, 25% compost, and 25% aged cow manure. Pour it in gently so you don’t shift the liner or pipe. As you go, press the liner back against the walls to keep it snug.
Cap your inlet pipe or cover it with something like a plastic pot so dirt doesn’t fall in and clog it.
Fill the soil up close to the top, leaving a few centimeters of space for mulch later.
Step 12: Trim Excess Liner
Grab a gardening tool – a pair of sharp scissors and trim the top of the pond liner, leaving about 3cm (1-1/4 inches) above the soil level. This little lip helps keep mulch in place and prevents runoff from washing soil over the edge.
Step 13: Moisten the Soil and Fill the Reservoir
Before your wicking system can work, the soil needs to be damp. Start watering from above – gently and thoroughly until the moisture reaches all the way down into the scoria layer. You’ll know you’re there when water starts trickling into the overflow outlet.
Now fill the reservoir through the inlet pipe until water flows out the overflow. Done right, you won’t have to water again for several days even in warm weather.
Step 14: Plant Your Crops and Apply Mulch
Now for the fun part.
Plant whatever you want – leafy greens, tomatoes, cucumbers, herbs. Wicking beds are especially good for vegetables that need steady moisture and lots of nutrients.
Cover the soil with a thick layer of mulch (5–7cm or 2–3 inches). Use pea straw, sugarcane mulch, hay – anything organic and loose. Mulch keeps the soil cool, slows down evaporation, and keeps weeds from moving in.
If your bed has a raised edge, even better. That helps hold mulch in place and gives it room to settle.
Early Care and Watering Transition
Even though your wicking bed is built to water itself, there’s one thing to know right out of the gate: you still need to water from above for the first 2 to 3 weeks.
Why? Because young plants don’t have deep roots yet. Their roots are sitting up near the surface, and the moisture in the reservoir – down at the bottom – hasn't started moving upward efficiently.
That capillary action? It only kicks in once the soil is fully moistened and the wick (that little bit of tucked soil along the liner) has had time to activate.
So during those first few weeks, water your garden like you normally would – gently and consistently from above.
Don’t flood it. Don’t let it dry out. Just keep the surface moist and the roots encouraged to grow downward.
After about 2 to 3 weeks, you’ll notice the soil stays damp longer. That’s your sign the system is starting to wick. At that point, you can slowly reduce top watering and start relying on the inlet pipe to keep the reservoir full.
Quick tip: stick your finger a few inches into the soil every couple of days. If it’s dry down there, give it a light watering from above. If it’s still damp, you’re good.
Over time, the roots will find the water themselves – and you’ll hardly have to touch the hose.
So grab a container, gather your materials, and start building your own wicking bed today!
Building a wicking garden bed takes a little effort upfront but the payoff is big.
You’ll use less water, grow healthier plants, and skip the daily watering routine. Plus, there’s something deeply satisfying about knowing you built a system that works with nature instead of against it.
Just remember: pick a solid container, keep it level, seal it right, and use good soil. If you follow those basics, the rest falls into place.
Whether you’re growing tomatoes in a steel stock tank or herbs in an old bathtub, wicking beds are a clever, low-maintenance way to keep your garden thriving.
Frequently Asked Questions (FAQs)
Can I use something other than scoria for the reservoir layer?
Yes, but it has to be coarse, durable, and porous. Alternatives like blue metal (crusher dust) or coarse gravel can work, but scoria is preferred because it’s lightweight and holds water better due to its air pockets. Avoid fine materials or anything that compacts – that will restrict water flow and reduce effectiveness.
How often do I need to refill the water reservoir?
That depends on the weather, plant size, and how full your bed is, but typically every 5 to 10 days in warm conditions. During a cool stretch, it might stretch to two weeks. Check by removing the inlet pipe cap and using a stick to see how deep the water is – like a DIY dipstick.
Is it safe to use plastic containers or liners for growing food?
Generally, yes – especially if you're using food-safe liners like butyl rubber or certain types of PVC. If you’re repurposing a container (like an IBC tote), make sure it was never used for storing chemicals. When in doubt, use a liner inside the container to separate the soil from the plastic.
What should I do if the wicking action isn’t working?
First, make sure the soil was fully saturated when you set it up. If the soil is dry, water can't move upward. Also, check that your geotextile fabric isn’t blocking the wick, or that your scoria layer hasn’t compacted or filled with dirt. If needed, water from above for a few days to re-prime the system, then monitor again.
Can I build a wicking bed directly in the ground?
Technically, yes – but it’s tricky. You’ll need to dig out the area, line it with pond liner, and create a raised edge around it to hold soil and mulch. It works better in containers or raised beds where you can control the structure more easily. For in-ground builds, drainage and liner protection become more difficult.
Ready To Transform Your Garden?

Are you looking for the best way to layout your garden beds? Maybe you're feeling a bit stuck on how to make the most of your space?
We’ve got you covered! Check out our 101+ Garden Bed Layout Ideas for your next raised bed project. This guide is filled with creative and practical ideas that can help you design a garden that fits your style, whether you’re just starting out or have been gardening for years.
Get your copy today and get inspired to bring your gardening dreams to life.