Pickled banana peppers can brighten up just about any meal. They’re tangy, a little sweet, and have that crunch that makes every bite better.
Making them at home is simpler than most people think. With just a few basic ingredients and about 30 minutes, you’ll have jars of peppers that taste fresher and brighter than store-bought – and you’ll know they’re safely preserved.
Let’s go over what you need, how to make them, and tips for safe pickling.
What Are Pickled Banana Peppers?
Banana peppers are those mild, yellow-green peppers you often see on sandwiches or piled onto a pizza. They have a gentle heat – nothing like jalapeños – and a natural sweetness that makes them perfect for pickling.
When you pickle them, the peppers soak up a tangy brine that gives them a sharper flavor while keeping that crunchy texture everyone loves.
Love Pickling? This is part of my How to Pickle Everything series! Check out more recipes:
- Quick Pickled Radishes Recipe
- Easy Pickled Beets Recipe
- Homemade Pickled Okra Recipe
- How to Make Pickled Cabbage (Only 20 Minutes!)
- How to Make Pickled Jalapeños at Home
- How to Make Pickled Cucumbers at Home
- Pickled Garlic Recipe
- Quick Pickled Carrots Recipe
- How to Make Pickled Asparagus at Home
- How to Make Pickled Ginger (Gari) at Home
- How to Make Pickled Cauliflower
- Crisp Pickled Green Beans Recipe
- Homemade Pickled Eggs with Beets
- Easy Pickled Cherry Tomatoes (No Canning Needed)
Pickled banana peppers aren’t just about preserving the peppers; they’re about turning something simple into a jar full of flavor that you can use for months.
You’ll find them in deli counters and on store shelves, but homemade ones have a brighter taste and let you control exactly how sweet, tangy, or spicy you want them to be.
Why Make Your Own Pickled Banana Peppers?
Store-bought jars of pickled peppers are fine in a pinch, but once you try making them at home, you’ll see the difference right away.
First, you control the flavor. Want a bit more sweetness or a sharper tang? You can adjust the sugar and vinegar to your liking. You can even toss in garlic, onion, or a few chili flakes for a twist that’s all yours.
Second, homemade peppers are fresher. You’re starting with crisp, just-sliced peppers, not ones that have been sitting on a shelf for who knows how long.
The texture is crunchier, and the flavor has a real “fresh from the garden” quality to it.
Lastly, it’s easy and cheaper. A handful of ingredients and less than half an hour is all it takes. Plus, you’ll have a couple of pints ready to go, and they’ll taste better than anything you could buy.
Key Ingredients (Makes 2 Pints)

- 2 cups distilled white vinegar (5% acidity)
- 2 cups apple cider vinegar (5% acidity)
- 1 cup white sugar
- 1 teaspoon mustard seed (whole)
- 1 teaspoon celery seed
- 1 pound banana peppers, fresh and firm, sliced into rings
- Optional: 2 garlic cloves, onion slices, or red pepper flakes for extra flavor
Important: Always use vinegar labeled 5% acidity. Do not substitute with homemade vinegar or alter the vinegar-to-pepper ratio.
4. Tools You’ll Need for Pickling
You don’t need much to make pickled banana peppers, but having the right tools makes the process quicker and less messy.
Here’s what you’ll want on hand:
- Two clean pint jars with two-piece lids (Ball®/Kerr® recommended)
- Non-reactive pot (stainless steel or enamel)
- Ladle and wide-mouth funnel
- Jar lifter or tongs
- Boiling water canner (for shelf-stable storage)
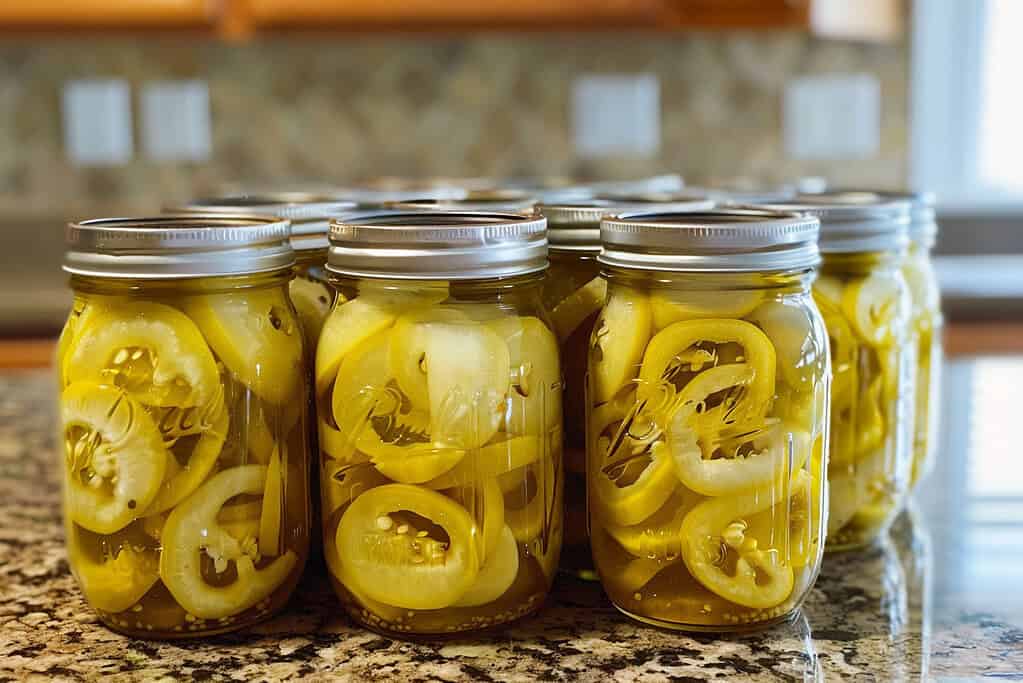
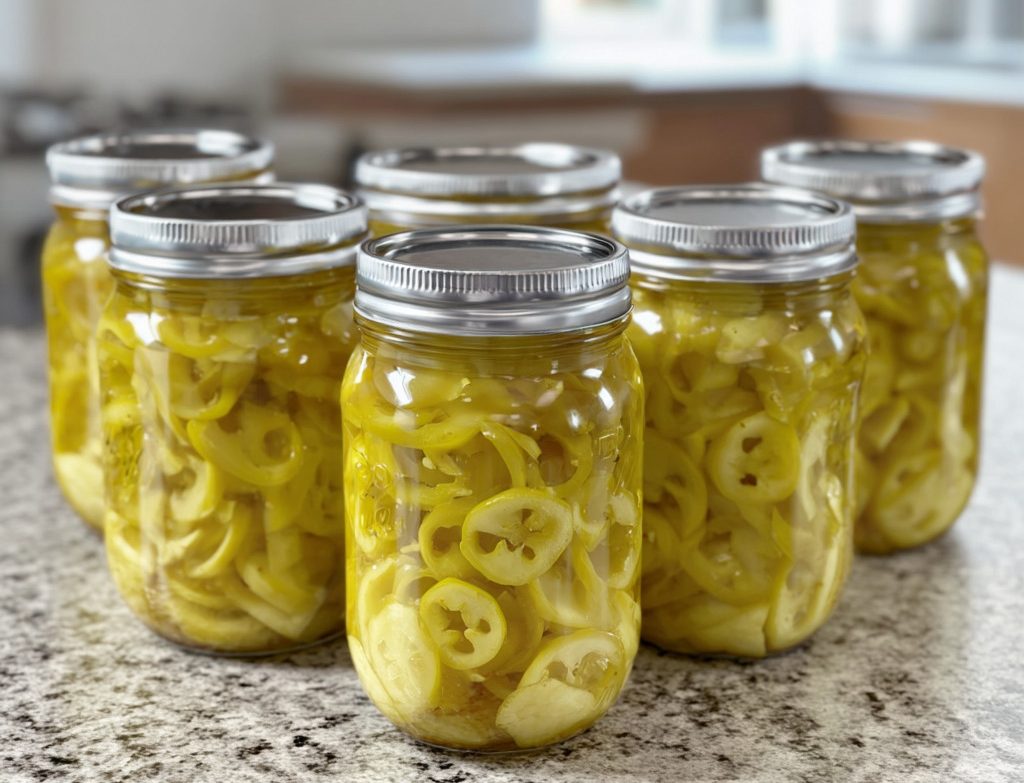
6 Steps for Making Pickled Banana Peppers
This method will give you two pint-sized jars of crisp, tangy banana peppers. If you want quick refrigerator pickles, you’ll be done in about 25 minutes.
If you’d like shelf-stable jars for the pantry, a short water bath canning process makes them safe to store for up to a year.
Step 1: Prep the Peppers

Wash the banana peppers thoroughly under cool running water, trim off the stems, and slice them into uniform rings.
Consistent slices help the peppers pickle evenly, and while most people remove the seeds for a cleaner look, leaving some in will not affect safety or flavor.
Always choose firm, fresh peppers for best results.
Step 2: Make the Brine
In a medium stainless steel or enamel pot, combine:
- 2 cups distilled white vinegar (5% acidity)
- 2 cups apple cider vinegar (5% acidity)
- 1 cup white sugar
- 1 teaspoon mustard seed (whole)
- 1 teaspoon celery seed
Bring the mixture to a rolling boil, stirring until the sugar dissolves completely.
Safety Tip: Never dilute the vinegar with water unless following a tested USDA/NCHFP recipe. The 5% acidity is essential for safe preservation.
Step 3: Pack the Jars
While the brine is heating, pack the sliced banana peppers into hot, clean pint jars.
Pack them firmly but without crushing, leaving space for the brine to circulate.
If you want to add garlic, onion slices, or red pepper flakes, place them in the jars at this stage. Be sure to leave ½ inch of headspace at the top of each jar.
Step 4: Add the Brine
Carefully ladle the boiling brine over the peppers, covering them completely and maintaining the ½-inch headspace.
Release any air bubbles by sliding a clean utensil down the inside of the jar.
Wipe the rims with a damp cloth to remove residue, then place the lids on top and screw the bands on until fingertip tight.
Step 5: Choose Your Storage Method
At this point, you can decide whether to make quick refrigerator pickles or process the jars in a boiling water canner for shelf-stable storage.
Both methods are safe, but they differ in how long the peppers will keep and where they must be stored.
Refrigerator Pickles (Quick Method)
If you are making refrigerator pickles, allow the jars to cool to room temperature, then place them directly in the refrigerator.
Let them sit for at least one week before eating so the flavors can fully develop. These pickles are best enjoyed within one to two months for the best quality and texture.
Water Bath Canning (Shelf-Stable Method)
For long-term storage, process the jars in a boiling water canner:
- Place jars in the canner with 1–2 inches of water covering the lids.
- Bring the water to a rolling boil.
- Process pint jars for the following times:
- 0–1,000 ft: 10 minutes
- 1,001–6,000 ft: 15 minutes
- Above 6,000 ft: 20 minutes
- Remove the jars and let them cool undisturbed for 12–24 hours.
- Check the seals; the lid center should be concave and should not flex when pressed.
- Store sealed jars in a cool, dark place.
Properly processed, shelf-stable jars will keep safely for up to 1 year.
Step 6: Let Them Sit
Although the peppers are safe to eat as soon as they are processed, the flavor improves if you let them sit.
Refrigerator pickles should rest for at least a week, while canned jars taste best after two weeks when the vinegar and spices have fully blended into the peppers.
6 Tips for Perfect Pickling
Making pickled banana peppers is simple, but a few small details can make a big difference in flavor, texture, and appearance. Here are the key things to keep in mind:
1. Use Boiling Hot Brine
Always pour the brine over the peppers while it is still boiling. This ensures the peppers are heated quickly, which both enhances flavor and helps maintain texture.
The heat softens the peppers just enough for them to absorb the tangy-sweet brine while still staying pleasantly crisp.
If the brine cools before pouring, the peppers may pickle unevenly and lose their crunch.
2. Mind the Seeds
Banana pepper seeds aren’t especially spicy, but they can float to the top and make the jar look less tidy. Most people remove them for appearance, though leaving some in is perfectly safe.
The choice won’t significantly change the flavor – it comes down to how clean you want your jars to look.
3. Keep the Mustard Seed Whole
Mustard seed is an important part of the flavor profile. Whole seeds add a gentle warmth and complexity without clouding the brine.
Avoid using ground mustard, as it makes the liquid cloudy and changes the texture of the finished product. Sticking with whole mustard seeds ensures a crisp, clean brine.
4. Celery Seed Adds the Secret Touch
Celery seed adds a subtle, earthy layer of flavor that complements the vinegar and peppers beautifully.
It doesn’t taste like fresh celery stalks; instead, it provides a mild depth that sets your brine apart.
Skipping it won’t ruin your peppers, but you’ll miss out on that extra character that makes the recipe special.
5. Leave Proper Headspace
Always leave about ½ inch of headspace at the top of the jar when filling it with brine.
This space allows the liquid to fully surround the peppers, prevents overflow, and is necessary if you decide to process the jars in a boiling water canner.
Proper headspace also helps ensure a reliable seal.
6. Don’t Rush the Flavor Development
Even though the peppers are technically pickled as soon as the hot brine covers them, the best flavor develops over time.
Allow at least one week before opening refrigerator jars so the vinegar, sugar, and spices have time to blend and mellow. For canned jars, waiting two weeks brings out the most balanced flavor.
This resting period transforms the peppers from sharp and vinegary to crisp, tangy, and perfectly seasoned.
When Are They Ready to Eat?
Pickled banana peppers aren’t at their best right away. Although the peppers begin absorbing the brine as soon as it’s poured over them, the flavors need time to settle and balance.
For refrigerator pickles, allow at least one full week before opening the first jar.
During this time, the vinegar penetrates the pepper rings, the sugar softens the sharp edges, and the spices meld into a tangy, mellow flavor.
If you taste them too soon, they will likely seem harsh and flat because the brine hasn’t fully infused.
For jars that are processed in a boiling water canner, the peppers are safe to eat once cooled and sealed, but the flavor improves after resting for about two weeks.
This waiting period allows the spices and vinegar to harmonize, creating the crisp, well-rounded flavor that makes pickled peppers so satisfying.
How Long Do They Last?
The storage life of your pickled banana peppers depends on the method you choose:
Refrigerator pickles: When jars are cooled, sealed, and stored in the refrigerator, they maintain the best quality for about 1 to 2 months.
After that, the texture softens and flavor declines. For best safety and quality, discard any refrigerator pickles after 2 months.
Water bath canning: If jars are processed according to USDA guidelines (10–20 minutes depending on altitude, with ½ inch headspace), they are shelf-stable for up to 1 year when stored in a cool, dark place.
Once opened, transfer the jar to the refrigerator and use within 1 to 2 months.
Creative Ways to Use Pickled Banana Peppers

Pickled banana peppers are one of those condiments that can go on just about anything.
Their sweet, tangy crunch brightens up simple dishes and adds flavor without being too spicy. Here are some popular ways to use them:
- On sandwiches and burgers: They bring a tangy bite that balances out rich meats and cheeses.
- As a pizza topping: They add the perfect pop of acidity and crunch on cheesy or meaty pizzas.
- In salads: Toss a few rings into a green salad or pasta salad for a quick flavor boost.
- With tacos or wraps: Their mild heat and tang work well with Mexican-inspired dishes.
- In sauces or relishes: Chop them up and stir into mayonnaise, aioli, or relishes for an easy homemade spread.
Once you start adding them to meals, you’ll realize just how versatile they are. A single jar can turn a plain dish into something more flavorful without any extra effort.
Bring Your Meals to Life with Homemade Pickles
Making your own pickled banana peppers is one of those simple kitchen projects that pays off every time you open the fridge.
With just a few basic ingredients and less than half an hour, you get jars of crisp, tangy peppers that taste fresher and brighter than anything you could buy.
Once you have a batch ready, you’ll find endless ways to use them, from topping sandwiches and pizzas to stirring them into salads or sauces.
And if you want to keep them longer, a quick round in the water bath canner means you can enjoy them for months without taking up fridge space.
If you’ve never made pickles before, this is the recipe to start with. It’s simple, forgiving, and incredibly rewarding. Your sandwiches and salads will thank you.
Frequently Asked Questions
1. Can I use only white vinegar instead of mixing it with apple cider vinegar?
Yes, you can use all white vinegar if that’s what you have. The mix of white and apple cider vinegar just gives the brine a more balanced and slightly fruity flavor, but the recipe works fine with one type.
2. Do I need to sterilize jars if I’m just keeping the peppers in the fridge?
No, sterilizing isn’t necessary for refrigerator pickles. As long as your jars are washed with hot, soapy water and dried well, you’re good. Sterilizing is only needed if you’re planning to can them for long-term storage.
3. How do I know if my pickled peppers have gone bad?
If the brine turns cloudy or slimy, the peppers develop an off smell, or you see any signs of mold, it’s best to throw them out. Always use a clean utensil when scooping peppers from the jar to keep them fresh longer.
4. Can I substitute other peppers for banana peppers?
Absolutely. This brine works well with other mild peppers like sweet bell peppers or even spicier ones like jalapeños. Just make sure the peppers are fresh and sliced evenly for the best texture.
5. Can I reduce or skip the sugar?
You can reduce the sugar if you prefer a sharper, less sweet pickle, but it does more than balance flavor. Sugar also helps maintain color and texture during storage. Skipping it entirely may make the brine too harsh and affect quality. If you want less sweetness, try cutting the sugar in half first.