Turning a basic shed into a she shed doesn’t have to cost a lot. With simple upgrades and secondhand materials, you can create a space that’s useful, comfortable, and personal.
Whether you want a quiet spot to read, a place to work on projects, or just a space to unwind, there are plenty of low-cost ways to make it happen.
You can even enhance the area around it with beautiful corner garden ideas to create a more peaceful backyard setting.
This list of 15 cheap she shed ideas will help you update your shed without overspending, using practical solutions that still look great.
15 Budget She Shed Ideas You Can Build Yourself
The ideas below focus on low-cost ways to improve both the look and function of your shed without going over budget.
1. Paint the Exterior for a Fresh Look

One of the easiest and most affordable ways to update a shed is by painting the outside. A new coat of paint can completely change how the shed looks and make it feel more inviting.
Choose a bold color like green, red, or blue if you want it to stand out, or go with white or soft gray for a cleaner look.
To make the paint last, especially if the shed is made of wood, use an exterior paint or a wood stain that also seals the surface against rain and sun.
If the siding is rough, sanding it lightly before painting can help the paint stick better and look more even. You can also paint the trim in a contrasting color to give the shed more detail without adding extra cost.
2. Add Window Boxes and Low-Cost Landscaping

Adding window boxes is a simple way to make your shed look more welcoming without spending much. You can build the boxes yourself using leftover wood or buy low-cost plastic or metal ones.
Fill them with flowers, herbs, or trailing plants like ivy or petunias. If you’re new to gardening, check out my guide on planting flowers for beginners for easy, low-cost ideas to get started.
Seeds or small starter plants are cheaper than full-grown ones and still give you color and texture.
For the area around the shed, use basic landscaping to make it more inviting. Plant low-maintenance bushes or use mulch and stones to define the space.
If you want extra privacy, try placing a few potted shrubs or using tall grasses as a natural screen. These additions help the shed blend into your yard while giving it a more finished look.
3. Decorate the Entryway to Add Charm

The entrance sets the tone for the whole shed. You can make it look inviting with just a few affordable touches.
A seasonal wreath made from items like dried flowers, twigs, or even fabric scraps adds personality without cost. Place a couple of planters or flower pots near the door to frame the entryway.
Look for containers at thrift shops or reuse old buckets, baskets, or crates for a rustic touch. A small outdoor mat can also help define the space and keep dirt from getting inside.
4. Create Outdoor Seating on a Budget

Setting up a small sitting area outside the shed gives you an extra spot to relax.
You don’t need to buy new patio furniture – look for secondhand chairs, benches, or small tables that you can repaint or fix up.
Wooden pallets can be turned into seating with just a few screws and cushions. Place the seating on gravel, pavers, or directly on grass.
This simple setup gives you an extra area to read, drink coffee, or chat with friends without needing extra space inside the shed.
5. Use Solar-Powered or Battery-Powered Lights

If wiring the shed for electricity isn’t in your budget, there are still plenty of lighting options. Solar-powered lights are widely available and easy to install.
Place solar path lights around the outside or use solar lanterns and string lights for a cozy glow. For inside, look for battery-powered puck lights or rechargeable LED lamps.
Some models can be mounted on walls or shelves, providing enough light for reading, crafts, or just relaxing in the evening.
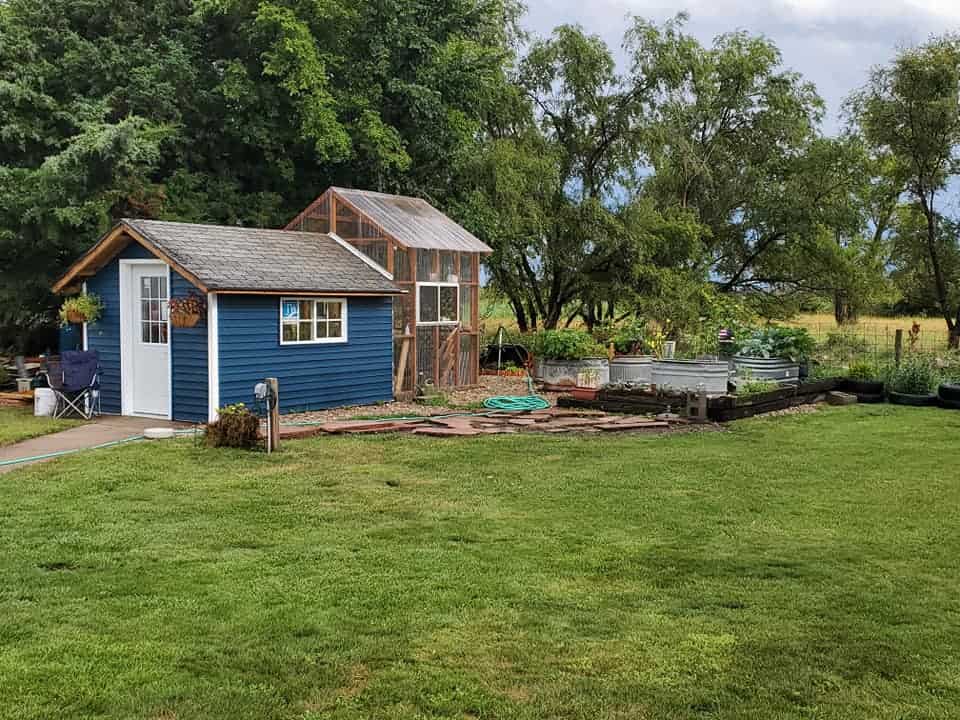
6. Add Secondhand Windows or Clear Roofing Panels

If the shed feels dark or closed in, bringing in more natural light can make a big difference.
Instead of installing expensive skylights or opening up a wall, look for secondhand windows or use clear polycarbonate roofing panels.
These can often be found at salvage yards or building reuse centers for a low cost.
Installing one or two windows or swapping out a roof panel can brighten up the space and make it feel more open without adding much to your budget.
Make sure to seal any gaps to keep out moisture.
7. Use Decorative Lighting to Set the Mood

Lighting isn’t just functional – it also adds warmth and style to the shed. String lights are a budget-friendly choice and work well both inside and outside.
You can hang them across the ceiling, around windows, or along the roofline. Look for secondhand or clearance lamps, pendant lights, or even a small chandelier to hang in the center of the room.
Choose warm white bulbs to create a soft, calming atmosphere, especially if you plan to use the shed in the evenings.
8. Install Simple Floating Shelves

Keeping the space organized is easier when you make use of wall space. Floating shelves are a cheap and practical option, especially if you build them yourself using leftover wood or basic brackets.
Use the shelves to store books, craft supplies, decor, or gardening items. If you want to add a decorative touch, paint them to match the shed or use mismatched boards for a more rustic look.
Even a few well-placed shelves can make the shed feel more functional without taking up floor space.
9. Use Storage Furniture with Dual Purposes
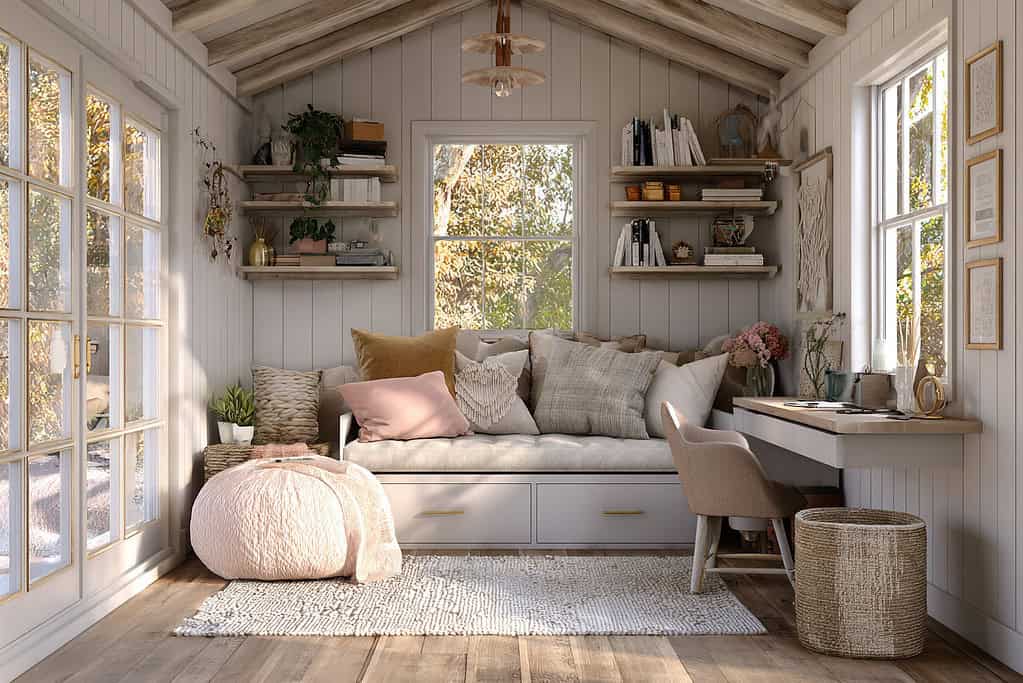
In a small space like a she shed, furniture that doubles as storage helps you stay organized without adding clutter.
Look for pieces like benches with lift-up seats, ottomans with hidden compartments, or side tables with drawers. These items are often available at thrift stores or garage sales.
You can repaint or refinish them to match your style. Using multi-purpose furniture means you’ll have a place to sit, work, or relax – while still keeping tools, craft supplies, or other items tucked away.
For more smart ways to stay organized, check out these practical tool storage ideas you can use around your shed or workspace.
10. Include a Budget-Friendly Bar Area

Adding a small bar area can make your she shed a nice place to unwind or entertain. A simple bar cart, a thrifted cabinet, or even a small table can hold a few bottles, glasses, and a pitcher.
If you want to go a step further, repurpose an old dresser or shelf as a drink station. Keep it simple and focus on function over decoration.
You don’t need plumbing or a fridge to create a relaxing drink setup – just enough space to keep a few essentials organized.
11. Add Rustic Touches with Reclaimed Items

Rustic details can give your she shed more character, and many of them cost little or nothing if you use reclaimed materials.
Look for old wood planks to use as wall paneling or shelves. A sliding barn-style door made from a salvaged piece of wood adds both function and style.
You can also bring in vintage items like an old ladder for display or crates for storage. These pieces add warmth to the space without requiring expensive upgrades.
12. Create a Gardening Corner Inside the Shed

If you enjoy gardening but don’t want to build a full greenhouse, set up a simple gardening zone inside the shed.
Use a small table or a DIY potting bench made from scrap wood. Store essential gardening tools in hooks on the wall or in labeled containers.
Reuse jars, old drawers, or small baskets to keep seed packets, gloves, and tags organized. Place potted herbs or plants near a window to take advantage of natural light.
This setup gives you a functional gardening space without the cost of major structural changes.
13. Use Rugs, Curtains, and Weather Stripping for Warmth

Instead of installing insulation or heating, use low-cost materials to make the shed more comfortable year-round.
Rugs help cover cold floors and can often be found secondhand. Heavy curtains or fabric panels can help retain warmth and add softness to the space.
Weather stripping around doors and windows blocks drafts and is easy to install yourself.
These simple upgrades can make a big difference in comfort without the high cost of construction work or climate control systems.
14. Create a Dedicated Hobby Space

A she shed is a great place to focus on a hobby without distraction. Whether it’s painting, sewing, reading, or writing, you can set up a space that’s just for that activity.
Use a basic table, thrifted cabinet, or foldable desk, and organize supplies in drawers, baskets, or wall-mounted storage.
If you’re working with small items – like tools or seeds – consider using something like a secondhand card catalog or spice rack for sorting.
The goal is to make the space functional without adding clutter or cost.
15. Define a Simple Outdoor Zone with Gravel or Pallets

You don’t need a full deck to enjoy the space outside your she shed. Instead, lay down a layer of gravel or use wood pallets to create a defined area just outside the door.
Add a couple of outdoor chairs, a small table, and string lights to make it comfortable.
This setup creates an outdoor living space without pouring concrete or building a frame. It’s a good way to extend the use of your shed without adding much to the budget.
Budgeting Tips for a Low-Cost She Shed
Planning your budget before you start making changes can help you avoid overspending and focus on what really matters.
Below are practical tips to guide your spending while keeping your she shed project affordable.
Start with a Clear Purpose
Before buying anything, decide how you’ll use the shed. Whether it's for relaxing, working, or gardening, having a clear purpose helps you avoid unnecessary purchases.
If you're setting it up for crafting, for example, focus your budget on workspace and storage – not on things you won’t use.
Use What You Already Have
Look around your home, garage, or storage for items you can reuse.
An old table can become a desk, leftover paint can refresh the walls, and baskets or bins can serve as organizers. Repurposing what you already own cuts costs and reduces waste.
Prioritize Function Over Style
It’s easy to get caught up in decorating, but functional upgrades – like shelving, lighting, or storage furniture – should come first.
Spend your money on things that make the space usable, then add inexpensive decor once the basics are in place.
Buy Secondhand or Trade Locally
Check thrift stores, online marketplaces, salvage yards, and community trading groups for furniture, tools, and building materials.
You can often find what you need at a fraction of retail prices – or even for free.
Break the Project into Phases
If your budget is tight, don’t try to do everything at once.
Start with cleaning and painting, then add lighting, furniture, and decor as you go. Spacing out your purchases over time helps manage costs and lets you adjust your plans as needed.
Mistakes to Avoid When Creating a Cheap She Shed
Even with a tight budget, it’s possible to build a useful and comfortable she shed—if you avoid a few common pitfalls. Here are some mistakes that can lead to extra costs, wasted effort, or a shed that doesn’t work the way you planned.
Skipping Weather Protection
It’s easy to overlook weatherproofing when you’re trying to save money, but ignoring it can lead to long-term problems.
Unsealed windows, gaps in doors, or untreated wood can let in moisture and pests.
Use basic weather stripping, seal any openings, and apply a protective coat to wood surfaces, even if it’s just a clear varnish or low-cost sealant.
Overloading the Space with Furniture or Decor
It’s tempting to fill the shed with furniture, decor, or storage units, but too much can make the space cramped and hard to use. Keep only what serves a clear purpose.
Choose pieces that offer storage and function, and avoid adding items just for looks unless there’s enough room.
Not Measuring Before Buying
Without accurate measurements, it’s easy to end up with furniture or shelves that don’t fit the space. Before bringing in anything new, measure the shed’s interior and plan your layout.
This helps you avoid buying items that are too large or awkward for the layout.
Ignoring Ventilation
Good airflow is important, especially in small sheds used for crafts, plants, or storage.
Even if you’re not installing full ventilation systems, make sure there’s some form of air movement – such as a window you can open, a small vent, or a fan.
Poor ventilation can lead to stuffiness, moisture buildup, or mold.
Not Checking Local Regulations
If you plan to modify the structure, run electricity, or change its use, check with your local building department.
Even though the shed is on your property, some areas have rules about what you can legally do. Skipping this step could result in fines or having to undo work later.
Wrap Up Your She Shed with Purpose and Practicality
Creating a she shed doesn’t have to involve expensive materials or major renovations. With the right approach, a small budget can go a long way.
Focus on function, repurpose what you already have, and work step by step.
Whether you're building a quiet retreat, a cute garden nook, or a hobby space, these ideas are flexible and can be adapted to suit your needs.
Pick a few ideas that match your space and purpose – and get started at your own pace.
Got your own budget she shed tip or question? Comment down below and share it!
FAQs
What tools do I need for most low-cost she shed projects?
Basic tools like a screwdriver, hammer, measuring tape, hand saw, and drill are enough for most DIY upgrades. For installing shelves or building simple furniture, clamps and a level can also help.
Can I use a plastic or metal shed for a she shed?
Yes, but they’ll need more work to make them comfortable. You may need to add insulation panels, a subfloor, and curtains to control temperature and reduce glare. Decorating the exterior also helps improve appearance.
How can I make the she shed secure without spending much?
Use a hasp and padlock on the door, and reinforce hinges if needed. Solar motion-sensor lights outside can deter unwanted visitors. If windows are large, install simple interior curtains or blinds for privacy.
What’s a good way to light the inside of a shed if there’s no electricity?
Use solar-powered LED lanterns, string lights with rechargeable battery packs, or USB-rechargeable touch lamps. These options give off enough light for most activities and are easy to move or mount.